
Integrating with GitHub - GitHub Apps and OAuth
When creating a web application designed to improve the experience of software development, it might be useful to integrate with version control providers in order to access your users’ existing code. For example, here at Northflank, users can link their version control provider accounts and then can use Northflank to build and deploy their code. The most popular version control providers all provide a way to link their version control accounts with your platform, allowing you to access data about that user’s version control through an API.
Here, we’ll be going into detail about GitHub, both because it is a very popular version control provider and also because its integration handling is more complex than many of the other providers. We’ll be discussing a number of quirks and pitfalls that you should be aware of when integrating with GitHub. Particularly, GitHub provides two ways to integrate with it - OAuth Apps, which are very similar to the way you integrate with GitLab and Bitbucket, and GitHub Apps, which is GitHub’s own, more powerful system.
In this article, we will answer some of the common questions about GitHub integration:
- What is the difference between a GitHub App and a GitHub OAuth App?
- How do I authenticate API requests using a GitHub App?
- How do I use OAuth linking with GitHub Apps?
OAuth Apps allow a user to link their GitHub account to your service, which then allows you to perform actions on behalf of that user. You can define which scopes your application requires as part of the linking process and once the user has linked, you can use their access token to perform any action that the user would be able to (provided it is in the permission scope).
For example, if a user links with the repo scope, you can use the access token to access any repository that the user could. This includes their own public and private repos, but also any repositories that they have been given access to by another user, or as part of an organization that they belong to. As all the actions are performed on behalf of the user, any commits you make will be made in the user’s name.
As the scopes are defined as part of the linking process, you can have multiple tokens with different scopes. For example, you could implement single sign-on with GitHub by having the user authenticate whilst providing only minimal account access. Then, you could have a second authentication flow with more scopes in order to integrate with their repositories. This could be useful if repository integration is only a small part of your application so you want users to be able to log in with GitHub without having to give you access to all of their repositories.
One thing to be careful of when generating OAuth tokens is that there is a limit to the number of valid tokens that can be generated at one time. Per user, each combination of scopes can only have ten active tokens. If you generate another OAuth token for this set of scopes, the oldest token will become invalid. It is important you don’t put yourself in a position where tokens you are using become invalidated. In the previous example with single sign-on, if you were to use the same scope for both SSO and a separate linking flow that you use when making API requests, a user repeatedly logging in could cause your API token to become invalid, so in this case you should make sure to use separate tokens. If your application allows users to make multiple accounts linked to the same GitHub account, a user who links their GitHub to more than ten accounts could have some of their tokens invalidated, so you should make sure to update your older tokens whenever a new one is generated.
OAuth tokens have a rate limit of 5000 API requests per hour. However, it is important to note that this rate limit is per user, and not per OAuth application. This means if a user has other OAuth applications linked to their account, or they are making API requests themselves with Basic Authentication, all these requests are coming out of the same limit. Therefore, it is important that you build in error handling for when you are being rate limited by GitHub, as well as to be respectful of the user’s rate limit in case they are using other OAuth applications. If your application performs regular polling on GitHub, you could allow the user to configure the frequency of the polling depending on how much rate limit they have to spare.
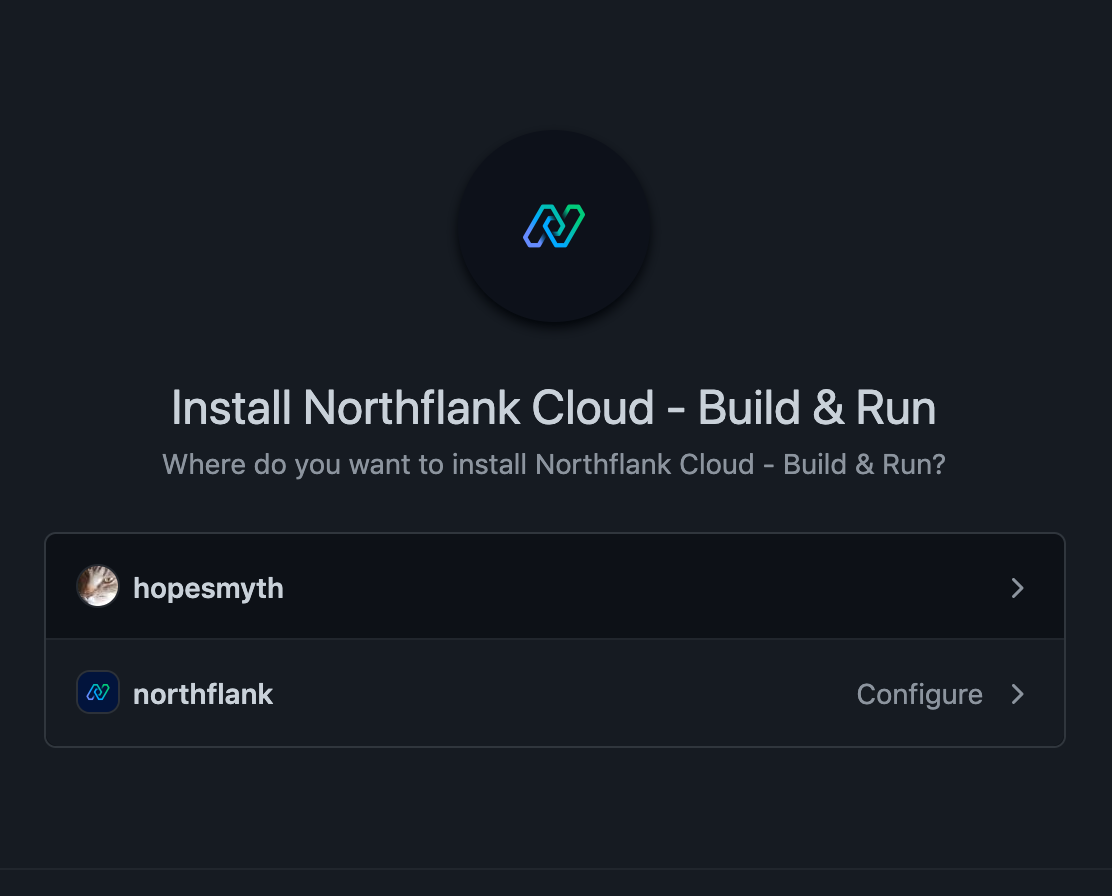
GitHub Apps are a more powerful way to link with GitHub, though they are a bit more complicated. Rather than linking with a user, users ‘install’ your GitHub App onto one or more repositories that they own. When linking, users get the option to either install the app on their personal account or an organization that they are an administrator of. They then get to choose whether the app can access every repository on that user or organization, or just a specific subset. Each user account or organization has its own installation, each with its own installation ID. Installations on an organization do not belong to any specific user - it does not matter which GitHub user performed the installation, and there can only ever be one installation of your app per organization.
Unlike OAuth applications, you select the scopes your GitHub App requires in the App settings, where it is then fixed for every user who installs your GitHub App. If you need to change the scopes in the future, you need to modify the scopes in the settings, and GitHub will then send an email to each user telling them about the additional permissions required and requesting that they authorize the additional scope requested. GitHub allows you to write a custom message for this email. Your GitHub App will continue to work without the user authorizing the additional permissions, and you can verify the current permissions of an installation with the ‘Get an installation for the authenticated app' endpoint.

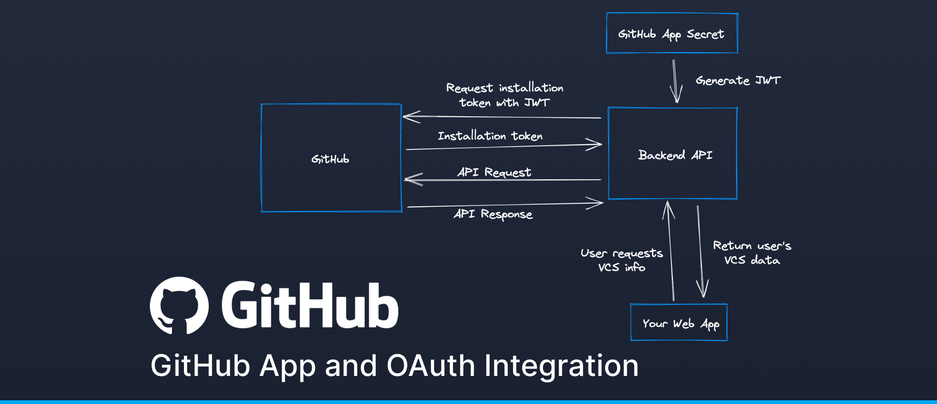
When you wish to perform an action, you perform the action on behalf of your GitHub app. To do this, you first create a JWT signed with your app’s secret. You can then authenticate with this JWT and make an API request to GitHub along with one of the installation IDs to get an installation token for that installation. This installation token then lets you make API requests for repositories in that installation. As this installation token is not linked to any specific user, any commits you make will be made in the app’s name, and labelled as a bot. This is useful for automated commits since it makes it very clear that this was not a user making the commit.
import jwt from 'jsonwebtoken';

const { GITHUB_APP_PEM, GITHUB_APP_ID_VALUE } = process.env;

// Tokens can have an expiry of at most 10 minutes
const expiryTime = 9 * 60;

// https://developer.github.com/apps/building-github-apps/authenticating-with-github-apps/#jwt-payload
const getGithubAppToken = () => {
  const pem = GITHUB_APP_PEM;
  const timestamp = Math.floor(Date.now() / 1000);

  const payload = {
    // Issued at time
    iat: timestamp,
    // JWT expiration time
    exp: timestamp + expiryTime,
    // Github app identifier
    iss: GITHUB_APP_ID_VALUE,
  };

  const token = jwt.sign(payload, pem, { algorithm: 'RS256' });
  return token;
};

export default getGithubAppToken;
import fetch from 'node-fetch';
import getGithubAppToken from './get-github-app-token';
const getGithubInstallationToken = async (installationId) => {
const uri = `https://api.github.com/app/installations/${installationId}/access_tokens`;
const accessToken = getGithubAppToken();
const options = {
method: 'POST',
headers: {
Accept: 'application/vnd.github.v3+json',
Authorization: `Bearer ${accessToken}`,
'User-Agent': 'Northflank',
},
};
const resp = await fetch(uri, options);
const json = await resp.json();
return json.token;
};
export default getGithubInstallationToken;The interesting thing about installation tokens not being linked to a user is that you can make requests without storing anything other than the app’s secret. For example, a GitHub App designed to make a comment on every new pull request could wait to receive a pull request webhook, take the installation ID from the webhook and generate an installation token using the ID and the app secret, and then make the comment API request with that token. In some circumstances, the user might not even need to have gone on your website - they could install the app from the GitHub marketplace and perform the whole installation without leaving GitHub.
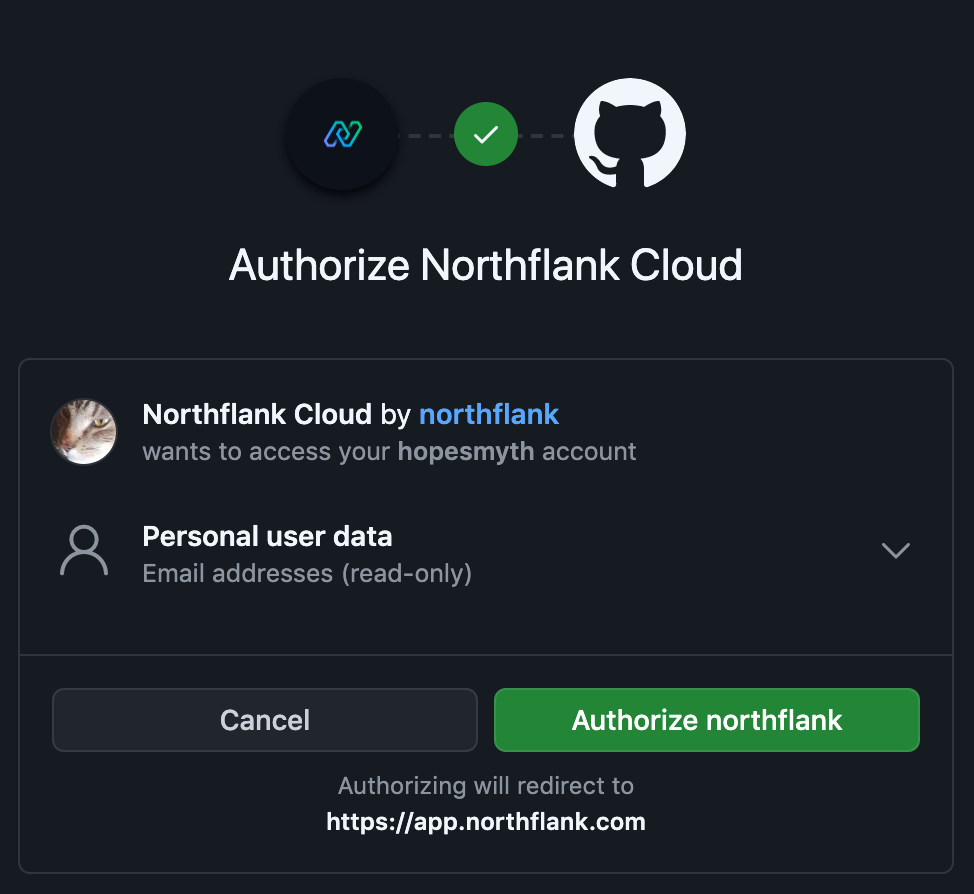
Of course, this kind of user-agnostic functionality is not always something you want. If you want a user to be able to link their account on your website with their GitHub account, you need a way of identifying who performed the linking, and we can do this with OAuth. Each GitHub app also has an OAuth app built in which you can link with - GitHub calls these App authorizations. You can perform the OAuth linking in two ways - you can either have it separate from the installation (e.g. the user performs the OAuth authorization flow, and then performs the installation flow, or vice versa) or you can select the ‘Request user authorization (OAuth) during installation’ option which will combine the two flows into a single one. Combining the steps avoids making the user navigate away from your site a second time, but it means users editing installation settings later will get redirected back to your OAuth callback endpoint, which you might not want.

Whilst users can start the OAuth flow from GitHub if the steps are combined, it’s recommended that you only perform OAuth linking originating from your site, and validate that request via a token that you pass to the GitHub authorization flow through the state parameter - this helps to avoid cross-site request forgery attacks.
With that OAuth token, you can then perform a number of things including check which installations that user can access. These OAuth tokens can be a little bit awkward however, since unlike the installations OAuth tokens are bound to a specific user - so there’s a bit of a disconnect there. It’s important that your users understand what they’re linking and what you’re trying to access. For example, a user who is part of a shared team account on your website might install your GitHub App on their GitHub organization. If you then use the OAuth token to perform actions on behalf of their personal account, they might be quite confused!
These OAuth tokens have the same ten token limitation as the OAuth application tokens mentioned before. However, you do not need to provide any scopes during the OAuth token request - GitHub App OAuth tokens inherit the scopes and permissions of the GitHub App they are a part of.
GitHub Apps have support for webhooks. Whenever a user installs your GitHub app, you will start to receive the webhooks you have selected for all the repositories your app can access. You can also receive webhooks for things like repository creation and changes to an organization such as members being invited or removed.
There are a few things we would love to see improved by GitHub in the future.
Firstly, the linking process for GitHub Apps that need to authenticate with OAuth is awkward. It is simpler for developers to split the OAuth authentication and the GitHub App installation into two parts. However, doing it this way requires sending the user through two separate flows. This is confusing for users and provides even more friction in your onboarding process, making it more likely that your users don’t finish setting up their accounts.
If you join them together though, that introduces its own problem. If you want the user to go through the linking process again, such as if they unlinked their account from your site but not via GitHub, or if they want to link the same GitHub account to a second account on your site such as a team account, they are sent directly to the installation settings form with seemingly no option to finish the link as the save button is greyed out. If the user wants to finish the linking process a second time, they need to first change their Repository access setting so that the save option becomes available. Then, the user can switch back to their previous setting and click the now enabled save button.
Also, the combined flow can be confusing to users. When installing a GitHub App, if you select a GitHub organization the App is installed on that organization but the OAuth link is performed on the user account who went through the linking process. That OAuth link can be used to fetch data about that specific user rather than the organization as a whole - particularly if the user has already installed the App on their personal account. If you are using the OAuth token in this way, you should make sure that your users understand that they are linking their personal account even though they selected an organization. You don’t want a user accidentally giving access to repositories they didn’t want to, especially if other users on your site have access to this information such as if you have team accounts or groups..
Working out which repositories a user can access can also be a pain. If you want list all the repos a user can access that have your app installed, you must first call the API endpoint that lists all installations a user can access then for each of those, call the API endpoint that lists the accessible repositories for that installation. Then, if you want to perform an operation on a repository that isn’t part of the user’s installation, you need to make sure that the user actually has access to perform that action. Since ideally you want to be using the GitHub App installation token whenever possible, and those tokens are user-agnostic, you need to either call the API endpoint to list a repository’s collaborators and verify that against the user performing the action, or get the user’s permissions by fetching the repo with their OAuth token. It would be useful to have some kind of endpoint that uses the installation token to verify which users can access that repo.
Similarly, whenever you receive a webhook, it can be difficult to know which users that webhook is relevant to, as there is not an easy way to know which users on your site have access to that repository.
Creating new repositories can also be difficult. Firstly, repo creation requires the Administration scope, which can be a scary ask for users since that gives your App the ability to delete repositories, among other things. Secondly, once you have created a repository, your App does not have access to that repo unless the user has selected the option to install the App on all repos. This is frustrating since you have to call an API endpoint to check whether the installation can access all repos, and if not, request that the user modifies their installation settings to support this. It would be great if repos created by the GitHub App automatically had the App installed.
GitHub Apps provide some great granularity to users by allowing them to select which repositories to install the GitHub App on, but it would be useful to extend that functionality to permission scopes. It would be handy to allow users to connect with the minimum scopes needed for your site, and then allow them to optionally select further permissions if you have specific features that need permissions like Administration.
As you can see, integrating with GitHub gives you access to a number of powerful features, and once you begin to understand the quirks of GitHub and GitHub Apps, you can begin to do all sorts of things with your application. Hopefully this article has helped you to grasp some of the complexities of GitHub integration, and help you to avoid some of the common pitfalls.
Thank you for reading! Hopefully you find some use from some of the lessons I've learnt from working on version control integration here at Northflank. If you have any questions you can contact me at [first name] @northflank.com.