
How to deploy a React app on Northflank
React is one of the most popular libraries for building fast, interactive web applications. From simple landing pages to production-ready dashboards, React powers millions of websites.
If you’re looking to deploy a React app, the process can sometimes be tricky. You need to bundle static files, configure a web server, and make sure everything runs smoothly in production. With Northflank, you can skip the complex setup and deploy your React app in just a few minutes.
In this guide, we’ll walk through how to deploy a React app step by step: setting up a React project, preparing it for production with Docker, and publishing it to Northflank. By the end, you’ll have a production-ready React application with automatic scaling, HTTPS, and monitoring.
Before starting, make sure you have:
- Basic knowledge of JavaScript and React
- Node.js and npm installed (download here)
- A GitHub, GitLab, or Bitbucket account
- A Northflank account
- Setting up a basic React project
- Preparing it for production with a build script and Dockerfile
- Deploying a React app with Northflank
Northflank is a platform that allows developers to build, deploy, and scale applications, services, databases, jobs, and GPU workloads on any cloud through a self-service approach. For DevOps and platform teams, Northflank provides a powerful abstraction layer over Kubernetes, enabling templated, standardized production releases with intelligent defaults while maintaining the configurability you need.
💡 If you already have a React project locally or on GitHub, you can skip this step.
To create a new React app, run the following command in your terminal:
$ npm create vite@latest hellonorth -- --template reactA new React app will be provisioned for you in the hellonorth directory.
Next, cd into the directory and install the dependencies.
$ npm installStart the Vite development server by running the following command:
$ npm run devOpen your browser and go to http://localhost:5173 to see your app.
Northflank runs your app inside a container. To deploy a React app effectively, we need to make a few configuration changes to make it production-ready:
React apps need to be compiled into production-ready assets. Run:
$ npm run buildThis generates static files inside a /build directory.
To package your app in a container, create a file named Dockerfile in your project root:
# ---- Build stage ----
FROM node:24-alpine AS build

# Set working directory inside the container
WORKDIR /app

# Copy dependency files and install
# Using npm ci ensures a clean, reproducible install
COPY package*.json ./
RUN npm ci

# Copy the rest of the source code and build the React app
COPY . .
RUN npm run build

# ---- Production stage ----
FROM nginx:alpine

# Copy built React files from previous stage into Nginx html directory
COPY --from=build /app/build /usr/share/nginx/html

# Expose port 80 for incoming traffic
EXPOSE 80

# Start Nginx in the foreground
CMD ["nginx", "-g", "daemon off;"]
Here’s what happens:
- The first stage installs dependencies and builds your React app.
- The second stage copies the built files into an Nginx web server.
- The container exposes port
80, which Northflank will route traffic to.
💡 Handling React Router and client-side routing:
If you’re using React Router or any client-side navigation, you’ll need to configure Nginx to redirect unknown routes back to index.html. Otherwise, refreshing a page like /dashboard may result in a 404.
To fix this, create an nginx.conf file:
server {
  listen 80;
  root /usr/share/nginx/html;

  location / {
    index index.html;
    try_files $uri /index.html;
  }
}
And update the Dockerfile:
# ---- Build stage ----
FROM node:24-alpine AS build

# Set working directory
WORKDIR /app

# Install dependencies
COPY package*.json ./
RUN npm ci

# Copy source and build React app
COPY . .
RUN npm run build

# ---- Production stage ----
FROM nginx:alpine

# Copy custom Nginx config (for React Router support)
COPY nginx.conf /etc/nginx/conf.d/default.conf

# Copy build output into Nginx's html directory
COPY --from=build /app/build /usr/share/nginx/html

# Expose port 80 for the container
EXPOSE 80

# Run Nginx in the foreground
CMD ["nginx", "-g", "daemon off;"]
This ensures your React app works smoothly with client-side routing.
Push your code to GitHub or any Git provider you prefer.
Now that you've prepared your React application for deployment, let's get it live on Northflank. The following steps will guide you through connecting your Git repository, configuring the build process, and setting up your public-facing service. In just a few minutes, you'll have a production-ready React application with automatic scaling, HTTPS, and monitoring capabilities.
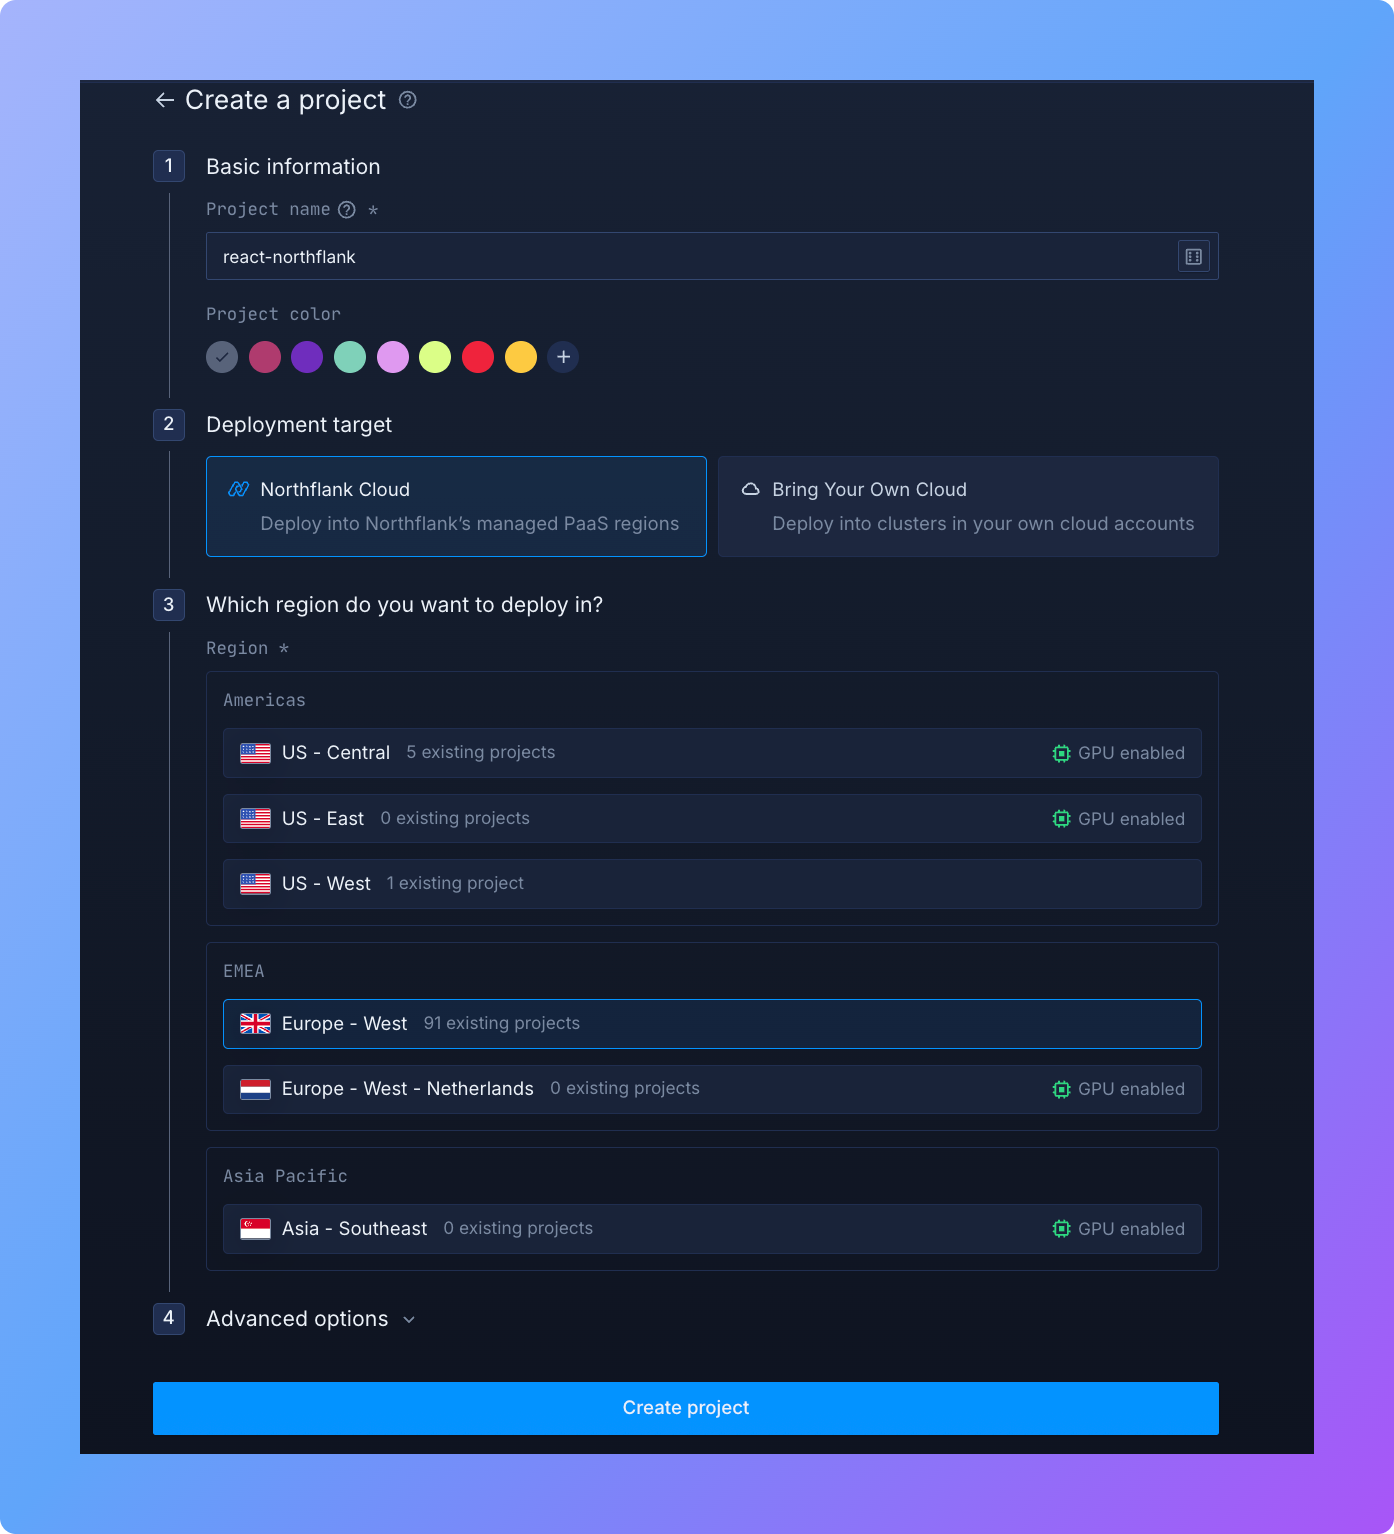
Before you can deploy your React app, you need a project. In Northflank, every resource, whether it is a service, a job, or a database addon, lives inside a project. Think of a project as your workspace, where all the pieces of your application come together.
- Log in to Northflank and open your dashboard. From the sidebar, click on Projects and then select ”Create project”.
- Give your project a clear name. Choose something descriptive that matches the application you are deploying, such as
react-portfolio,dashboard-ui, ormarketing-site. Using clear names will make it easier to quickly identify the purpose of each project later. - Select where you want your project to run. You can deploy directly on Northflank Cloud, which is the fastest option for most users, or you can connect your own cloud provider if you already use AWS, Azure, or GCP.
- Pick a region that is close to your users or your development team. Running your project in a nearby region reduces latency and ensures faster performance.
- Click ”Create project” to finish. Within a few moments, your workspace will be ready, and you can begin setting up the service that will host your React application.
Now you have a clean environment where your React service will live alongside any other backend services or databases you may add later.
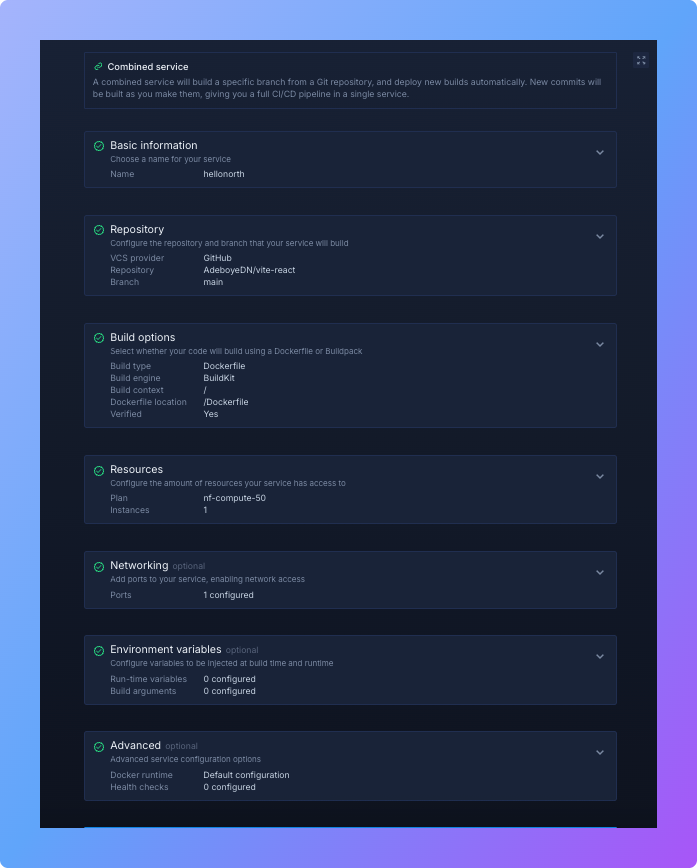
With your project set up, the next step is to deploy your React application as a service. In Northflank, a service is where your code is built, deployed, and run inside a container. For a React app, the most common setup is to use a combined service, which handles both the build process and the deployment in a single workflow.
- Open your project dashboard and go to the Services tab. Click ”Create service” to begin.
- Choose Combined service. This option is ideal for frontend projects because it allows you to connect your repository, build your application, and serve it from one place without needing additional configuration.
- Next, connect your Git provider. Northflank supports GitHub, GitLab, and Bitbucket. Once connected, select the repository where your React application code lives.
- In the Build options, select ”Dockerfile” and set the path to
/Dockerfile. The Dockerfile is responsible for defining how your React application is built and served. A common setup is to build the React project into static files and then serve those files using a lightweight web server such as Nginx. - Move to the Networking section and make your application publicly accessible. Add a port configuration with port set to
80, protocol set to HTTP, and public access enabled. This ensures that users can reach your application directly through the internet. - Once you have reviewed all your settings, click ”Create service”. Northflank will now begin building and deploying your React application. You can follow the progress in the build logs, and within a few moments, you will see your service running in the dashboard, ready to serve your application to the world.
Once the build completes successfully, you'll see a public service URL in the dashboard (like "p01--react--tqlt.code.run"). Open it to confirm your React app is live 🚀.

From here, you can:
- Add a custom domain with automatic HTTPS
- Scale your service by increasing replicas or resources
- Add backend services (e.g. APIs, databases)
- Securely manage environment variables with Secrets groups
- Monitor logs and performance in real-time
For more advanced setups, check the Northflank documentation.
You've successfully deployed a React app to Northflank! This deployment approach leverages containerization, automated builds, and production-ready infrastructure without the traditional DevOps overhead. By following this guide, you now have a scalable, reliable platform for hosting your React applications with built-in monitoring, HTTPS, and the ability to expand as your project grows.