
How to deploy a Postgres database on Northflank
PostgreSQL is one of the most popular open-source relational databases used by developers and companies around the world. It is well known for being reliable, scalable, and full of advanced features that make it suitable for both small projects and large production applications.
With Northflank, you don’t need to worry about installation, server configuration, or manual updates. In just a few clicks, you can provision a fully managed PostgreSQL instance that’s secure, scalable, and ready for your application.
In this guide, we’ll walk through setting up a Postgres database on Northflank, retrieving your credentials, and connecting both your application and your local machine.
Before you begin, make sure you have the following:
That is all you need to get started.
In this step-by-step guide, you will learn how to:
- Create a project on Northflank
- Deploy a PostgreSQL database addon inside your project
- Retrieve your database credentials and connection string
- Connect your application to the database securely
- Optionally connect to the database from your local computer
Northflank is a platform that allows developers to build, deploy, and scale applications, services, databases, jobs, and GPU workloads on any cloud through a self-service approach. For DevOps and platform teams, Northflank provides a powerful abstraction layer over Kubernetes, enabling templated, standardized production releases with intelligent defaults while maintaining the configurability you need.
Before we can deploy Postgres, we need a project. In Northflank, every resource, whether it is a service, a job, or a database addon, lives inside a project. Think of a project as your workspace, where all the pieces of your application come together.
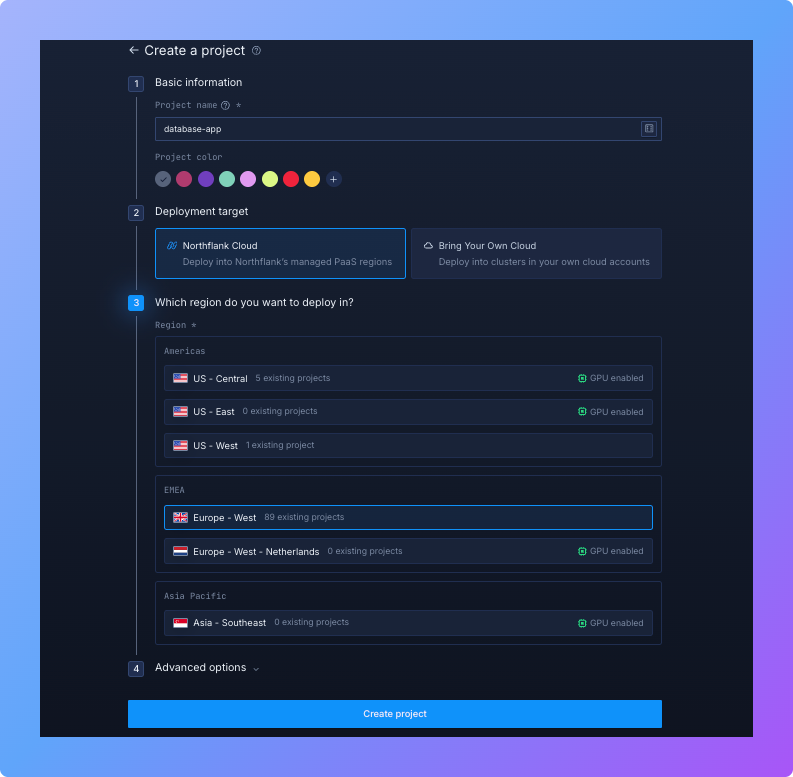
- Log in to Northflank and open your dashboard. From the sidebar, click on Projects, then select Create project.
- Name your project. Choose something descriptive that makes sense for the application you are working on, such as
todo-app,database-apporanalytics-platform. Clear names will help you quickly recognize the purpose of each project later. - Choose a deployment environment. You can run your project directly on Northflank Cloud, which is the easiest option for most cases, or link your own cloud provider if you already use platforms like AWS, Azure, or GCP.
- Select a region close to your users or development team. Running in a nearby region helps minimize latency and improve performance.
- Click “Create project” to finalize. Within seconds, your project will be provisioned and ready.
You now have a clean workspace where your PostgreSQL addon and application services will live. This structure keeps everything organized and makes it easy to scale or add more components later.
Once you have your project set up, the next step is to add a PostgreSQL addon. An addon in Northflank is a fully managed service. So instead of manually provisioning a VM, installing Postgres, and configuring TLS, you get a ready-to-use database with just a few clicks.
Here’s how to deploy your Postgres database:
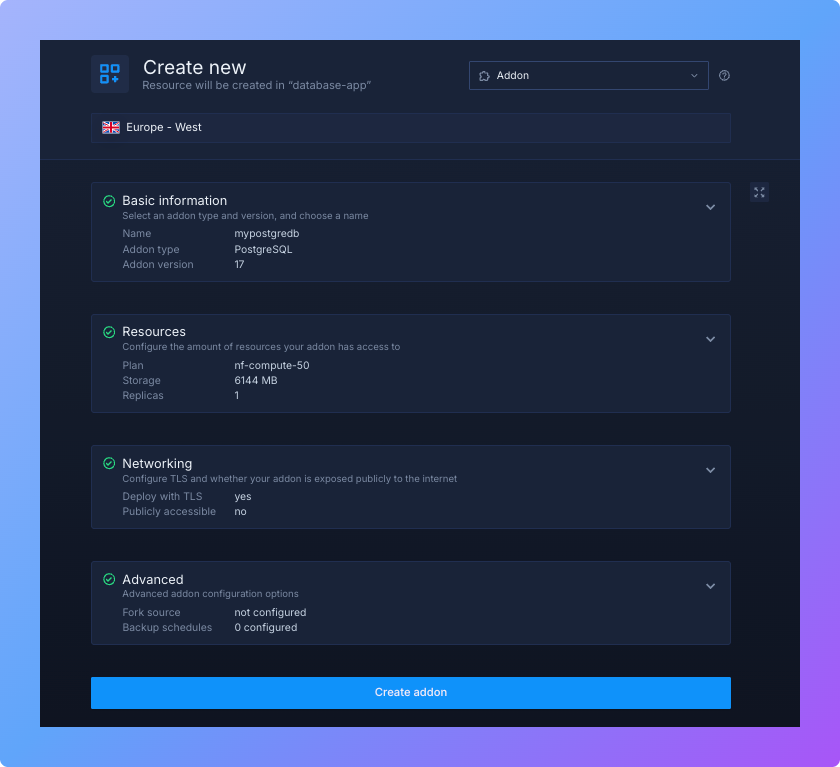
- In your project dashboard, open the Addons tab and click “Create new addon”. Northflank supports several addons like Redis, MongoDB, and MySQL, but for this guide, select “PostgreSQL”
- Enter a descriptive name, e.g.
mypostgresdb. If you plan to run multiple environments (like staging, testing, and production), use clear names such aspostgres-prodorpostgres-dev. This will make credential management easier later. - Choose a PostgreSQL version. The Latest version is recommended for most applications, since it includes the newest performance improvements and security patches. But if you’re working with an older application, you may need to select a specific version (e.g., PostgreSQL 13) for compatibility.
- Configure resources such as memory and CPU depending on the needs of your application. For small projects, the default settings are usually enough, while production workloads may require more resources.
- Under the networking section, enable ”Deploy with TLS” to secure your database connections. You can also choose to make the database publicly accessible if you want to connect from outside Northflank.
By default, the database is only available to services and jobs within the same project. If you do not expose it publicly, you can still connect from your local machine by using the Northflank CLI to forward traffic.
Learn more in the documentation: Expose a database publicly.
- Review your settings carefully. When everything looks good, click Create addon.
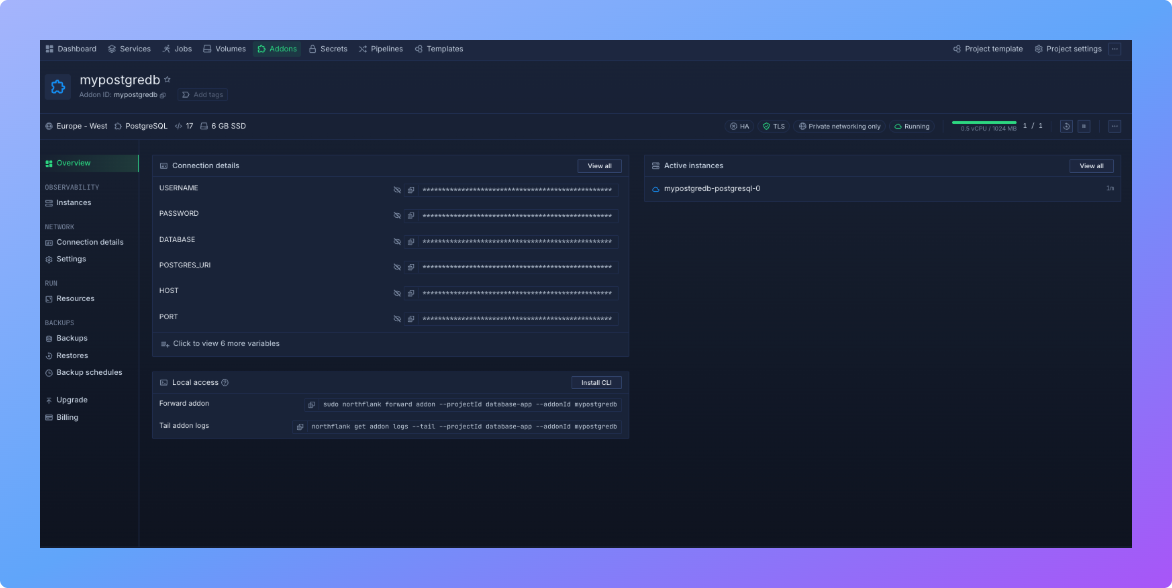
Northflank will now provision your PostgreSQL instance. This usually takes less than a minute. Once it’s ready, you’ll see the addon in your project dashboard, complete with monitoring, logs, and connection details.
After your PostgreSQL addon has been created and is running, Northflank automatically provides all the details you need to connect. These credentials are generated securely for each addon and are unique to your project.
The details include:
- Host – the address where your PostgreSQL database is running
- Port – by default this is
5432, the standard PostgreSQL port - Database name – the default database created with your addon
- Username – the user account with permissions to access your database
- Password – the randomly generated password tied to that user
In addition to these individual values, Northflank also creates a ready-to-use environment variable called DATABASE_URL. This is the most convenient option because it contains all of the connection information in one string: postgresql://username:password@hostname:5432/databasename.
You will use this connection string whenever you want to connect your application or an external tool such as psql, pgAdmin, DBeaver, or TablePlus.
Now that your PostgreSQL database is provisioned, the next step is to connect your application. This connection allows your backend services to run queries, store data, and retrieve information from the database.
Northflank provides two main approaches:
- Using Secrets groups (recommended for security and scalability)
- Using environment variables (a simpler but less secure alternative)
Both methods achieve the same goal, but Secrets groups are the best choice for production environments.
Secrets groups keep sensitive information such as database passwords out of your code. Instead, credentials are stored securely within Northflank and injected into your application when it runs. This means you don’t have to hardcode any secrets or worry about accidentally committing them to version control.
To set up a Secrets group:
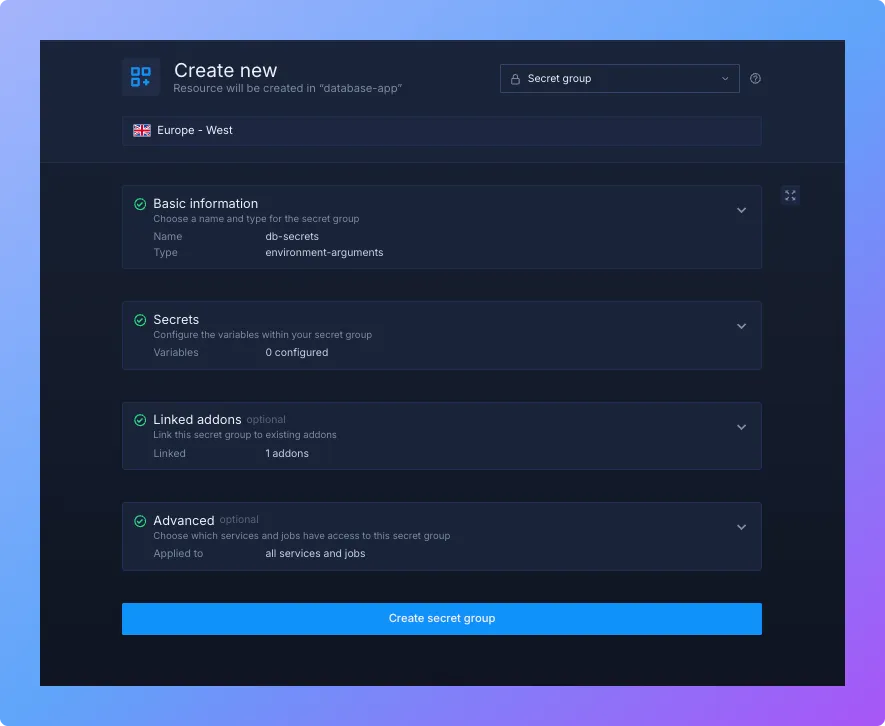
- In your project dashboard, open Secrets groups.
- Click ”Create new secret group” and give it a clear name like
db-secrets. - Under Linked Addons, select your PostgreSQL addon. You’ll see all of the generated secrets, including the
DATABASE_URL. - Choose the secrets you want to make available.
- Review your configuration and click ”Create secrets group”.
- Link the new group to your service so the secrets are automatically available as environment variables.
This approach ensures that your credentials remain secure and can be updated easily without changing your application code.
If you want a more direct setup, you can copy the database connection string and add it manually as an environment variable. This option is less flexible than Secrets groups but can be useful for quick prototypes.
Here’s how to do it:
- Go to your service settings in Northflank.
- Open the Environment tab.
- Add a new variable named
DATABASE_URLand paste in the full connection string: - Save your changes and redeploy your service.
Your service will now be able to connect directly to the PostgreSQL database.
You can also access your Northflank PostgreSQL database from your local machine, which is especially useful for development and testing.
By default, databases are only accessible inside the same project. To connect locally, forward the database using the Northflank CLI:
sudo northflank forward addon --projectId [project-name] --addonId [addon-name]Once forwarding is active, the database will be available on your machine using the connection details shown in the addon page.
You can now connect with the PostgreSQL command line client:
psql postgresql://username:password@hostname:5432/databasenameIf you prefer a graphical interface, use tools such as pgAdmin, DBeaver, or TablePlus, and paste in the same connection details.
Your PostgreSQL database is now live on Northflank!
Here are some things you can do next:
- Connect your database to your application
- Monitor performance and observability with built-in metrics and logs
- Set up backups, restores, and data imports
- Configure addons for high availability and reliability
This guide has walked you through how to deploy a Postgres database on Northflank with minimal effort. By following these steps, you've learned how to create a project, deploy Postgres, retrieve credentials, and connect both your applications and local environment.
Northflank makes it remarkably simple to deploy Postgres databases that are production-ready, secure, and scalable. Unlike traditional database deployment methods that require extensive configuration and maintenance, deploying Postgres on Northflank takes just minutes and provides enterprise-grade reliability.
Whether you're building a small application or enterprise solution, you can confidently deploy Postgres on Northflank knowing that you'll have all the tools needed for monitoring, scaling, and maintaining your database as your project grows.