
Implementing secure and reliable authentication is a crucial but often complex task for modern applications. Ensuring robust session management, handling OAuth providers for social logins, and passwordless authentication are all challenges in their own right, before you even consider maintenance, customisation, and scalability.
These challenges can lead to increased development time, technical debt, and potential security vulnerabilities if not handled properly.
SuperTokens is an open-source authentication solution designed to simplify these challenges while offering flexibility and scalability. It provides:
- Secure Session Management: With robust anti-CSRF and anti-session fixation protections.
- Multiple Login Methods: Including traditional email-password, social logins (Google, Facebook, etc.), and passwordless options like magic links.
- Prebuilt UI Components: Ready-to-use frontend components for seamless integration into your React or JavaScript applications.
- Backend SDKs: Available for Node.js, GoLang, and Python, offering flexibility across different technology stacks.
- Customisable Authentication Flows: Tailor login and signup processes to your app’s needs without compromising security.
- Scalable Architecture: Core service runs independently from your application logic, making it easy to scale.
SuperTokens enables you to add robust authentication in minutes while giving you control over the user experience.
In this guide, we’ll cover:
- The architecture of self-hosted SuperTokens
- How to deploy SuperTokens on Northflank
- How SuperTokens integrates with your application
A SuperTokens deployment (using PostgreSQL) consists of:
- The SuperTokens core service (
supertokens/supertokens-postgresql:latest) - A PostgreSQL database
These are used to integrate with your frontend and backend applications.
Before deploying SuperTokens on Northflank, make sure you have completed the following:
- Sign up or log in to your Northflank account and create or select a team
- A Git account integrated with Northflank
- Add your domain to Northflank and add subdomains for the backend and frontend applications
- Optional: Install Node.js, npm/Yarn, and Git, if you'd like to build on the example React/Express project in this guide
You can deploy SuperTokens with an example project with just a click using Northflank’s stack template. Running the stack template will deploy all the required resources and create secret groups with the necessary environment variables to immediately start using SuperTokens.
The stack template will clone Northflank’s example repository, which consists of:
- A React + Vite frontend with SuperTokens
- A Node + Express backend with SuperTokens
You’ll need to provide your own subdomains for the backend and frontend example services.
Navigate to the domains page in your Northflank team and follow the steps to add a domain. Then, add separate subdomains for your frontend and backend services (for example example.com and api.example.com ).
Enter these domains (without any prefix such as https:// ) in the form before deploying the stack template to correctly configure CORS in the example applications.

If you want to deploy the SuperTokens service on its own, you can use this stack template which does not contain the example project.
After running the stack template, navigate to the backend service in your new SuperTokens project.
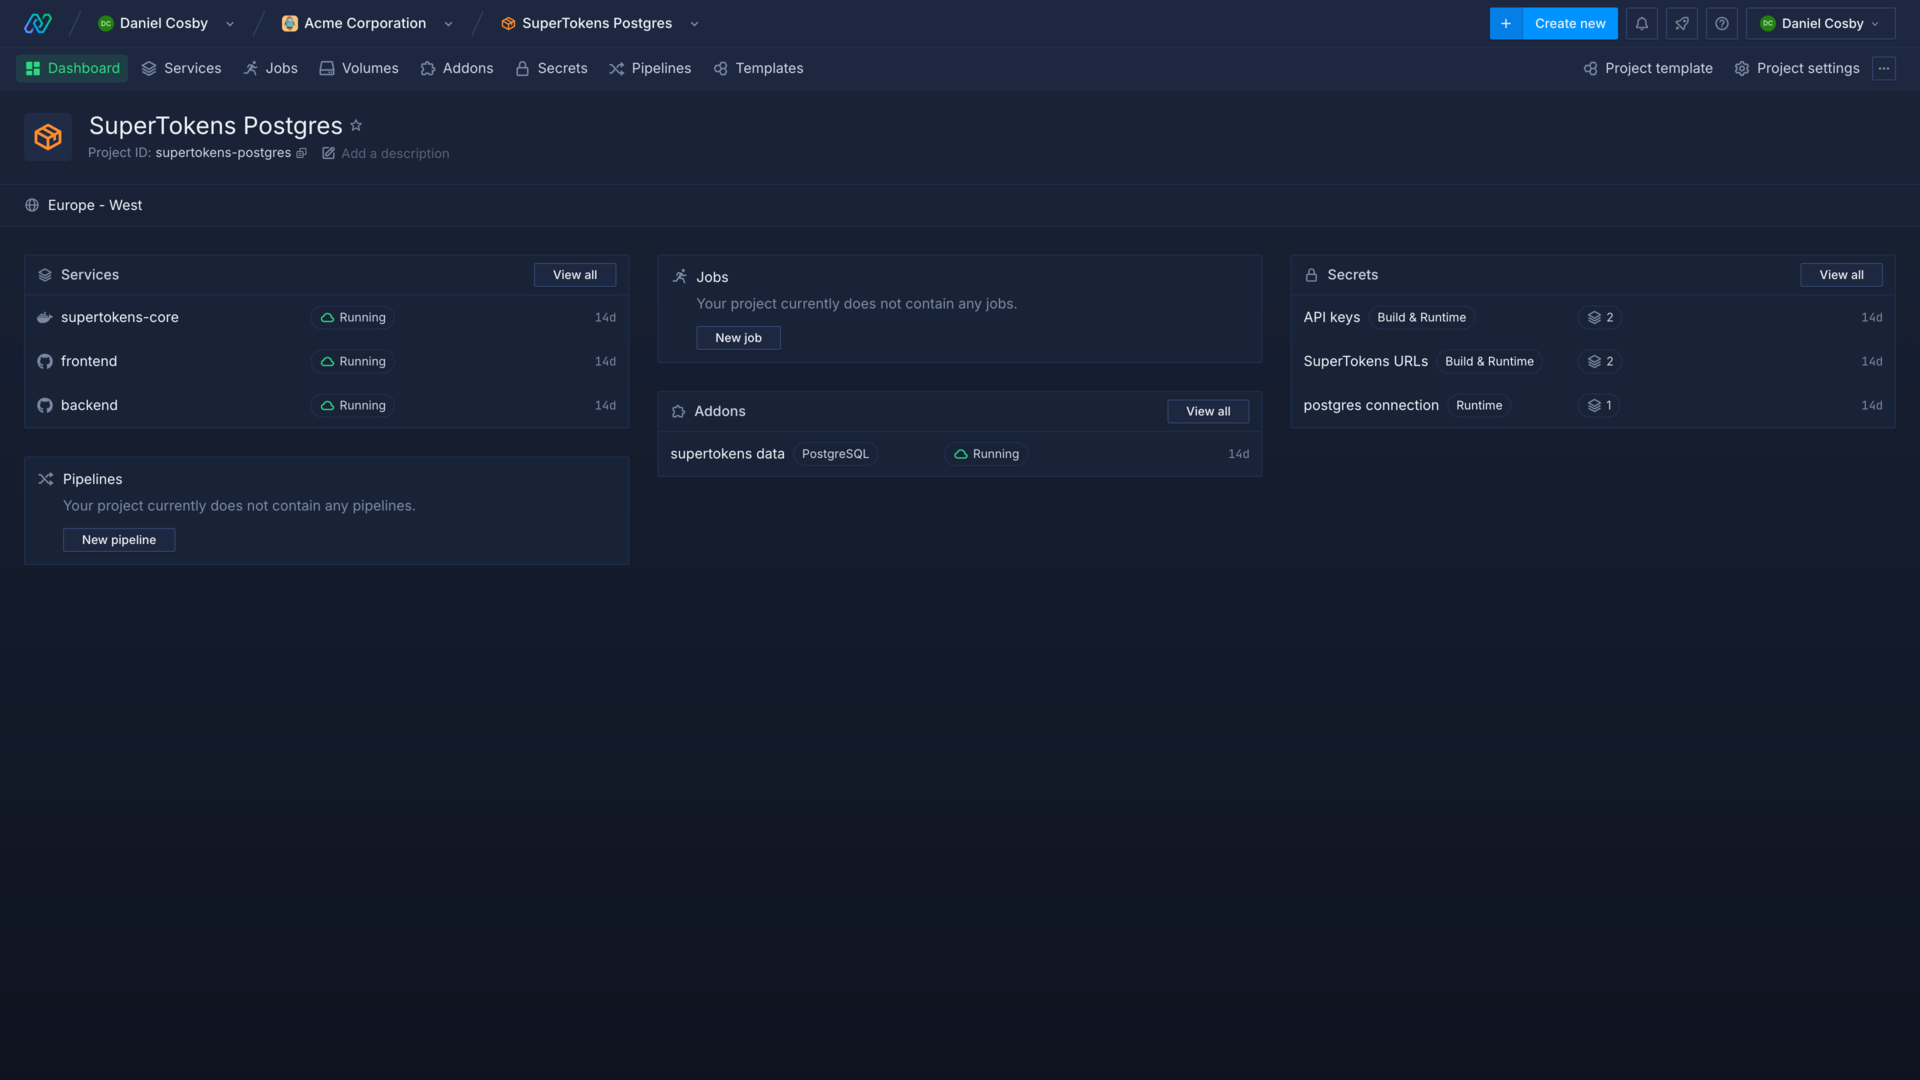
Copy the public domain, found in the header of the service or on the ports & DNS page, and try running the following commands in your shell (replacing the domain with yours):
curl https://<your-backend-domain>/hello
curl https://<your-backend-domain>/sessioninfo
You should receive a response of hello for the first command, and a message stating that you’re unauthorised to access the second endpoint.
Next, navigate to your frontend service and open your public domain to see the example application.

Click Dashboard and you should be prompted to sign in. Sign up, enter a username and password, and create your user.

You should see a success screen with your userID. Click call API to see a successful response about your session info from the backend service.

You can build on this example by cloning your repo locally. Navigate to it in your terminal, or open the project in your IDE, and run npm install. Next, change to your frontend and backend directories and run npm install to download the dependencies for each application:
npm install && cd frontend && npm install && cd ../backend && npm installWhen you commit and push changes to the backend (found in /backend) or frontend (/frontend) Northflank will trigger a build for the respective directories and deploy your changes.

This is achieved by the path rules and build context configured on the services.
SuperTokens offers SDKs for ReactJS, Angular, and Vue for the frontend, and NodeJs, GoLang, and Python for the backend. You can follow the examples in their quickstart guides to begin building your project, or integrate SuperTokens with your existing project.
You can now expand SuperTokens’ capabilities depending on your requirements and configure:
- Passwordless login
- Social login
- Enterprise login (paid feature)
- Unified login (paid feature)
- Machine to machine authentication (paid feature)
- Passkeys
By default SuperTokens will handle emails for your deployment, which is rate limited and should not be used for production applications. You can configure SuperTokens to use your own SMTP server instead.
By default SuperTokens will handle SMS for your deployment, which is rate limited and should not be used for production applications. You can configure SuperTokens to use your own SMS provider instead.
The API keys generated in the template are used to authenticate between the backend and the SuperTokens core service. Two API keys are generated, and one is passed to the backend service via the environment variable API_KEY, which inherits API_KEY1 from the API keys secret group can change the API key passed
If you prefer, you can deploy SuperTokens with a MySQL database rather than PostgreSQL.
You can deploy a MySQL addon and link it to a secret group with the alias MYSQL_CONNECTION_URI.
You can make these changes in the SuperTokens template before running it by editing the addon and secret group nodes.
Northflank allows you to deploy your code and databases within minutes. Sign up for a Northflank account and create a free project to get started.
- Build, deploy, scale, and release from development to production
- Observe & monitor with real-time metrics & logs
- Deploy managed databases and storage
- Manage infrastructure as code
- Deploy clusters in your own cloud accounts
- Run GPU workloads