
If you need a lightweight, flexible LLM gateway that supports multiple providers, LiteLLM is one of the most reliable open-source options available. It allows you to proxy and manage requests to different LLMs through a single API, making it easier to standardize how your applications interact with AI models.
With Northflank, you can deploy LiteLLM in minutes using a one-click template or configure it manually. Northflank manages scaling, networking, storage, and infrastructure so you can focus on your model configuration instead of DevOps tasks.
Before you begin, create a Northflank account.
- Deploying LiteLLM with a one-click template on Northflank
- Deploying LiteLLM manually on Northflank
What is Northflank?
Northflank is a modern developer platform that makes it easy to build, deploy, and scale applications, databases, jobs, and GPU workloads. It abstracts away Kubernetes complexity with smart defaults, giving you production-ready deployments while still allowing advanced customization.
You can launch LiteLLM on Northflank in just a few minutes using the ready-made template. This option is ideal if you want a quick, reliable, and secure deployment without performing manual configuration.
The LiteLLM deployment template includes:
- 1 PostgreSQL addon for storing model and configuration data
- 1 Secret group for environment variables and service credentials
- 1 Deployment service using the official LiteLLM image
This setup gives you a complete, ready-to-use LiteLLM instance with all dependencies installed.
- Visit the LiteLLM template on Northflank
- Click
Deploy LiteLLM Now - Northflank will automatically:
- Create the project and database
- Set up the secret group
- Deploy the LiteLLM service
- Expose a public URL for your LiteLLM dashboard
- Once deployment completes, open the generated URL to access your LiteLLM web app
If you prefer a more customizable setup, you can deploy LiteLLM manually. This gives you full control over configuration, addons, and environment variables.
Note: You can also customise Northflank's one-click deploy templates.
Log in to your Northflank dashboard, then click the “Create new” button (+ icon) in the top-right corner. Then, select “Project” from the dropdown.

Projects serve as workspaces that group together related services, making it easier to manage multiple workloads and their associated resources.
You’ll need to fill out a few details before moving forward.
-
Enter a project name, such as
litellm-projectand optionally pick a color for quick identification in your dashboard. -
Select Northflank Cloud as the deployment target. This uses Northflank’s fully managed infrastructure, so you do not need to worry about Kubernetes setup or scaling.
(Optional) If you prefer to run on your own infrastructure, you can select Bring Your Own Cloud and connect AWS, GCP, Azure, or on-prem resources.
-
Choose a region closest to your users to minimize latency.
-
Click Create project to finalize the setup.

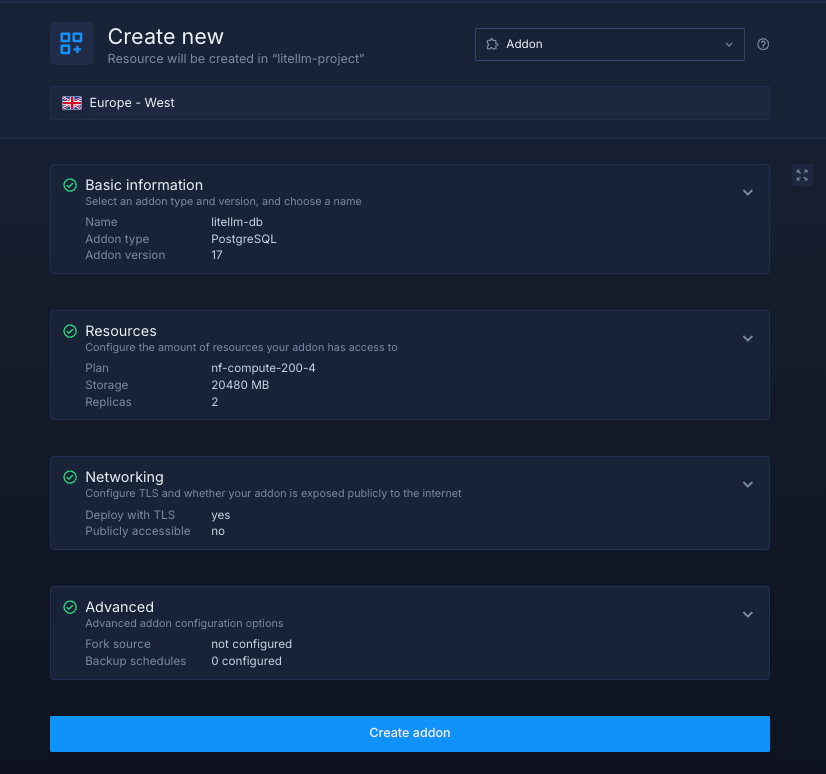
Inside your project, go to the Addons tab at the top menu and click “Create new addon”. Then, select PostgreSQL as the Addon type, give it a descriptive name such as litellm-db. Select your preferred version, and choose a compute plan size.
- If you’re testing or experimenting, the smallest option is cost-effective and sufficient.
- For production, we recommend starting with
nf-compute-50. This provides more resources and stability, ensuring LiteLLM runs reliably under real workloads.
Once you’ve configured the settings, click Create addon to provision your database.
Next, navigate to the Secrets tab and click "Create Secret Group." Name it something easy to recognize, such as litellm-secrets. This group contains all environment variables required by LiteLLM. You can find the full list of supported variables in the LiteLLM documentation.
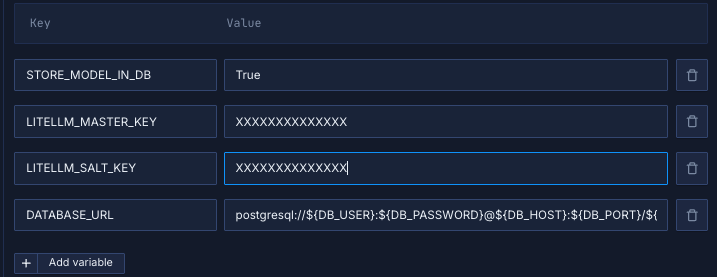
If you don't want to go through the stress of manually configuring or searching for environment variables to use, you can use the already configured ones below:
STORE_MODEL_IN_DB="True"
LITELLM_MASTER_KEY={update this}
LITELLM_SALT_KEY={update this}
DATABASE_URL="postgresql://${DB_USER}:${DB_PASSWORD}@${DB_HOST}:${DB_PORT}/${DB_NAME}"
Notes about these values:
STORE_MODEL_IN_DB– Tells LiteLLM to persist model configurations in the PostgreSQL database rather than in memory. This ensures your settings survive restarts.LITELLM_MASTER_KEY– A secret key used to authenticate administrative requests to the LiteLLM API. Replace{update this}with a strong, randomly generated string.LITELLM_SALT_KEY– An additional secret used for hashing sensitive data. Like the master key, replace{update this}with a unique, secure value.DATABASE_URL– The connection string for your PostgreSQL database. The placeholders (${DB_USER},${DB_PASSWORD}, etc.) will be automatically populated by linking your PostgreSQL addon, as explained in the next step.
Link the PostgreSQL addon to your secret group
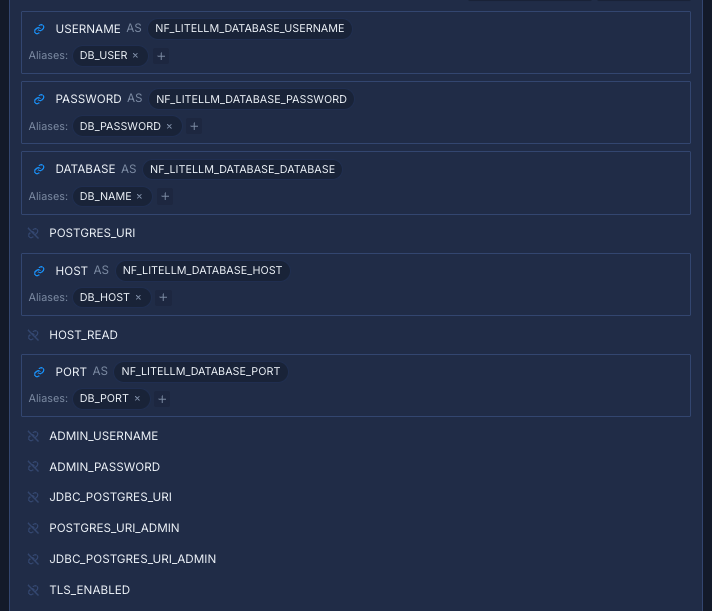
Northflank addons (like PostgreSQL) expose connection details (username, password, etc.). Instead of manually copying these values into your secrets, you can link the addon directly to your secret group. This way, whenever the addon rotates credentials, your service automatically receives the updated values.
- Under the Linked addons section, click “Configure” to map
HOSTto the aliasDB_HOST. - Map
PORTtoDB_PORT. - Map
USERNAMEtoDB_USER. - Map
PASSWORDtoDB_PASSWORD. - Map
DATABASEtoDB_NAME.
Here we’re not inventing new values, we’re just telling Northflank to feed the Postgres addon’s host and URI into the environment variable names your service requires.
Finally, click Create secret group to save everything.
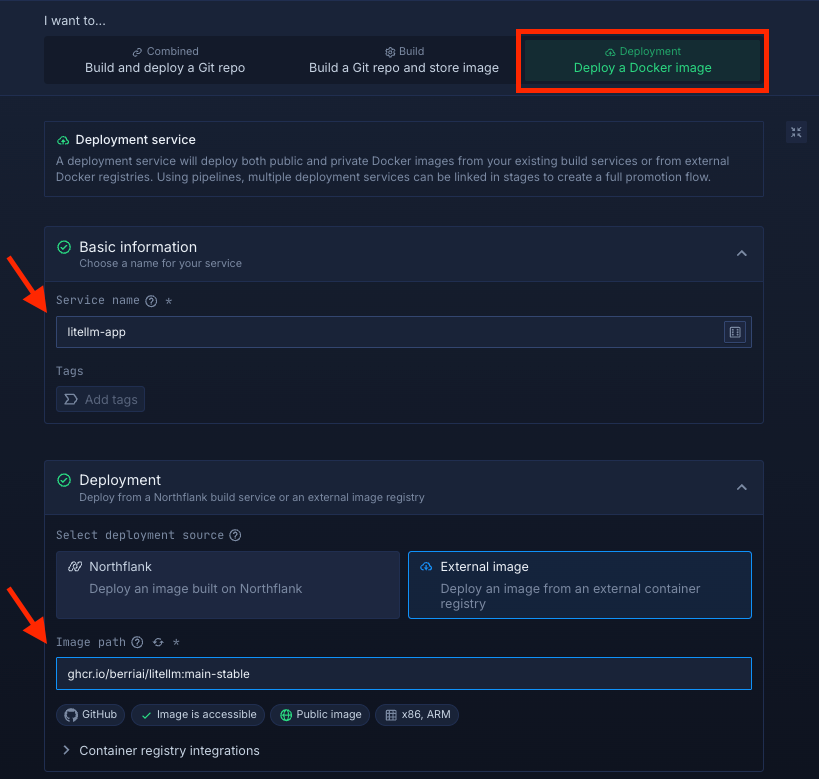
Within your project, navigate to the Services tab in the top menu and click ’Create New Service’. Select Deployment and give your service a name such as litellm-app.
For the deployment source, choose External image and enter the official LiteLLM Docker image:ghcr.io/berriai/litellm:main-stable.
Select compute resources
Choose the compute size that best matches your workload:
- Small plans are fine for testing or lightweight usage.
- Larger plans are recommended for production, as LiteLLM can be resource-intensive under real-world traffic.
The flexibility to adjust resources later means you can start small and scale up as your scheduling needs grow.

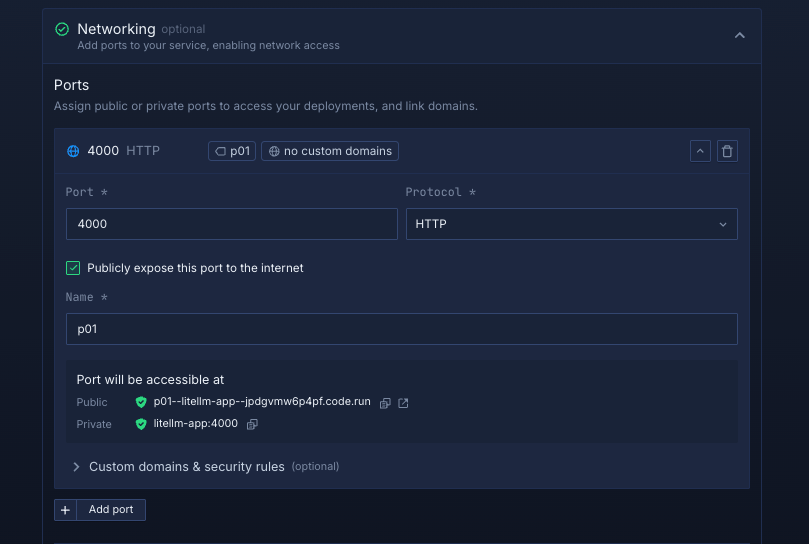
Set up a port so your app is accessible:
- Port:
4000 - Protocol:
HTTP - Public access: enable this to let people access your scheduling app from the internet
Northflank will automatically generate a secure, unique public URL for your service. This saves you from having to manage DNS or SSL certificates manually.
Deploy your service
When you’re satisfied with your settings, click “Create service.” Northflank will pull the image, provision resources, and deploy LiteLLM.
Once the deployment is successful, you’ll see your service’s public URL at the top right corner, e.g.: p01--litellm-app--lppg6t2b6kzf.code.run

Deploying LiteLLM on Northflank provides a reliable and straightforward way to run a fully managed LLM gateway. You can choose the one-click template for a fast setup or configure everything manually for more control. Northflank handles scaling, networking, and infrastructure, so you can focus on how your applications interact with LLMs.
This setup works well for developers, teams, or organisations that need a flexible and scalable way to manage multiple LLM providers through a single API.