
LibreChat is a self-hosted chat platform that brings together multiple AI providers, custom models, and RAG features in a single interface. It is built for anyone who wants a private and flexible alternative to hosted AI chat services. You can connect OpenAI, Anthropic, Google, Groq, local models, and an optional RAG pipeline.
With Northflank, you can deploy LibreChat in minutes using a one-click template or configure it manually. Northflank handles scaling, networking, and infrastructure so you can focus on customising models and features.
Before you begin, create a Northflank account.
- Deploying LibreChat with a one-click template on Northflank
- Deploying LibreChat manually on Northflank
What is Northflank?
Northflank is a modern developer platform that makes it easy to build, deploy, and scale applications, databases, jobs, and GPU workloads. It abstracts away Kubernetes complexity with smart defaults, giving you production-ready deployments while still allowing advanced customisation.
The easiest way to run LibreChat on Northflank is through the LibreChat one-click template. It creates a project, a deployment service, and databases, all with required settings preconfigured. This is ideal if you want to launch LibreChat quickly without manually setting up everything.

The LibreChat template includes:
- 1 PostgreSQL addon with pgvector enabled
- 1 MongoDB addon for application and history storage
- 1 Meilisearch service for search and indexing
- 1 RAG API service for document retrieval and embedding
- 1 Deployment service for the main LibreChat application
- Secret groups for all required environment variables and credentials
This setup provides a stable and ready-to-use chat environment with search, RAG, storage, and access to external model providers.
- Visit the LibreChat template on Northflank
- Click
Deploy LibreChat Now - Click
Deploy stackto save and run the LibreChat template - Northflank will automatically:
- Create the project
- Provision PostgreSQL and MongoDB
- Deploy Meilisearch, RAG API, and the LibreChat service
- Generate public URLs for LibreChat and its APIs
- Once the deployment is complete, open the generated URL to access your LibreChat instance.
You're done, no manual configuration needed.
If you want more control over configuration, you can deploy LibreChat manually. This lets you adjust compute plans, environment variables, and service behaviour.
You can also modify the one-click template if you want to extend or customise the default deployment.
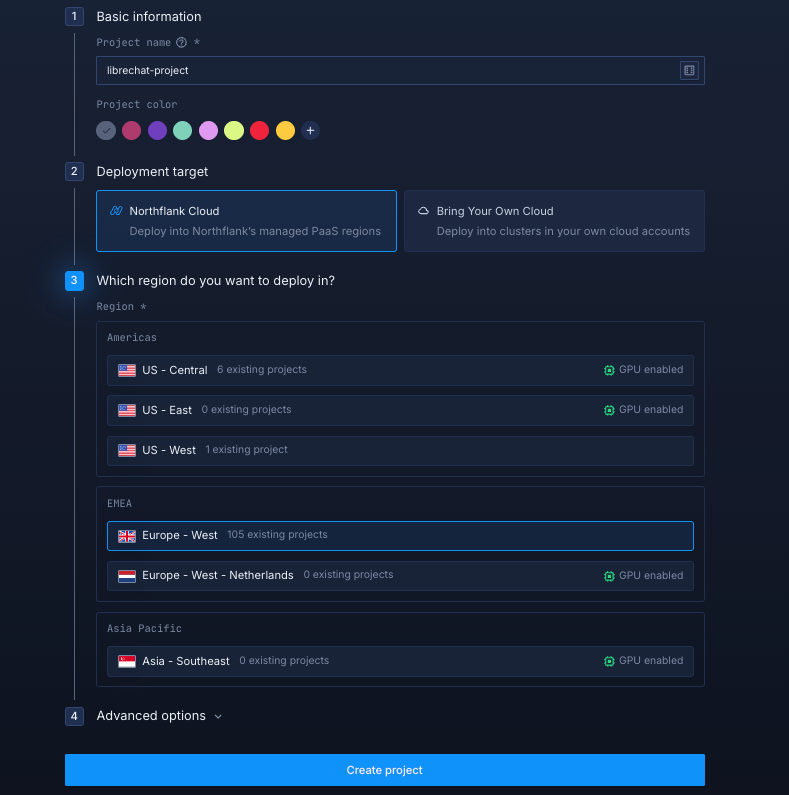
Log in to your Northflank dashboard, then click the “Create new” button (+ icon) in the top-right corner. Then, select “Project” from the dropdown.

Projects serve as workspaces that group together related services, making it easier to manage multiple workloads and their associated resources.
You’ll need to fill out a few details before moving forward.
-
Enter a project name, such as
librechat-projectand optionally pick a colour for quick identification in your dashboard. -
Select Northflank Cloud as the deployment target. This uses Northflank’s fully managed infrastructure, so you do not need to worry about Kubernetes setup or scaling.
(Optional) If you prefer to run on your own infrastructure, you can select Bring Your Own Cloud and connect AWS, GCP, Azure, or on-prem resources.
-
Choose a region closest to your users to minimise latency.
-
Click Create project to finalise the setup.
LibreChat uses:
- PostgreSQL → vector storage for RAG (pgvector)
- MongoDB → chat history, configuration, user data
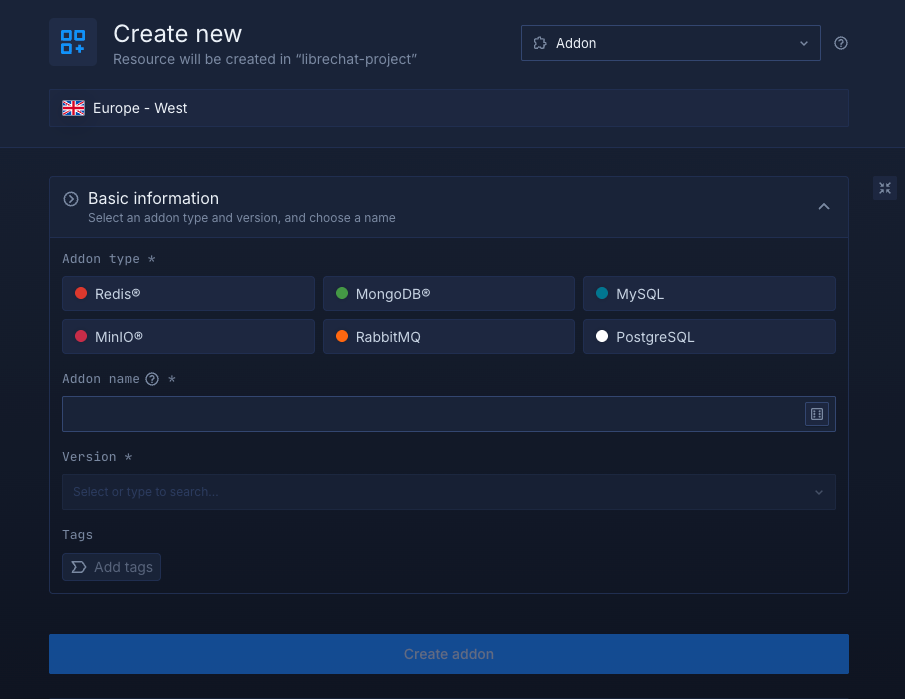
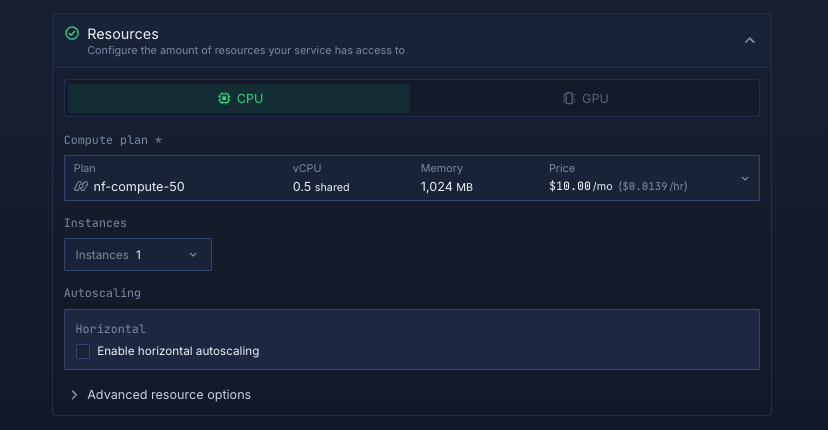
In your project, open the Addons tab in the top menu and click Create new addon. Choose PostgreSQL as the addon type, give it a clear name like librechat-postgres, select a version, and pick a compute plan.
- For testing or early development, the smallest plan is fine.
- For production, it’s best to start with
nf-compute-50so your database has enough resources to stay stable under load.
Click Create addon when you're done.
Repeat the same steps to create a MongoDB addon named librechat-mongo.
Next, navigate to the Secrets tab and click "Create Secret Group." Name it something easy to recognise, such as meilisearch-secrets. This group contains all environment variables required by Meilisearch. You can find the full list of supported variables in the LibreChat documentation.
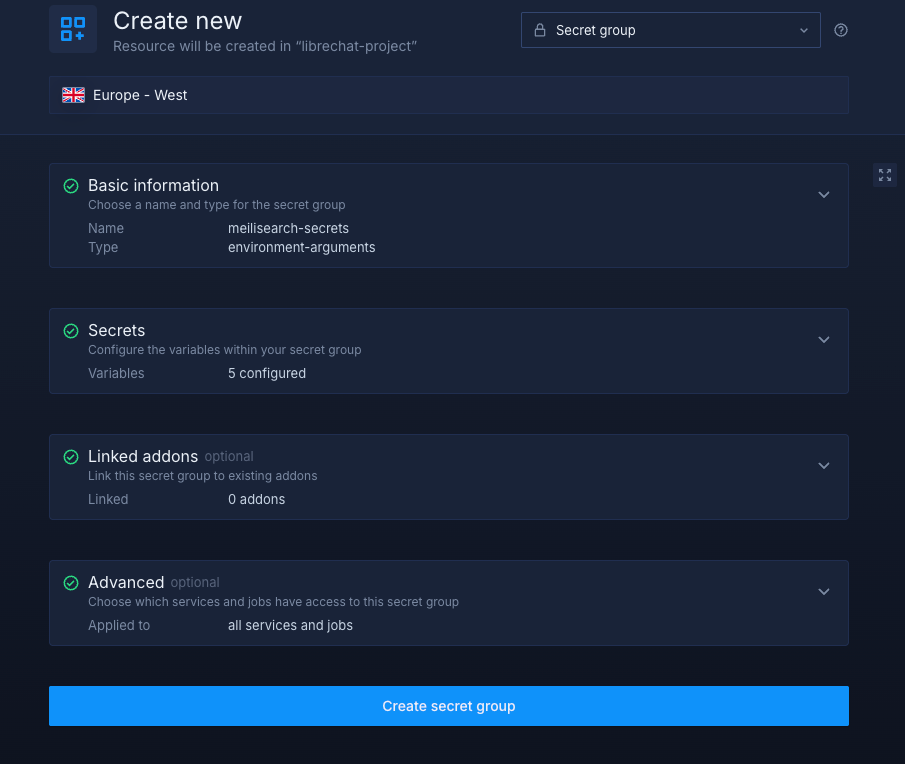
If you don't want to go through the stress of manually configuring or searching for environment variables to use, you can use the already configured ones below:
MEILI_ENV="production"
MEILI_DB_PATH="/meili_data/data.ms"
MEILI_HTTP_ADDR="0.0.0.0:7700"
MEILI_MASTER_KEY="XXXXXXXXXXXXXXXXX"
MEILI_NO_ANALYTICS=true
Note about the values:
MEILI_ENVis set toproductionto enable production mode with optimised performance and security settings.MEILI_DB_PATHspecifies where Meilisearch stores its database files within the container.MEILI_HTTP_ADDRconfigures Meilisearch to listen on all network interfaces at port 7700.MEILI_MASTER_KEYshould be replaced with a secure 32-character master key for API authentication. You can generate one using a password generator or a command likeopenssl rand -base64 32.MEILI_NO_ANALYTICSis set totrueto disable telemetry and analytics collection.
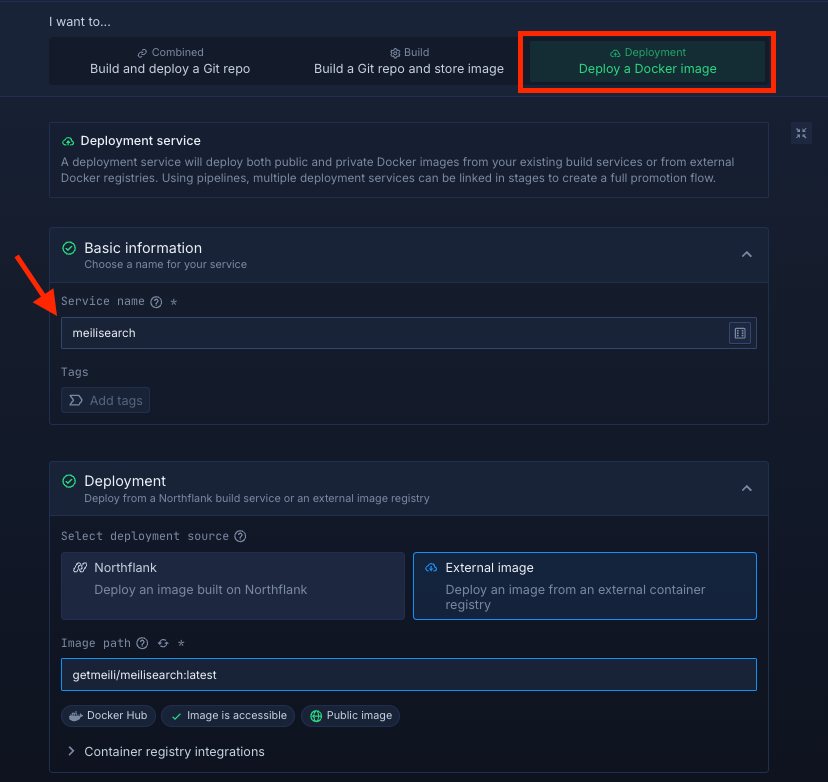
Within your project, navigate to the Services tab in the top menu and click ’Create New Service’. Select Deployment and give your service a name such as meilisearch.
For the deployment source, choose External image and enter the official Meilisearch Docker image: getmeili/meilisearch:latest.
Select compute resources
Choose the compute size that best matches your workload:
- Small plans are fine for testing or lightweight usage.
- Larger plans are recommended for production, as Meilisearch can be resource-intensive under real-world traffic.
The flexibility to adjust resources later means you can start small and scale up as your needs grow.
Set up a port so your app is accessible:
- Port:
7700 - Protocol:
HTTP - Public access: enable this to let people access your LibreChat instance app from the internet
Northflank will automatically generate a secure, unique public URL for your service. This saves you from having to manage DNS or SSL certificates manually.

Deploy your service
When you’re satisfied with your settings, click “Create service.” Northflank will pull the image, provision resources, and deploy Meilisearch.
Once the deployment is successful, you’ll see your service’s public URL at the top right corner, e.g.: p01--meilisearch-app--lppg6t2b6kzf.code.run
Return to the Secrets tab and create another secret group, e.g. ragapi-secrets. This group contains all environment variables required by the RAG API service.
If you prefer not to manually collect each environment variable, you can start with this preconfigured set:
DEBUG_RAG_API=false
EMBEDDINGS_PROVIDER="openai"
Note about the values:
DEBUG_RAG_APIis set tofalseto disable debug logging in production. Set totrueif you need detailed logs for troubleshooting.EMBEDDINGS_PROVIDERspecifies which provider to use for generating embeddings. Set toopenaito use OpenAI's embedding models. You'll need to provide your OpenAI API key in the LibreChat service configuration.
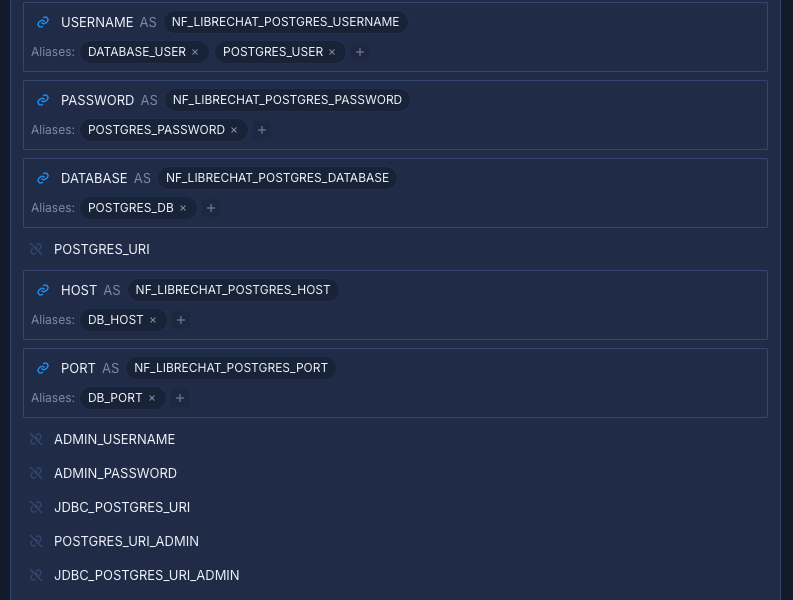
Link the PostgreSQL to your secret group
Northflank addons expose connection details (username, password, host, etc.). Instead of manually copying these values into your secrets, you can link the addon directly to your secret group. This way, whenever the addon rotates credentials, your service automatically receives the updated values.
Map the addon fields as follows:
HOST→DB_HOSTPASSWORD→POSTGRES_PASSWORDDATABASE→POSTGRES_DBUSERNAME→DATABASE_USERandPOSTGRES_USERPORT→DB_PORT
Once done, click Create secret group to save your configuration.
Go to the Services tab and click "Create New Service." Choose Deployment and name your service something like rag-api.
For the deployment source, select External image and enter the official RAG API Docker image: ghcr.io/danny-avila/librechat-rag-api-dev-lite:latest.
Choose compute resources
Pick a compute plan based on your expected load:
- Small plans work well for testing or personal use.
- Larger plans are recommended for production traffic, since RAG operations can be resource-heavy.
You can always scale the resources later.
Set up a port so your app is accessible:
- Port:
8000 - Protocol:
HTTP - Public Access: enable this to allow external access to your RAG API
Northflank will automatically assign a secure public URL, so you don’t need to manage DNS or SSL.
Deploy your service
Click "Create service." Northflank will pull the Docker image and launch the RAG API. When deployment completes, you’ll see the generated public URL in the top right corner, for example: p01--rag-api--lppg6t2b6kzf.code.run
Return to the Secrets tab and create another secret group, e.g. librechat-secrets. This group contains all environment variables required by LibreChat.
If you prefer not to manually collect each environment variable, you can start with this preconfigured set:
PROXY="XXXXXXXXXXXXXXXXX"
HOST="0.0.0.0"
SEARCH=true
CREDS_IV="XXXXXXXXXXXXXXXXX"
NO_INDEX=true
APP_TITLE="LibreChat"
CREDS_KEY="XXXXXXXXXXXXXXXXX"
ENDPOINTS="openAI,agents,assistants,azureOpenAI,google,anthropic,custom"
LOGIN_MAX="7"
GOOGLE_KEY="XXXXXXXXXXXXXXXXX"
JWT_SECRET="XXXXXXXXXXXXXXXXX"
MEILI_HOST="<https://$>{refs.meilisearch.ports.0.dns}"
CONFIG_PATH="<https://raw.githubusercontent.com/LibreChat-AI/librechat-config-yaml/main/librechat-env-l.yaml>"
RAG_API_URL="<https://$>{refs.rag-api.ports.0.dns}"
TITLE_CONVO=true
BAN_DURATION="1000 * 60 * 60 * 2"
BAN_INTERVAL="20"
DEBUG_OPENAI=false
GROQ_API_KEY="$XXXXXXXXXXXXXXXXX"
LOGIN_WINDOW="5"
REGISTER_MAX="5"
CHECK_BALANCE=false
DEBUG_CONSOLE=false
DEBUG_LOGGING=true
DEBUG_PLUGINS=true
GOOGLE_MODELS="gemini-2.5-pro-preview-05-06,gemini-2.5-flash-preview-04-17,gemini-2.0-flash-001,gemini-2.0-flash-exp,gemini-2.0-flash-lite-001,gemini-1.5-pro-002,gemini-1.5-flash-002"
BAN_VIOLATIONS=true
MESSAGE_IP_MAX="40"
OPENAI_API_KEY="XXXXXXXXXXXXXXXXX"
OPENROUTER_KEY="XXXXXXXXXXXXXXXXX"
SESSION_EXPIRY="1000 * 60 * 15"
MISTRAL_API_KEY="user_provided"
REGISTER_WINDOW="60"
ANYSCALE_API_KEY="XXXXXXXXXXXXXXXXX"
LIMIT_MESSAGE_IP=true
MESSAGE_USER_MAX="40"
ALLOW_EMAIL_LOGIN=true
ANTHROPIC_API_KEY="XXXXXXXXXXXXXXXXX"
FIREWORKS_API_KEY="XXXXXXXXXXXXXXXXX"
MESSAGE_IP_WINDOW="1"
OPENAI_MODERATION=false
ALLOW_REGISTRATION=true
ALLOW_SOCIAL_LOGIN=false
JWT_REFRESH_SECRET="XXXXXXXXXXXXXXXXX"
LIMIT_MESSAGE_USER=false
MEILI_NO_ANALYTICS=true
OPENAI_TITLE_MODEL="gpt-3.5-turbo"
PERPLEXITY_API_KEY="XXXXXXXXXXXXXXXXX"
TOGETHERAI_API_KEY="XXXXXXXXXXXXXXXXX"
GITHUB_CALLBACK_URL="/oauth/github/callback"
GOOGLE_CALLBACK_URL="/oauth/google/callback"
MESSAGE_USER_WINDOW="1"
DISCORD_CALLBACK_URL="/oauth/discord/callback"
REFRESH_TOKEN_EXPIRY="(1000 * 60 * 60 * 24) * 7"
FACEBOOK_CALLBACK_URL="/oauth/facebook/callback"
LOGIN_VIOLATION_SCORE="1"
CONCURRENT_MESSAGE_MAX="2"
MESSAGE_VIOLATION_SCORE="1"
ALLOW_SOCIAL_REGISTRATION=false
LIMIT_CONCURRENT_MESSAGES=true
CONCURRENT_VIOLATION_SCORE="1"
NON_BROWSER_VIOLATION_SCORE="20"
REGISTRATION_VIOLATION_SCORE="1"
CUSTOM_FOOTER="XXXXXXXXXXXXXXXXX"
MONGO_INITDB_ROOT_PASSWORD="XXXXXXXXXXXXXXXXX"
Here are the most important ones to pay attention to:
HOST="0.0.0.0"allows the service to listen on all interfaces.SEARCHenables Meilisearch-powered search.CREDS_IV,CREDS_KEY,JWT_SECRET, andJWT_REFRESH_SECRETshould be replaced with secure, randomly generated values.MEILI_HOSTandRAG_API_URLuse Northflank's built-in service reference system to automatically track service DNS.ENDPOINTSdefines which model providers LibreChat will allow.- API keys like
OPENAI_API_KEY,GOOGLE_KEY,ANTHROPIC_API_KEY, etc., should be replaced with your own keys. - Rate-limiting variables (
LOGIN_MAX,MESSAGE_IP_MAX, etc.) help prevent abuse. ALLOW_REGISTRATIONandALLOW_EMAIL_LOGINcontrol how users can sign up or log in.MONGO_INITDB_ROOT_PASSWORDcan be auto-populated once you link the MongoDB addon.
Link the MongoDB addon to your secret group
Just like with PostgreSQL, you can link the MongoDB addon so your secrets always stay in sync.
Map the fields like this:
HOST→MONGOHOSTPASSWORD→MONGOPASSWORDDATABASE→MONGO_INITDB_ROOT_USERNAMEUSERNAME→MONGOUSERPORT→MONGOPORTMONGO_SRV→MONGO_URI,MONGO_URL, andMONGO_PRIVATE_URL
Click Create secret group to finalise.
Go back to the Services tab and click "Create New Service." Choose Deployment and name the service librechat.
Set the deployment source to External image and use the official Docker image: ghcr.io/danny-avila/librechat-dev:latest
Select compute resources
Like before:
- Small plans are suitable for testing and exploration.
- Larger plans are suitable for teams or production workloads.
LibreChat can be heavy under real usage, so scaling is encouraged.
Expose the application by adding:
- Port:
3080 - Protocol:
HTTP - Public access: enabled to allow users to reach your instance
Northflank automatically configures a secure public URL.
Deploy your service
Click Create service to launch LibreChat. When the deployment finishes, Northflank will display your public URL, for example: p01--librechat--lppg6t2b6kzf.code.run

Deploying LibreChat on Northflank gives you a complete and secure chat system that supports multiple LLM providers, RAG, search, and user authentication. You can choose the one-click template for a simple launch or build everything manually for complete control.
This setup works well for personal projects, team deployments, or production environments that require a private, flexible AI chat interface.