
How to build and deploy a Model Context Protocol (MCP) server
In this guide, you’ll containerize a simple MCP server, push it to a registry, and build and deploy an MCP server on Northflank as a secure, autoscalable service.
We’ll cover secrets, health checks, networking (HTTP/SSE or WebSocket), and how to point your MCP client at the hosted endpoint.
If you prefer, you can deploy any existing Docker/OCI image directly from a container registry; Northflank runs persistent services and one-off jobs from public or private images.
A Model Context Protocol (MCP) server is a process that exposes tools, functions, or external data sources to AI models through a standardized protocol. Think of it as a bridge: the model calls your MCP server, and the server responds with structured results.
- Why it matters: MCP servers give AI models safe, auditable access to external systems.
- How it works: The server speaks the MCP protocol (via HTTP/SSE or WebSocket). A client (such as an AI assistant or agent framework) connects to it and can call the tools you’ve defined.
- Use cases: Wrapping APIs, databases, or internal business logic so that AI models can interact with them in a controlled way.
If you’re searching for how to run an MCP server, how to build an MCP server, or how to deploy an MCP server, the steps below show you exactly how to do it in a production-grade environment.
- A minimal HTTPS MCP server (Python example with FastMCP + Starlette)
- A Northflank combined service that exposes your MCP endpoint over HTTPS with environment variables managed as secrets
MCP supports multiple transports. We’ll use HTTPS in this example.
- A Northflank account and project
- Github linked with your Northflank account
- (Optional) A domain you can point to Northflank for pretty URLs (Northflank will still give you an HTTPS endpoint)
This is the first step in building an MCP server before deployment.
Below is a tiny Python example using FastMCP and Starlette to expose MCP over HTTP/SSE. (Any MCP server that supports HTTP/SSE or WebSocket will work similarly.)
app.py
# app.py
import json
import logging
from starlette.applications import Starlette
from starlette.responses import JSONResponse, PlainTextResponse
from starlette.routing import Route
from starlette.requests import Request
from starlette.middleware import Middleware
from starlette.middleware.cors import CORSMiddleware

from mcp.server.fastmcp import FastMCP

# Basic MCP server with two example tools
mcp = FastMCP("Example MCP")

@mcp.tool()
def add(a: int, b: int) -> int:
    """Add two numbers."""
    return a + b

@mcp.tool()
def multiply(a: int, b: int) -> int:
    """Multiply two numbers."""
    return a * b

# HTTP endpoints: /mcp for requests, /health for health checks
async def mcp_handler(request: Request):
    payload = await request.json()
    # Delegate to FastMCP to process the MCP message & return a response
    result = await mcp.handle_http(payload)
    return JSONResponse(result)

async def health(_request: Request):
    return PlainTextResponse("ok", status_code=200)

routes = [
    Route("/mcp", endpoint=mcp_handler, methods=["POST"]),
    Route("/health", endpoint=health, methods=["GET"]),
]

middleware = [
    Middleware(CORSMiddleware, allow_origins=["*"], allow_methods=["*"], allow_headers=["*"]),
]

app = Starlette(routes=routes, middleware=middleware)
Notes
- If your SDK doesn’t include a helper like
handle_http, adapt to your framework’s request/response handling per your MCP SDK docs.- For WebSocket transport, you’d create a
/wsroute and speak the MCP WebSocket protocol. (There are community transports and gateways if you prefer WS.)
requirements.txt
mcp>=0.1.0
fastmcp>=0.1.0
starlette>=0.47.2
uvicorn>=0.30
Dockerfile
# Use a slim Python image
FROM python:3.12-slim

WORKDIR /app

# System deps (if needed) and security updates
RUN apt-get update -y && apt-get install -y --no-install-recommends \
    ca-certificates curl && rm -rf /var/lib/apt/lists/*

# Install Python deps
COPY requirements.txt .
RUN pip install --no-cache-dir -r requirements.txt

# Copy app
COPY app.py .

# Northflank will pass PORT; default to 8080 for local runs
ENV PORT=8080
EXPOSE 8080

# Start the HTTP server
CMD ["uvicorn", "app:app", "--host", "0.0.0.0", "--port", "8080"]
Push this code to your Github repository.
- In your Northflank project, choose Services → Create service.
- Choose Combined service and select your code repository.
Northflank can build and run container images continuously, and handle HA, restarts, and scaling for you.
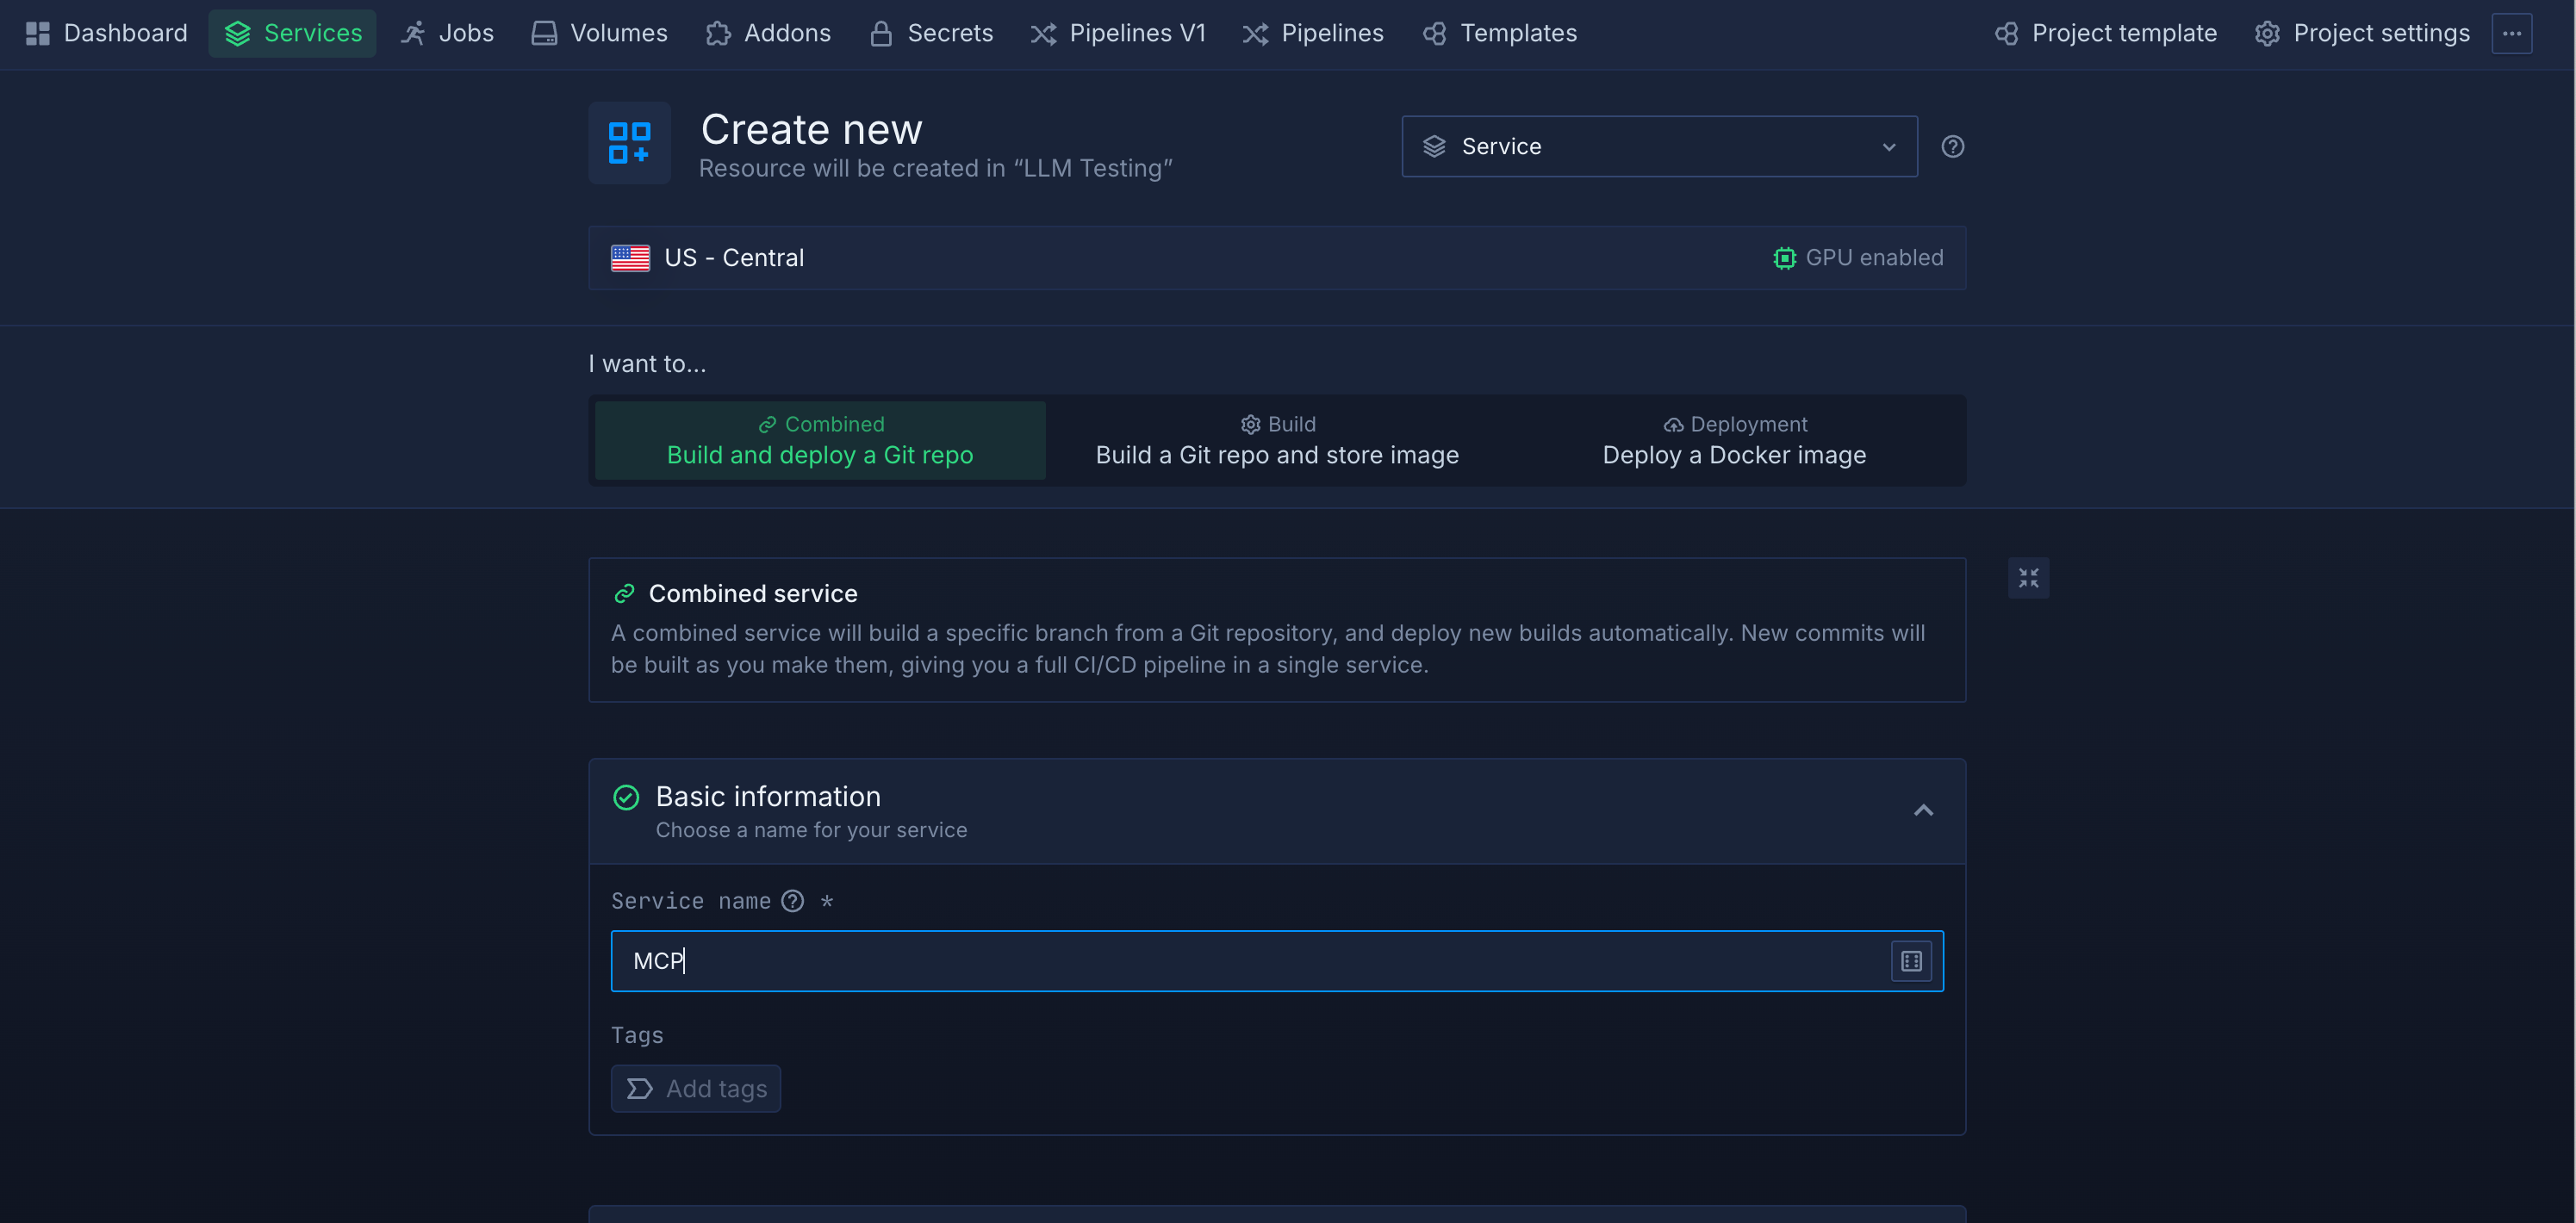
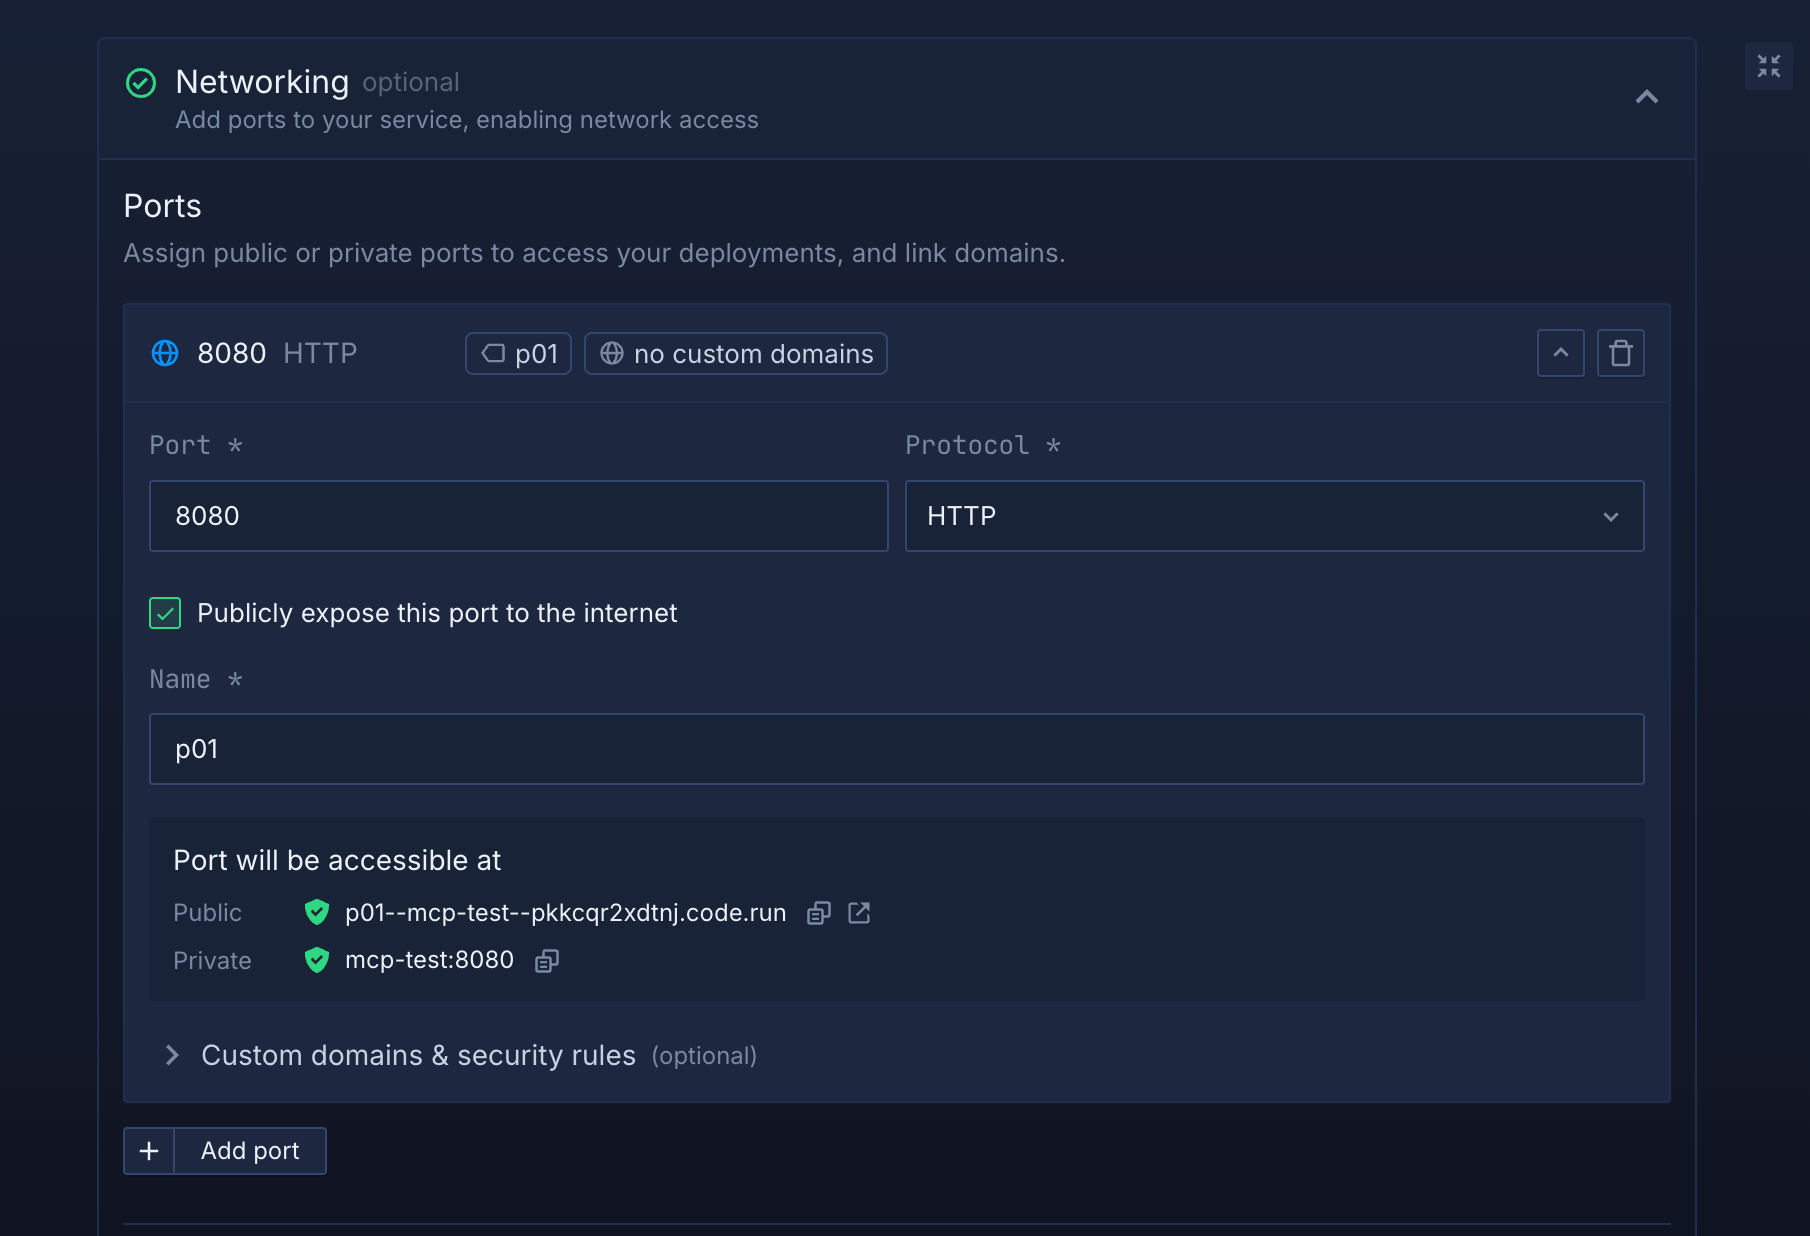
- Ports: add an HTTP port (e.g., 8080).
- Protocol: HTTP (Northflank will terminate TLS and give you an HTTPS URL).
- (Optional) Custom domain: attach your domain to the service’s HTTP port.
Add environment variables under Runtime variables or via Secret groups. This is ideal for API keys your MCP tools might need.
- Go to Secure → Secret groups, create one, and add variables (e.g.,
OPENAI_API_KEY,MY_BACKEND_URL). - Link the secret group to your service so the variables are injected at runtime.
- If you need mounted files (certs, config), use Secret files.
Priority: variables set directly on the service override inherited secret group values.
Add an HTTP health check on /health to get fast, accurate readiness/liveness signals. (The sample app above exposes that path.) This helps Northflank keep your service healthy and restart on failure.
- Vertical: choose the right CPU/RAM plan.
- Horizontal: increase replicas; Northflank load balances HTTP traffic across instances.
- Consider adding a cache or database add-on if your MCP server maintains state or needs persistence; you can link add-on secrets directly to your workloads.
Once deployed, your service will have an HTTPS base URL like:
https://<your-service>.code.runPoint your MCP client at:
-
HTTP/SSE endpoint:
POST https://.../mcp(and use SSE if your client supports streaming). -
Include auth headers or keys as your client/server expects (supply via Northflank secrets).
MCP’s Streamable HTTP transport supports POST/GET and optional SSE for multi-message streaming
If your client expects WebSocket, run a WS route (e.g., /ws) or place a WS/SSE gateway in front of your server. Community gateways exist that bridge WebSocket/SSE for MCP.
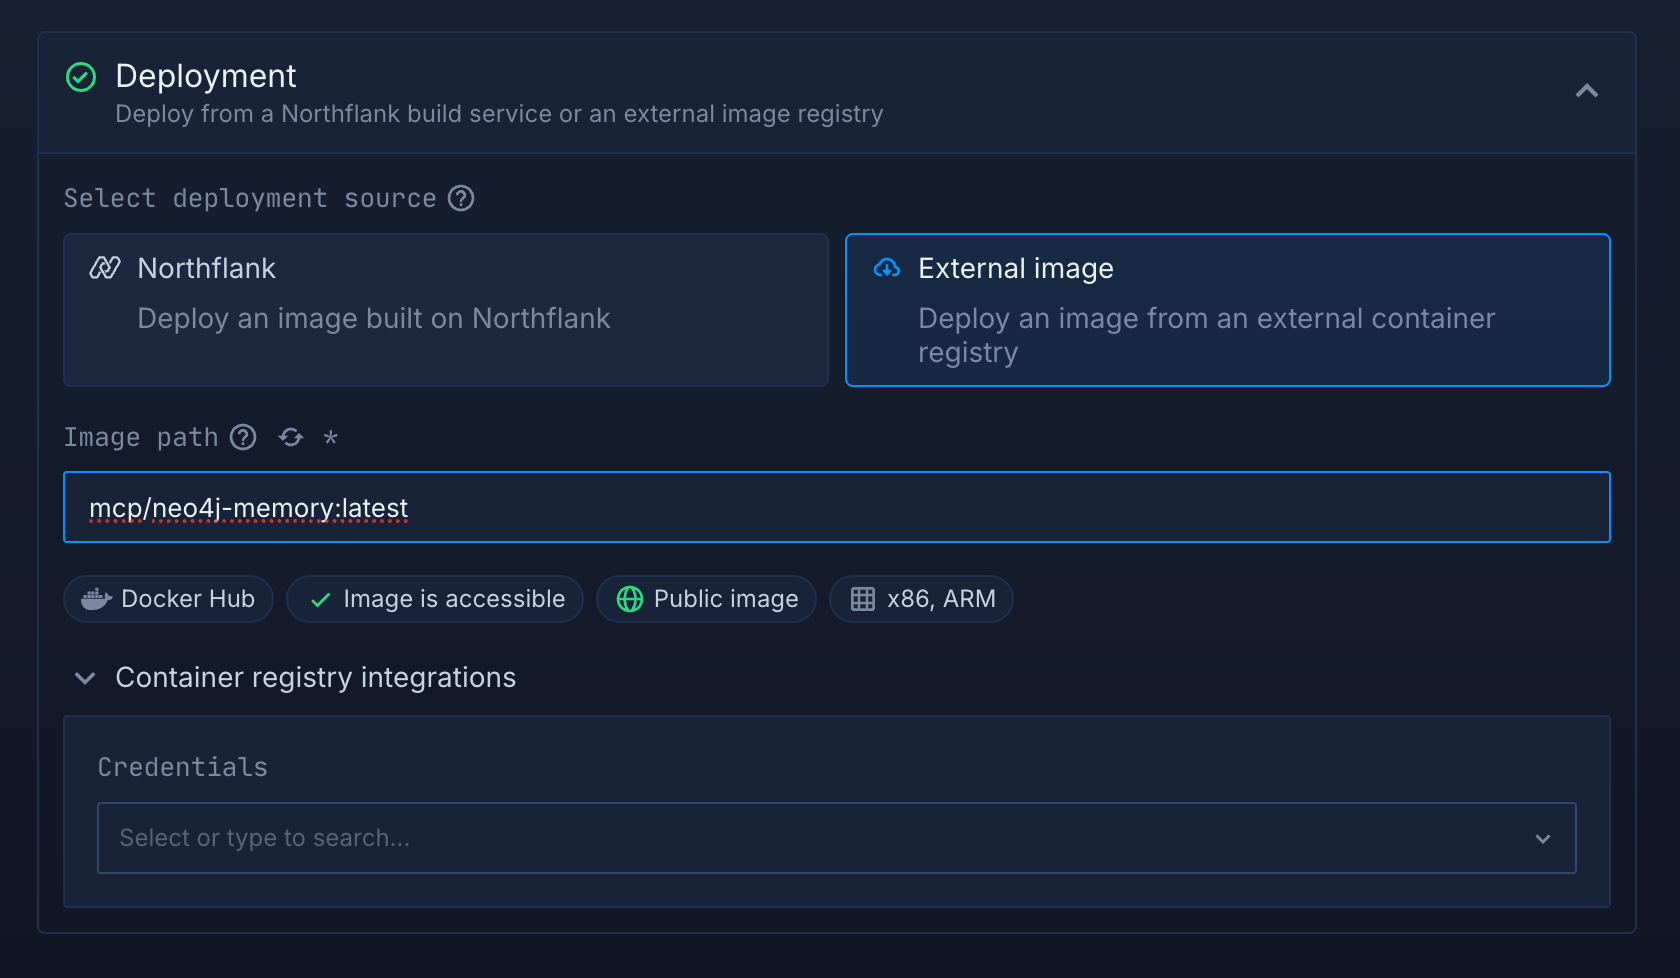
If you don’t want to build an MCP server from scratch, you can still deploy an MCP server using a prebuilt image.
- Create a Deployment service
- Enter the image path (public or private)
- Set the command/entrypoint and PORT if required by that image
- Add runtime variables and expose port 8080 HTTP.
You can also explore community/reference MCP servers for ready-made examples.
- Container won’t start
- Check logs in the service UI; verify the container listens on
0.0.0.0:$PORT.
- Check logs in the service UI; verify the container listens on
- Health check failing
- Ensure
/healthreturns200and that your HTTP port & path match the check.
- Ensure
- 403/401 from endpoint
- Confirm secrets are set and injected (service variables or linked secret group).
- No streaming
- Make sure your client and server both support MCP’s Streamable HTTP with SSE; otherwise use plain HTTP or a WS/SSE transport/gateway.
- Stateful tools
- Add a database add-on and link its secrets; avoid using admin credentials from apps.
Running an MCP server in production means you need more than a container runtime. You need uptime guarantees, secure secret storage, and the ability to scale without manual intervention. That’s where Northflank fits:
- Persistent services – keep your MCP server online 24/7 with automatic restarts and health checks
- Built-in HTTPS ingress – every service gets a production-ready TLS endpoint, no extra config
- Secrets & config management – inject API keys and environment variables securely at runtime
- Autoscaling – run a single container or scale to many replicas with load balancing
- Multi-cloud ready – deploy into your own cloud or run on Northflank’s managed infrastructure
Instead of wiring these pieces together yourself with Kubernetes or VM scripts, Northflank gives you everything you need to build and deploy MCP servers in a production-grade environment.