
How to self-host Qwen3-Coder on Northflank with vLLM
Qwen3-Coder is Alibaba’s most advanced open-source coding model, designed for agentic code generation, tool use, and long-context reasoning.
It’s a 480B parameter Mixture-of-Experts model (35B active) with support for 256K–1M token context windows. Benchmarks show it matches or outperforms proprietary models like GPT-4.1 and Claude Sonnet on tasks like code repair, repo-wide reasoning, and tool calling.
Released under Apache 2.0, it’s free for commercial use and available on Hugging Face and GitHub.
Qwen3-Coder can generate clean, functional code from natural language prompts.
It’s also great at debugging, offering suggestions to fix errors in code snippets or explaining complex logic. Its agentic capabilities enable it to interact with external tools, like GitHub APIs or IDE plugins, to automate workflows, such as generating pull requests or running tests.
With its browsing capabilities, Qwen3-Coder can fetch and incorporate up-to-date documentation or code samples from the web, making it a versatile assistant for real-world development.
This guide shows you how to self-host Qwen3-Coder on Northflank using vLLM, a high-performance serving engine with OpenAI-compatible API endpoints.
With Northflank, you can have Qwen3-Coder running in minutes.
Northflank simplifies GPU resource management, offers easy scaling, and provides integrated monitoring and logging.
1️⃣ Data privacy: Keep full control over your code, logs, and data in Northflank’s secure cloud.
2️⃣ High performance: Use Northflank’s GPU-powered infrastructure for fast, low-latency inference.
3️⃣ Quick and simple setup: Get Qwen3-Coder running in under an hour.
4️⃣ Scalable infrastructure: Adjust resources easily to match your project’s needs.
5️⃣ No rate-limits: Get Claude Sonnet 4 level performance without any rate-limits and API costs.
- A Northflank account (which you can create here)
- Python installed locally (optional, for interacting with the model via API)
Option 1: One-click deploy
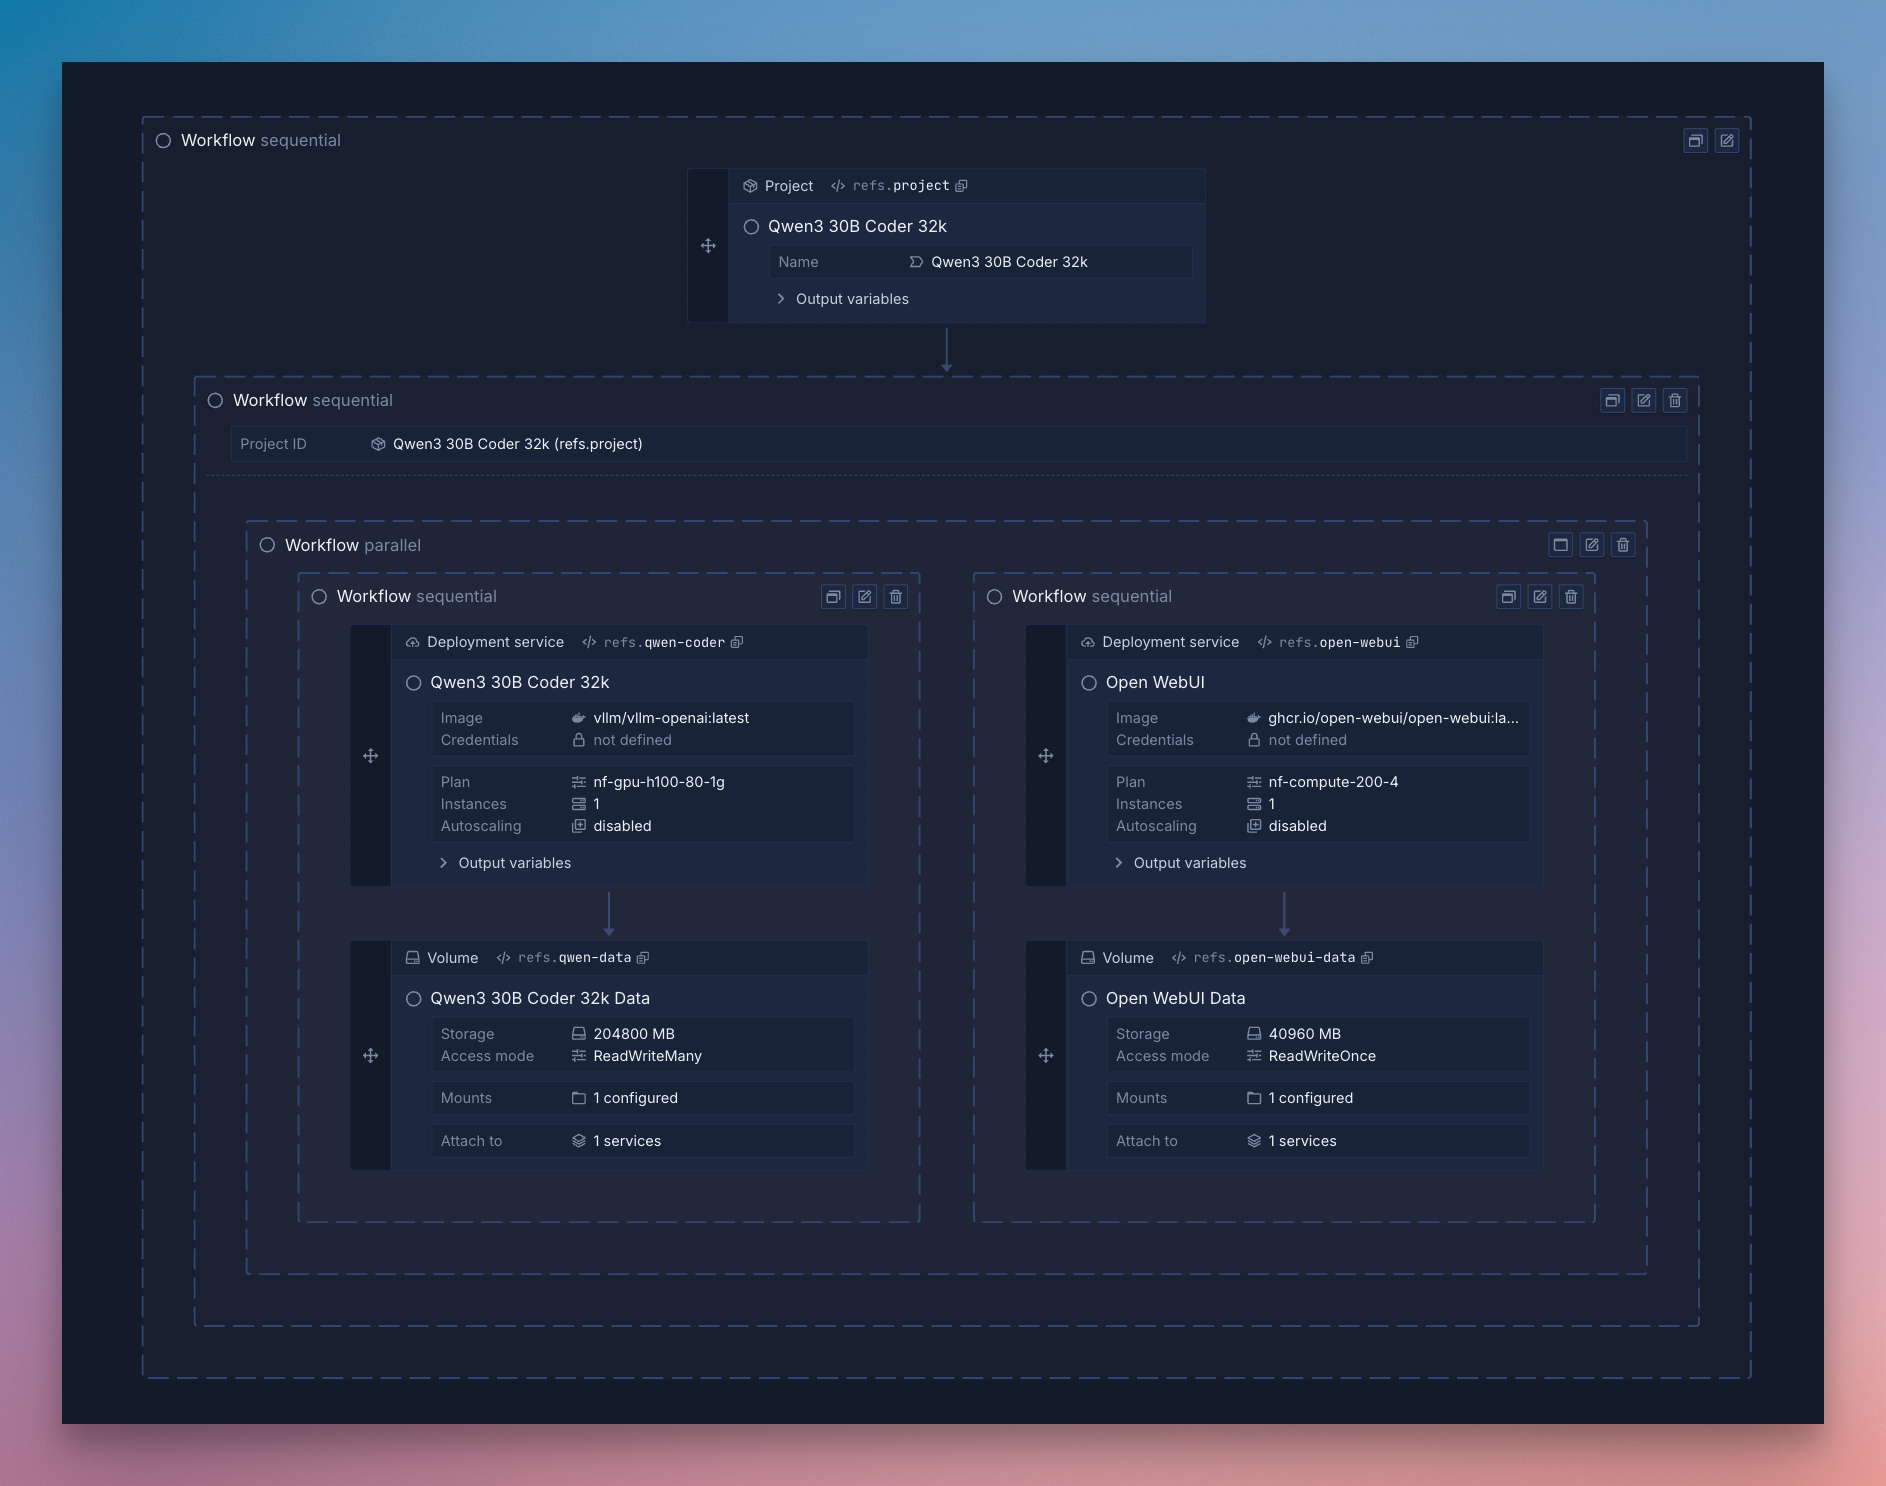
You can deploy Qwen3-Coder with Open WebUI using Northflank’s stack template in one click.
Sign up and configure your Northflank account
You can read the documentation to familiarize yourself with the platform.
Northflank provides templates to deploy Qwen3-Coder with a few clicks.
Deploy the stack to save the template in your team, then run it to create a cluster in Northflank’s cloud with a vLLM service for high-performance inference and an Open WebUI for easy interaction.
For more details on this, see our guide on deploying Qwen3-Coder.
Option 2: Deploy Qwen 3-Coder on Northflank manually
Below are the steps to deploy manually.

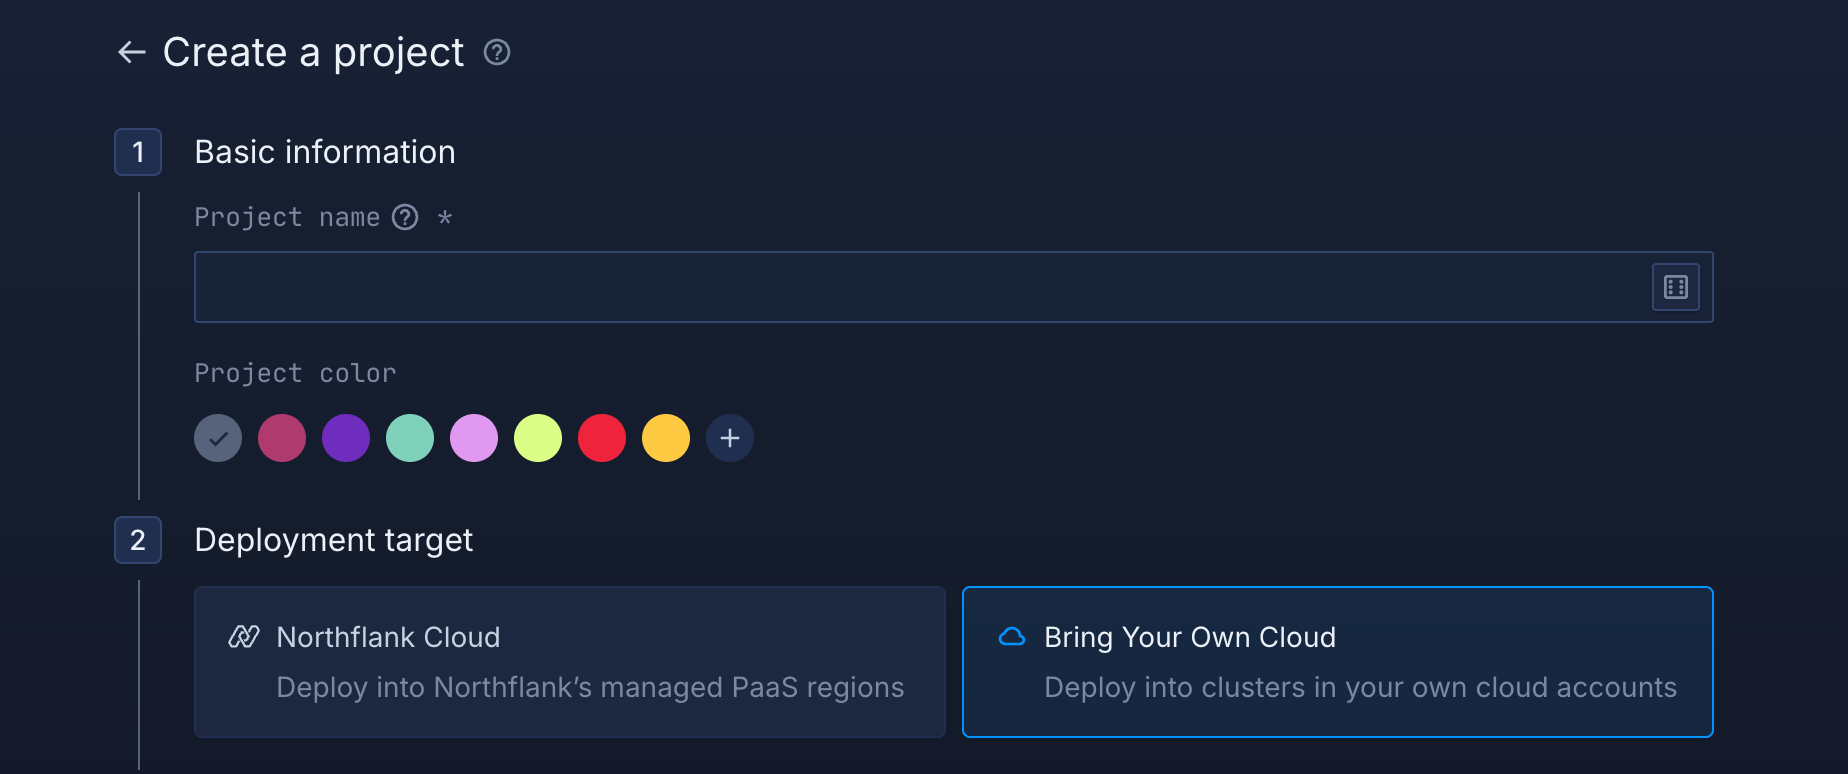
- In your Northflank account, create a new project.
- Name it, select a GPU-enabled region, and click create.
- Create a new service in your project and select deployment.
- Name the service qwen3-coder-vllm and choose external image as the source.
- Use the image path
vllm/vllm-openai:latest. - Add a runtime variable with the key OPENAI_API_KEY and click the key to generate a random value. Select length 128 or greater and copy this to the environment variable value.
- In networking, add port 8000 with http protocol and publicly expose it for this guide.
- Select a GPU deployment plan, and choose Nvidia’s H200 from the GPU dropdown with a count of 8 for high-performance inference.
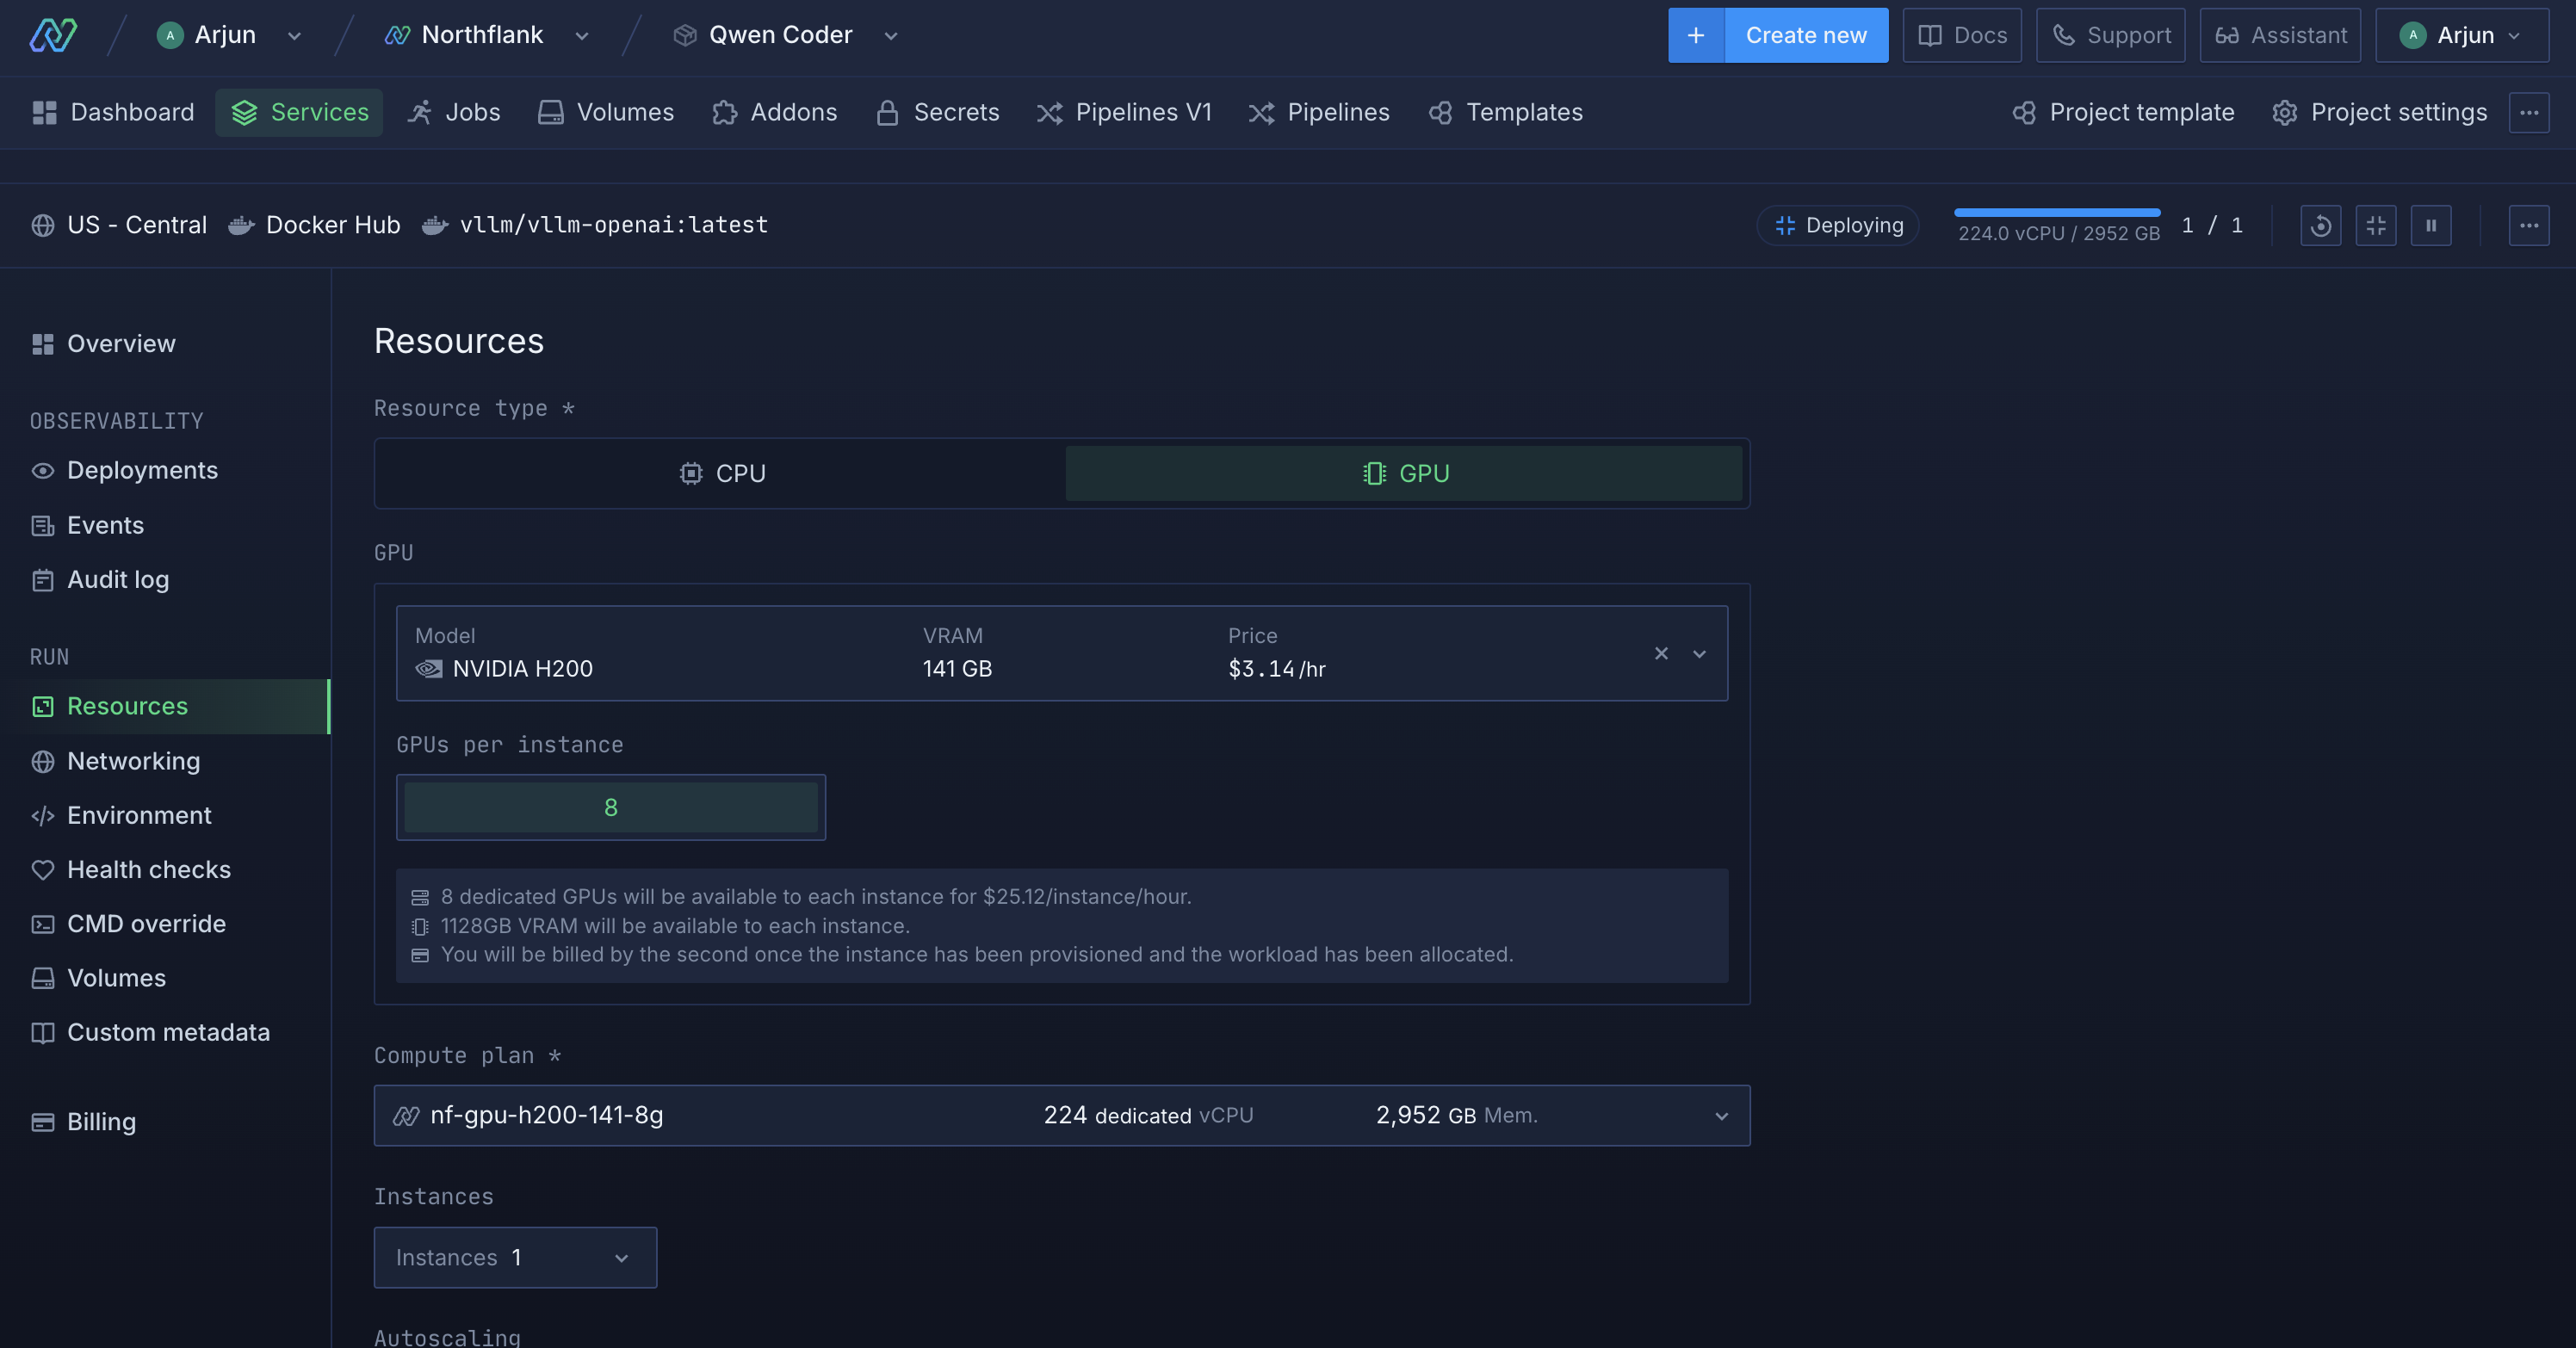
- In advanced options, set a custom command to sleep 1d to start vLLM without loading a default model.
- Click create service.
Containers on Northflank are ephemeral, so data is lost on redeployment. To avoid re-downloading Qwen3-Coder:
- From the service dashboard, go to volumes.
- Add a volume named vllm-models with 1000GB storage.
- Set the mount path to /root/.cache/huggingface for Hugging Face model downloads.
- Click create and attach volume.
- Open the shell in a running instance from the service overview or observability dashboard.
- Download and serve the model with: vllm serve Qwen/Qwen3-Coder.
To automate this, set the entrypoint to bash -c and command to export HF_HUB_ENABLE_HF_TRANSFER=1 && pip install hf-transfer && vllm serve Qwen/Qwen3-Coder-480B-A35B-Instruct-FP8 --tensor-parallel-size 8 --quantization fp8 --enable-expert-parallel.
- Run sample queries: Test Qwen3-Coder with coding prompts, adjusting parameters like output style or latency as needed.
- Keep iterating: One of the best parts of self-hosting is you can adapt as quickly as your business demands.
Use the public code.run URL from the service header (e.g., https://api--qwen-coder-vllm--abc123.code.run/v1/models) to check available models. Interact using OpenAI-compatible APIs in Python or other languages. Here’s a Python example:
-
Create a project directory:
qwen3-project/ ├── .env ├── Dockerfile ├── requirements.txt └── src/ └── main.py -
Add to .env:
# The API key in your service's runtime variables OPENAI_API_KEY=your_api_key_here # The URL from your vLLM service's header OPENAI_API_BASE="https://your-vllm-instance-url/v1" # The model you downloaded and served with vLLM MODEL=Qwen/Qwen3-Coder -
Create Dockerfile:
FROM python:3.9-slim WORKDIR /app COPY requirements.txt . RUN pip install -r requirements.txt COPY . . CMD ["python", "src/main.py"] -
Add requirements.txt:
openai>=1.65.1 openapi>=2.0.0 python-dotenv>=1.0.0 -
Add to main.py:
import os from dotenv import load_dotenv from openai import OpenAI load_dotenv() client = OpenAI( api_key=os.environ.get("OPENAI_API_KEY"), base_url=os.environ.get("OPENAI_API_BASE"), ) completion = client.completions.create( model=os.environ.get("MODEL"), prompt="Write a Python function to sort a list" ) print("Completion result:", completion) chat_response = client.chat.completions.create( model=os.environ.get("MODEL"), messages=[ {"role": "user", "content": "Explain how to optimize a Python loop"} ] ) print("Chat response:", chat_response) -
Run locally with python src/main.py or deploy as a Northflank service.
Optimize Qwen3-Coder by adjusting vLLM arguments, e.g.:
vllm serve Qwen/Qwen3-Coder --tensor-parallel-size 8 --max-model-len 256000 --gpu-memory-utilization 0.85Add debugging environment variables:
VLLM_LOGGING_LEVEL="DEBUG"
NCCL_DEBUG="TRACE"
PYTHONUNBUFFERED=1
Option 3: Bring Your Own Cloud (BYOC)
If you want full control over your infrastructure, Northflank supports BYOC. This lets you run Qwen3-Coder inside your own cloud environment (AWS, GCP, or Azure), while still using Northflank’s developer-friendly UI, deployment automation, and observability tooling.
- Data residency and compliance: Keep workloads and data within your private cloud or VPC.
- Cost optimization: Leverage your own GPU discounts, reserved instances, or spot fleet.
- Enterprise-grade control: Integrate with your existing IAM, networking, and security policies.
- Create/Log in to your cloud provider account
- Sign Up for Northflank
- Create a Northflank account, then enable the BYOC functionality by linking your cloud provider credentials.
- Check your cloud quotas
- Before deploying, ensure you have sufficient quota for the GPU resources you intend to use. Spot instances are cheaper but can be reclaimed by the cloud provider, so you'll want to plan for that.
The rest of the process is the same as Step 2 from Option 2.
The only change for BYOC is that instead of choosing “Northflank’s Cloud” in the project creation, you choose Bring Your Own Cloud.
Conclusion
Self-hosting Qwen3-Coder on Northflank with vLLM gives you a powerful coding assistant with minimal setup.
Northflank’s GPU infrastructure and templates make deployment fast and scalable, so you can focus on coding. Start your Qwen3-Coder project today to boost your development workflow.
Sign up to Northflank, for free, here.