
How to run Claude Code in the cloud
To run Claude Code in the cloud, create a remote coding workspace, authenticate with your Claude account or an API key, add your project, and give Claude a task to complete and test.
- For Anthropic-hosted execution: use Claude Code cloud sessions through the browser or
claude --cloudafter configuring access. - For a managed, configurable workspace: use Northflank Cloud Harnesses to work with your repository, preview the application, and retain workspace files.
- For a server you maintain: install Claude Code on a compatible cloud VM and manage its runtime, access, storage, and process lifetime.
- Before running a task: confirm authentication, install project dependencies, run baseline tests, and review permissions.
- Before finishing: inspect the changes, rerun tests, save your work, and pause or remove resources you no longer need.
Run Claude Code in the cloud with Northflank Cloud Harnesses, or book a demo to discuss running coding agents in your team’s infrastructure.
Claude Code can run in Anthropic-hosted cloud sessions, a managed coding workspace, or a cloud server you maintain. In each case, the agent works on a remote machine, so your laptop does not have to run the project’s development tools and tests.
This guide explains how to choose an approach, then shows you how to run Claude Code in the cloud with Northflank: authenticate, prepare a workspace, fix a failing test, preview the application, and retain your work between sessions.
Use Anthropic-hosted sessions for its built-in cloud workflow, a managed workspace for configurable development infrastructure, or a VM when you want to maintain the environment yourself.
| Approach | Best for | What you configure |
|---|---|---|
| Anthropic-hosted Claude Code sessions | Delegating repository tasks through Claude’s cloud interface | Repository access, environment setup, network access, and task instructions |
| Northflank Cloud Harnesses | Teams and developers who need a persistent coding workspace, application previews, and infrastructure choice | Repository, agent authentication, runtime resources, storage, ports, and workspace access |
| Your own cloud VM | Teams that want to administer the machine and development environment directly | Claude Code installation, OS updates, project toolchain, credentials, networking, and process management |
Open Claude Code on the web, connect GitHub, select your repository and environment, and submit a task. You can review the changes and create a pull request when the work is ready. Access depends on your Claude plan and organisation settings.
With cloud access configured, you can also start a new task from your repository’s local terminal:
claude --cloud "Run the tests and explain any failures before changing code."For a GitHub-backed session that clones your branch, push the commits you want it to use first. This command launches Claude’s cloud workflow; it does not create a Northflank workspace.
A cloud VM gives you a remote machine to administer. You install Claude Code and the project toolchain, configure authentication, and arrange for processes to survive SSH disconnections. Follow the Claude Code system requirements, including at least 4 GB of RAM, and allow additional capacity for builds and tests.
A managed workspace provides controls around that machine. Northflank brings agent selection, repository setup, application ports, persistent storage, and resource monitoring into one interface. This is useful when your team wants to work on the application without assembling those workspace controls itself.
You can run on Northflank’s managed cloud or use bring your own cloud (BYOC), where Northflank acts as the control plane to run Claude Code and its workspace inside your cloud account and VPC. The Claude model service remains separate from the workspace.
Connect a development branch and work through a task you can review. Create a Cloud Harness, or book a demo to discuss your team’s infrastructure requirements.
You need a Northflank account, Claude authentication, and a Git integration if you want to connect a repository:
- A Northflank account with permission to create a Cloud Harness in your project.
- A Claude account with Claude Code access, or an Anthropic API key, for agent authentication.
- A Git integration if you want to connect an existing repository.
Use a development branch of your project, or continue without a repository and create the small Node.js example below. The example uses built-in Node.js modules and needs no third-party packages. For this example, use Node.js 24 LTS. After creating the harness, run node --version in the Cloud Harness shell and confirm it reports v24.x. If Node.js is missing or a different version is installed, configure the runtime before continuing.
For a Northflank workspace or a VM, budget for the development infrastructure and Claude usage separately. A Claude subscription does not pay for your separately hosted compute, and workspace hosting does not include unlimited model usage.
- Claude account authentication: use an account with Claude Code access; your plan’s usage limits and organisation policies apply.
- Anthropic API key: model requests use API billing. Treat this as separate from your Claude subscription.
- Workspace infrastructure: account for the resources you configure, storage, and applicable transfer. Northflank’s pricing includes free, Pay-as-you-go, and Enterprise plans; paid resources are prorated to the second. Size the workspace for Claude Code and your project’s builds and tests.
In the Cloud Harness, choose the authentication method you intend to use, then check /status inside Claude Code. An API key configured alongside a subscription login can change which credential the CLI uses. The authentication settings explain that precedence.
Pause the workspace when you no longer need its running processes. Check retained storage and other allocated resources separately when estimating the bill.
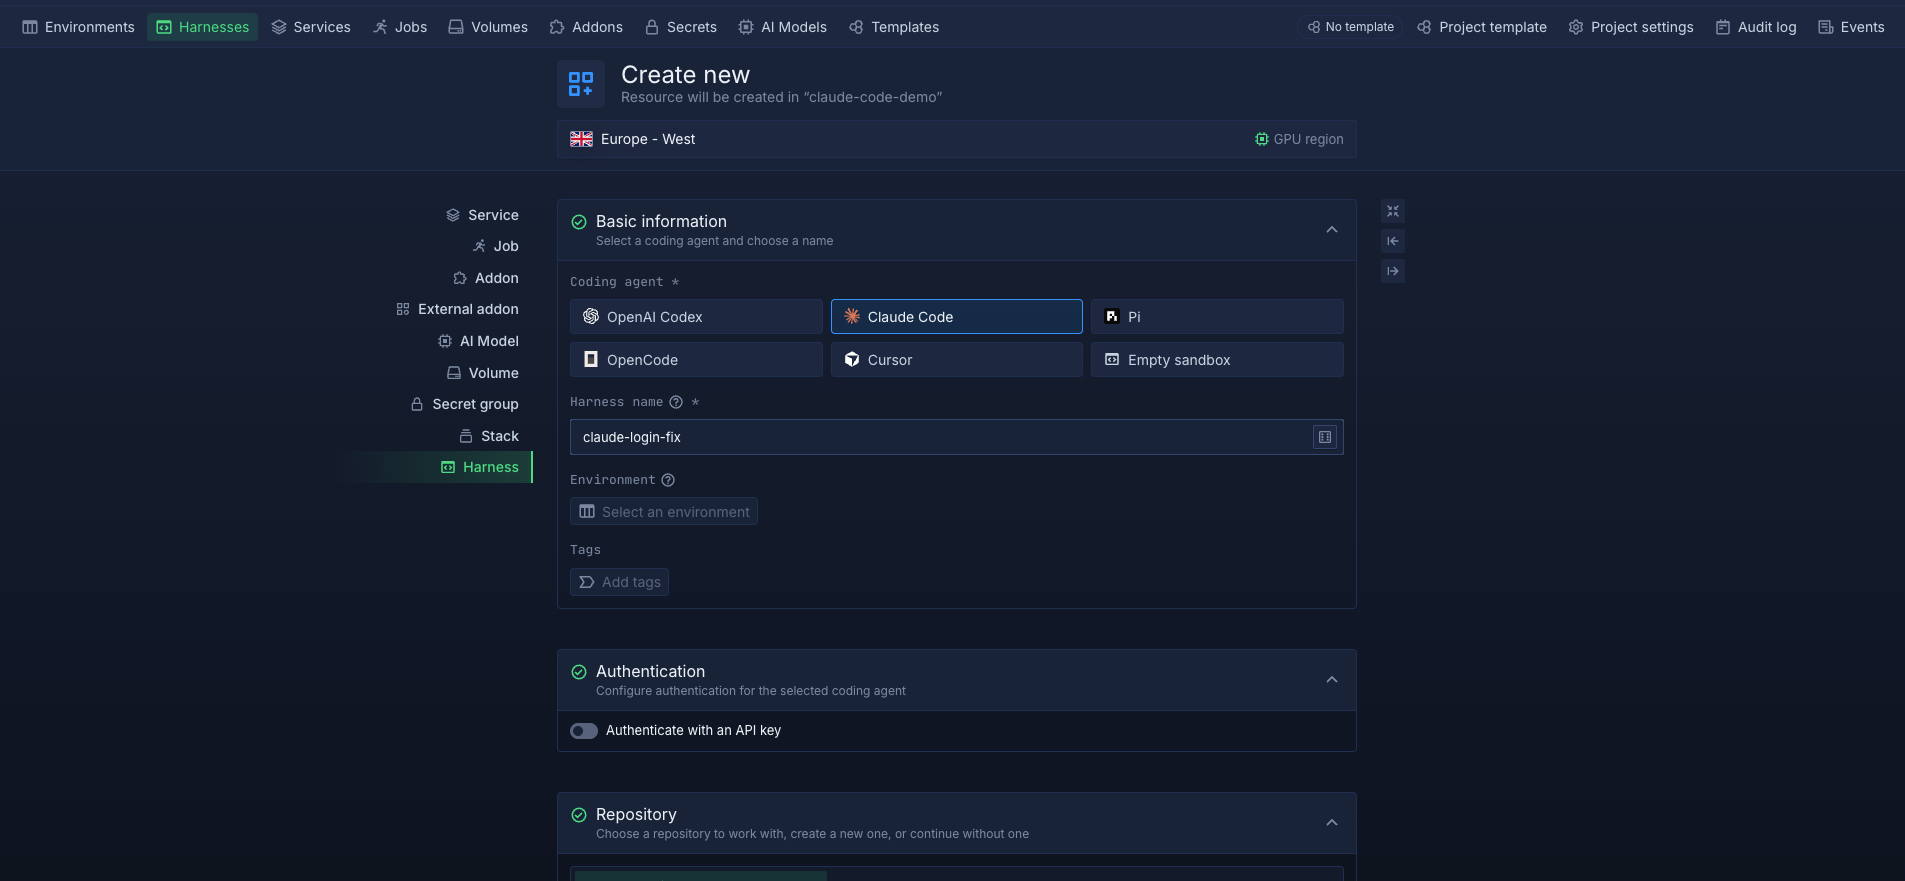
Create the workspace from the Northflank dashboard using the Cloud Harness quickstart.
- Create or open a project. A project groups related resources. To create a project, select Create project, enter a name, choose Northflank Cloud or Bring Your Own Cloud under Deployment target, select a region, and create the project. Then open Harnesses and select Create harness.
- Select Claude as the coding agent.
- Name the Cloud Harness, for example
claude-health-check. - Select the environment where it should run.
- Choose authentication. Under Authentication, select an API key or a linked account.
- Choose a repository. Under Repository, select an existing repository and branch, create a new repository, or continue without one.
- Review Advanced options. Choose privacy and review runtime variables, the runtime image, resources, and workspace storage. Select Team privacy if you need SSH or authorised teammates to connect; Private workspaces use the in-app terminal. Keep Persist workspace files enabled to retain your work. Privacy and persistence cannot be changed after creation.
- Select Create Harness. Northflank opens the terminal. Complete the agent sign-in if prompted.
For BYOC, your cluster also needs a supported microVM runtime and compatible nodes; follow the prerequisites in the linked quickstart before creating the harness.
The remaining walkthrough takes place in this Northflank Cloud Harness. Use the Northflank dashboard for workspace settings, the Cloud Harness shell for terminal commands, and the Claude Code session for prompts and slash commands. A shell reached through SSH still runs commands in the remote harness. Prepare the project before asking Claude to edit files.
In the Cloud Harness shell, enter your existing project’s directory, follow its setup instructions, install dependencies, and run its tests before editing. Review unfamiliar installation scripts before running them. The example below needs no package installation.
In the Northflank dashboard, open your Cloud Harness, select Environment in the right sidebar, and select Edit. Add the runtime variables or secret files your application requires, then select Update & restart to apply them. These controls are part of Cloud Harness configuration.
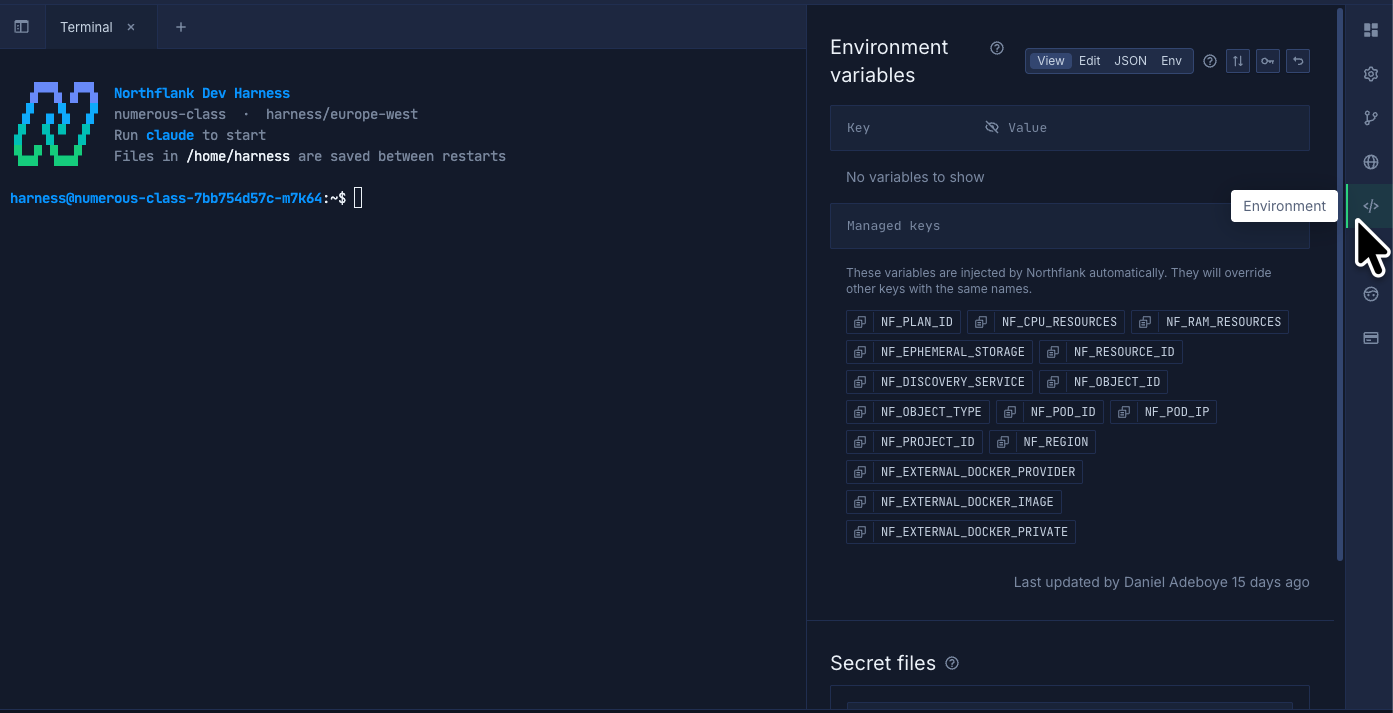
Add only the development credentials the project needs. Keep baseline test results so you can identify new failures.
Inside the Claude Code session running in your Cloud Harness, review Claude Code’s permission settings before giving it a task. Keep approval checks enabled for actions that need your review, and use Plan mode to inspect Claude’s proposed approach before allowing edits.
The cloud workspace and Claude Code’s built-in Bash sandbox provide different controls: the latter restricts sandboxed shell commands and their child processes. If you want to use this additional control, run /sandbox inside Claude Code to check its availability and status.
Enable it if you intend to rely on it, review its filesystem and network settings, and test a project command inside it. On Linux, check its required dependencies and runtime support. Review unsandboxed fallback settings before treating it as an enforced boundary. See the Bash sandbox setup for configuration details.
Inside your Northflank Cloud Harness, give Claude Code a small failing test with a clear expected result. Use your project’s tests, or follow the optional example below: create the files and run the baseline in the Cloud Harness shell, then give the task prompt to the Claude Code session.
This example serves a /health endpoint that incorrectly returns starting instead of ok. It also tests that an unknown route still returns HTTP 404.
In the Cloud Harness shell, create and enter a new directory. If the terminal currently shows Claude’s prompt, exit that session to return to the shell first. Run these commands remotely in the harness:
mkdir /home/harness/claude-cloud-example
cd /home/harness/claude-cloud-example
Copy this whole block into the Cloud Harness shell, including the final EOF line. It creates server.mjs in the directory you just entered:
cat > server.mjs <<'EOF'
import { createServer } from 'node:http';

export function createApp() {
  return createServer((request, response) => {
    if (request.method === 'GET' && request.url === '/health') {
      response.writeHead(200, { 'Content-Type': 'application/json' });
      response.end(JSON.stringify({ status: 'starting' }));
      return;
    }
    response.writeHead(404);
    response.end('Not found');
  });
}

if (process.argv.includes('--serve')) {
  createApp().listen(3000, '0.0.0.0');
}
EOF
In the same Cloud Harness shell, copy this block to create server.test.mjs alongside it:
cat > server.test.mjs <<'EOF'
import test from 'node:test';
import assert from 'node:assert/strict';
import { createApp } from './server.mjs';

async function withServer(check) {
  const server = createApp();
  await new Promise(resolve => server.listen(0, '127.0.0.1', resolve));
  try {
    await check(`http://127.0.0.1:${server.address().port}`);
  } finally {
    await new Promise(resolve => server.close(resolve));
  }
}

test('health check returns ready status', () => withServer(async base => {
  const response = await fetch(`${base}/health`);
  assert.equal(response.status, 200);
  assert.deepEqual(await response.json(), { status: 'ok' });
}));

test('unknown route returns 404', () => withServer(async base => {
  assert.equal((await fetch(`${base}/missing`)).status, 404);
}));
EOF
Still in /home/harness/claude-cloud-example in the Cloud Harness shell, run the baseline test:
node --test server.test.mjsYou should see one passing test and one failing test: the health response contains starting, while the test expects ok. If you instead see a missing runtime or permission error, resolve that before asking Claude to fix the application.
From /home/harness/claude-cloud-example in the Cloud Harness shell, run claude to open the agent session. Select Plan mode in Claude Code, then paste this prompt into the Claude Code session:
Work in /home/harness/claude-cloud-example.
Run node --test server.test.mjs and identify why the health check fails.
Explain the smallest fix before editing.
Keep the existing tests unchanged and do not add dependencies.
After I approve the plan, fix the endpoint and rerun both tests.
Report the changed file and the test results.
After reviewing the plan, switch out of Plan mode and allow Claude to make the edit and run the tests. Then exit the Claude Code session to return to the Cloud Harness shell and run node --test server.test.mjs yourself from the example directory. Both tests should pass, and the endpoint should return { "status": "ok" }. Review server.mjs to confirm that Claude fixed the response rather than weakening the test.
If you are working in an existing Git repository, run these commands from its directory in the Cloud Harness shell before committing:
git status --short --untracked-files=all
git diff
git diff --cached
If you created the standalone example without Git, skip these Git commands. Keep the two files in the persistent workspace to return later, and copy their contents somewhere outside the harness before deleting it.
For a Git-backed project, open untracked files separately because they are not included in git diff. Check for unrelated edits and secrets, then commit and push through your normal review process. Keep the task and test results with the change so your agent execution audit trail connects the work to its review.
In the Cloud Harness shell, return to the example directory, start the server, and leave it running:
cd /home/harness/claude-cloud-example
node server.mjs --serve
It listens on port 3000 and binds to 0.0.0.0. Next, switch to the Northflank dashboard, open the same Cloud Harness, and select Networking in the right sidebar:
- Select Add port.
- Enter 3000 and select HTTP.
- Enable Publicly expose to make this example’s preview accessible from the internet.
- Select Save changes.
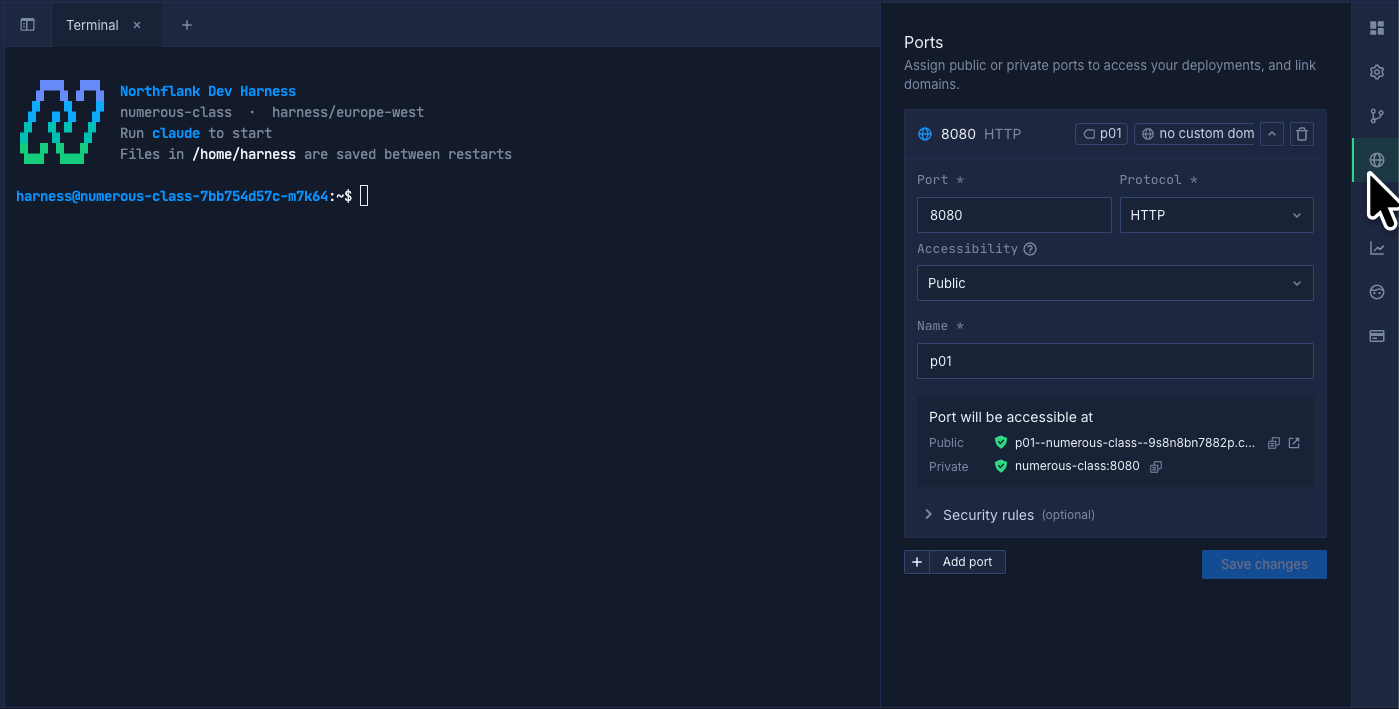
In your web browser, open the public endpoint shown by Northflank and append /health. After the fix, it should display { "status": "ok" }; the root URL returns 404 intentionally. For your own application, use its actual port and bind the server to 0.0.0.0.
Before sharing a public preview, check for debug routes, sensitive data, and missing authentication. Remove public access when the review is complete.
Port exposure controls incoming connections. If you also need outbound restrictions on your own cluster, configure BYOC network policies; without egress rules, outbound traffic is allowed.
You can connect from your local terminal when the Cloud Harness is running, uses Team privacy, and you have permission to access it. Private harnesses use the in-app terminal, including for their creator.
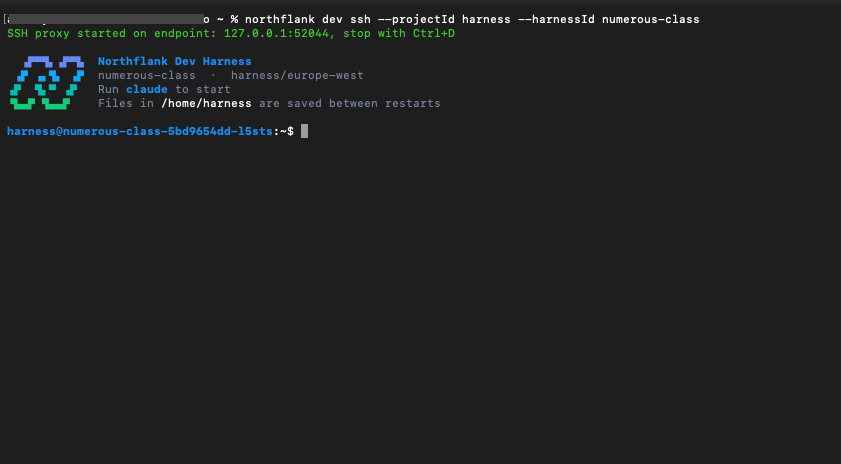
Install and authenticate the Northflank command-line interface (CLI). To connect to your Cloud Harness locally, open its overview in the Northflank dashboard, select Connect under Local access, and copy the generated command. Run it in your local terminal. It has this form:
northflank dev ssh --projectId YOUR_PROJECT_ID --harnessId YOUR_HARNESS_IDUse the dashboard-generated command with your actual project and harness IDs.
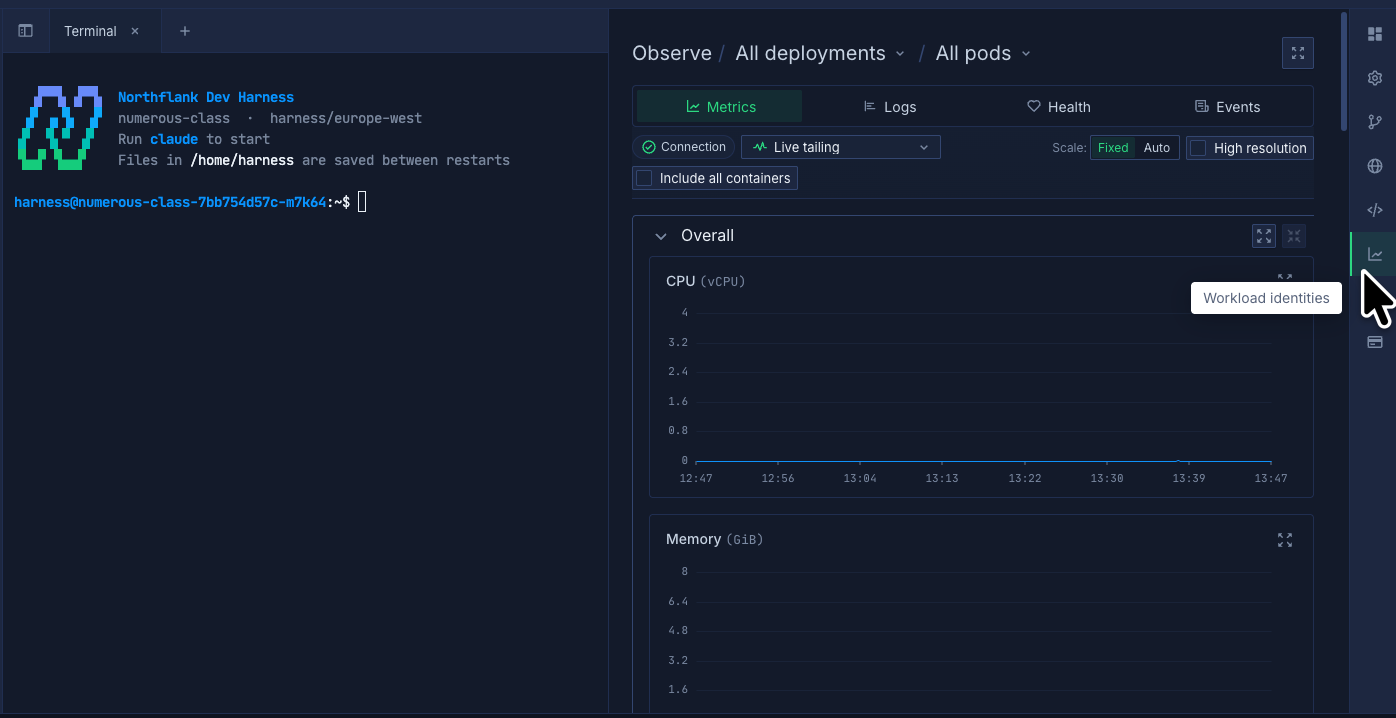
In the Northflank dashboard, open your Cloud Harness and select Observe in the right sidebar to check CPU and memory while Claude runs builds or tests. If resources are constrained, adjust them under Options → Update options, then rerun the task.
In Northflank, pause the Cloud Harness to return to the work later, or delete it after saving the files you need. An active Cloud Harness keeps running until you pause or delete it; closing your terminal does not stop it.
To pause your Cloud Harness, open its overview and select the Pause harness icon in the top-right corner. With persistent workspace storage enabled, files under /home/harness survive, while terminal sessions and running processes stop. Select Resume harness from the overview when you want to continue, then restart any development servers or other processes you need.
Persistent storage defaults to enabled at creation. If you disabled it, files are lost when the container restarts, is redeployed, or stops.
Before deleting, push your commits or export the files you want to keep. Open the three-dot menu in the top-right corner, select Delete harness, and confirm. Deleting a Cloud Harness permanently removes its associated workspace. Revoke temporary credentials at the services that issued them when they are no longer needed.
Check whether the failure is in authentication, project setup, application networking, or workspace state before changing permissions or resources.
| Problem | What to check |
|---|---|
| Claude cannot authenticate or uses the wrong account | In the Claude Code session, run /status. Renew an expired account login with /login, or update the API credential selected for the harness. Check for conflicting environment credentials. |
| The repository is missing or inaccessible | Check the Northflank Git integration, repository permissions, and selected branch. Confirm that the commit you need has been pushed. |
| A command or dependency is missing | Check the runtime image and follow the repository’s installation instructions. For the example, run node --version in the Cloud Harness shell and confirm Node.js 24. |
| The preview does not open | Confirm the server is running, the configured port matches it, and it binds to 0.0.0.0. The example uses port 3000 and the /health path. |
| SSH access fails | Check that the harness is running, uses Team privacy, and that your CLI is authenticated with permission to connect. |
| Files disappear after a restart | Keep work under /home/harness with persistence enabled at creation. Files outside that directory are temporary. Restore lost work from Git or another backup. |
| A resumed workspace has no running server | Pause stops processes. Restart the development server after resuming; persistent files do not preserve a running process. |
Create a Cloud Harness, connect a development branch, and let Claude work on one change you can test and review. Once that workflow works for your project, reuse the environment with clear access and cleanup rules.
Get started with Northflank, or book a demo to discuss your team's infrastructure and security requirements.
Cloud execution changes where your project runs; workspace settings determine how you access it and retain your work.
An active Northflank Cloud Harness keeps running until you pause or delete it, so closing your browser or local terminal does not stop the workspace. A task can still pause for input, fail, or reach an account limit; a running workspace does not guarantee that the task finishes unattended.
A Cloud Harness provides the cloud workspace where Claude Code runs. Claude Code's built-in Bash sandbox separately restricts shell commands and their child processes. Check its status with /sandbox inside Claude Code; workspace configuration and command sandboxing are separate controls.
No. Remote Control lets you interact with a session running on its original machine. Starting it on your laptop does not move execution to a cloud server. A Northflank Cloud Harness runs the workspace remotely; Claude’s --cloud command starts its separate cloud-session workflow.
Yes. On Northflank, teammates with the required permissions can access the same Cloud Harness when it uses Team privacy. Private privacy restricts workspace access to its creator. Share access only with collaborators authorised to use the repository and development credentials.
Yes. With bring your own cloud (BYOC), Northflank acts as the control plane, managing Kubernetes to run Claude Code and its workspace inside your cloud account and VPC. Your team owns the underlying cloud resources; the model service remains separate.
Yes. You can keep files between Claude Code sessions in a Northflank Cloud Harness with persistent workspace storage enabled. Files under /home/harness survive pause and resume, but terminal sessions and processes stop. Restart the processes you need after resuming, and export any files you want to keep before deleting the Cloud Harness.
Continue with the infrastructure and release controls around your coding workspace: