
How to auto-create preview environments on every PR
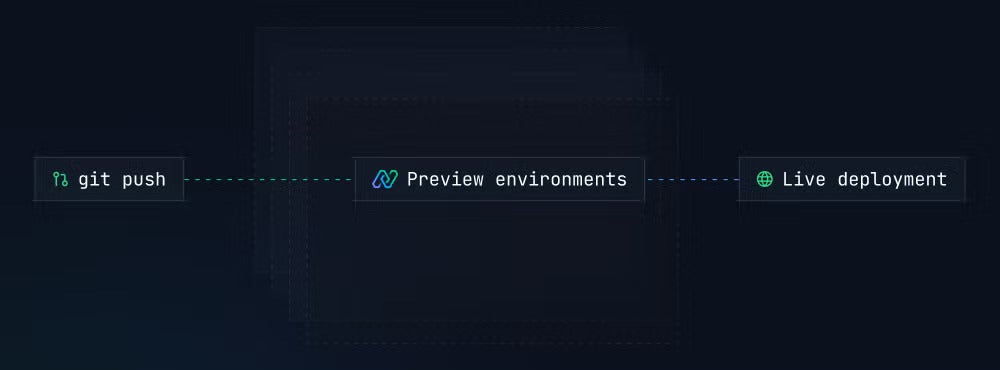
A preview environment is an ephemeral, on-demand environment provisioned when a specific Git event occurs, like opening a pull request (PR) or pushing code to a feature branch. It is tied to that event: when the PR is merged or closed, the environment is destroyed.
Key things to know about preview environments:
- They can be created automatically via Git triggers, removing the need for manual setup
- Each one is typically isolated to a single branch or feature
- Depending on the platform, they can include all the services your app needs: databases, queues, jobs, and microservices
- They can be configured to tear down automatically once the PR is resolved, keeping costs low
- Stakeholders can get a live, shareable URL to review the feature in a real environment
On Northflank, preview environments are full-stack environments built into your pipeline. They are automatically provisioned on every pull request or new commit to a branch, and you get full control over the environment lifecycle, from creation to termination. You can set Git triggers, configure naming conventions, and define active time windows for how long each environment stays running.
If your team is sharing a single staging environment to test every feature before merging, you are likely dealing with deployment queues, conflicting changes, and slow feedback cycles. Preview environments solve this.
Every code change gets its own clean, production-like space to be tested and reviewed, without blocking other developers or polluting a shared environment.
In this guide, you will learn what preview environments are, how they work, how they compare to traditional environments, and how to set up preview environments for pull requests on Northflank, step by step.
A preview environment is a short-lived, isolated environment created on demand to test the code changes in a specific branch before they are merged into the main branch.
Unlike a shared staging environment where all developers are deploying their features at the same time, a preview environment is scoped to a single branch.
This means a developer can validate their changes in isolation, without interference from other developers' code.
To understand the value of preview environments, it helps to look at what goes wrong with the alternative.
In a traditional long-lived staging environment, multiple teams are deploying different features at the same time. That shared environment becomes a bottleneck. When a bug appears, it is often unclear whether the cause is your change, someone else's deployment, or the environment's accumulated state, which tends to diverge from production over time.
Teams end up waiting in a queue to deploy and test. The feedback loop slows down. And because the environment has been running for weeks or months, its configuration may no longer reflect production, making it unreliable as a testing baseline.
Preview environments are designed to address exactly this. Each one is:
- Isolated: only the changes from a single branch are deployed, so there is no cross-contamination from other developers
- Automated: provisioned as soon as a PR is opened or a commit is pushed
- Fresh: created as a clean copy each time, so you are always testing against a consistent baseline
- Ephemeral: destroyed once the PR is resolved, so resources are not running longer than necessary
Here is a direct comparison:
| Characteristic | Traditional environments | Preview environments |
|---|---|---|
| Lifespan | Persistent, long-lived | Ephemeral, short-lived |
| Cost | Higher; resources run continuously | Lower potential cost; resources are not running permanently |
| Sharing | Shared across teams and features | Isolated per branch or PR |
| Accessibility | Typically limited to the engineering team | Can provide a shareable URL accessible to any stakeholder |
| State consistency | Can diverge from production over time | Designed to be a fresh copy each time |
| Feedback cycle | Slower due to shared resource bottlenecks | Faster, with immediate access for review |
The most common trigger for a preview environment is opening a pull request. Here is what the workflow looks like end-to-end:
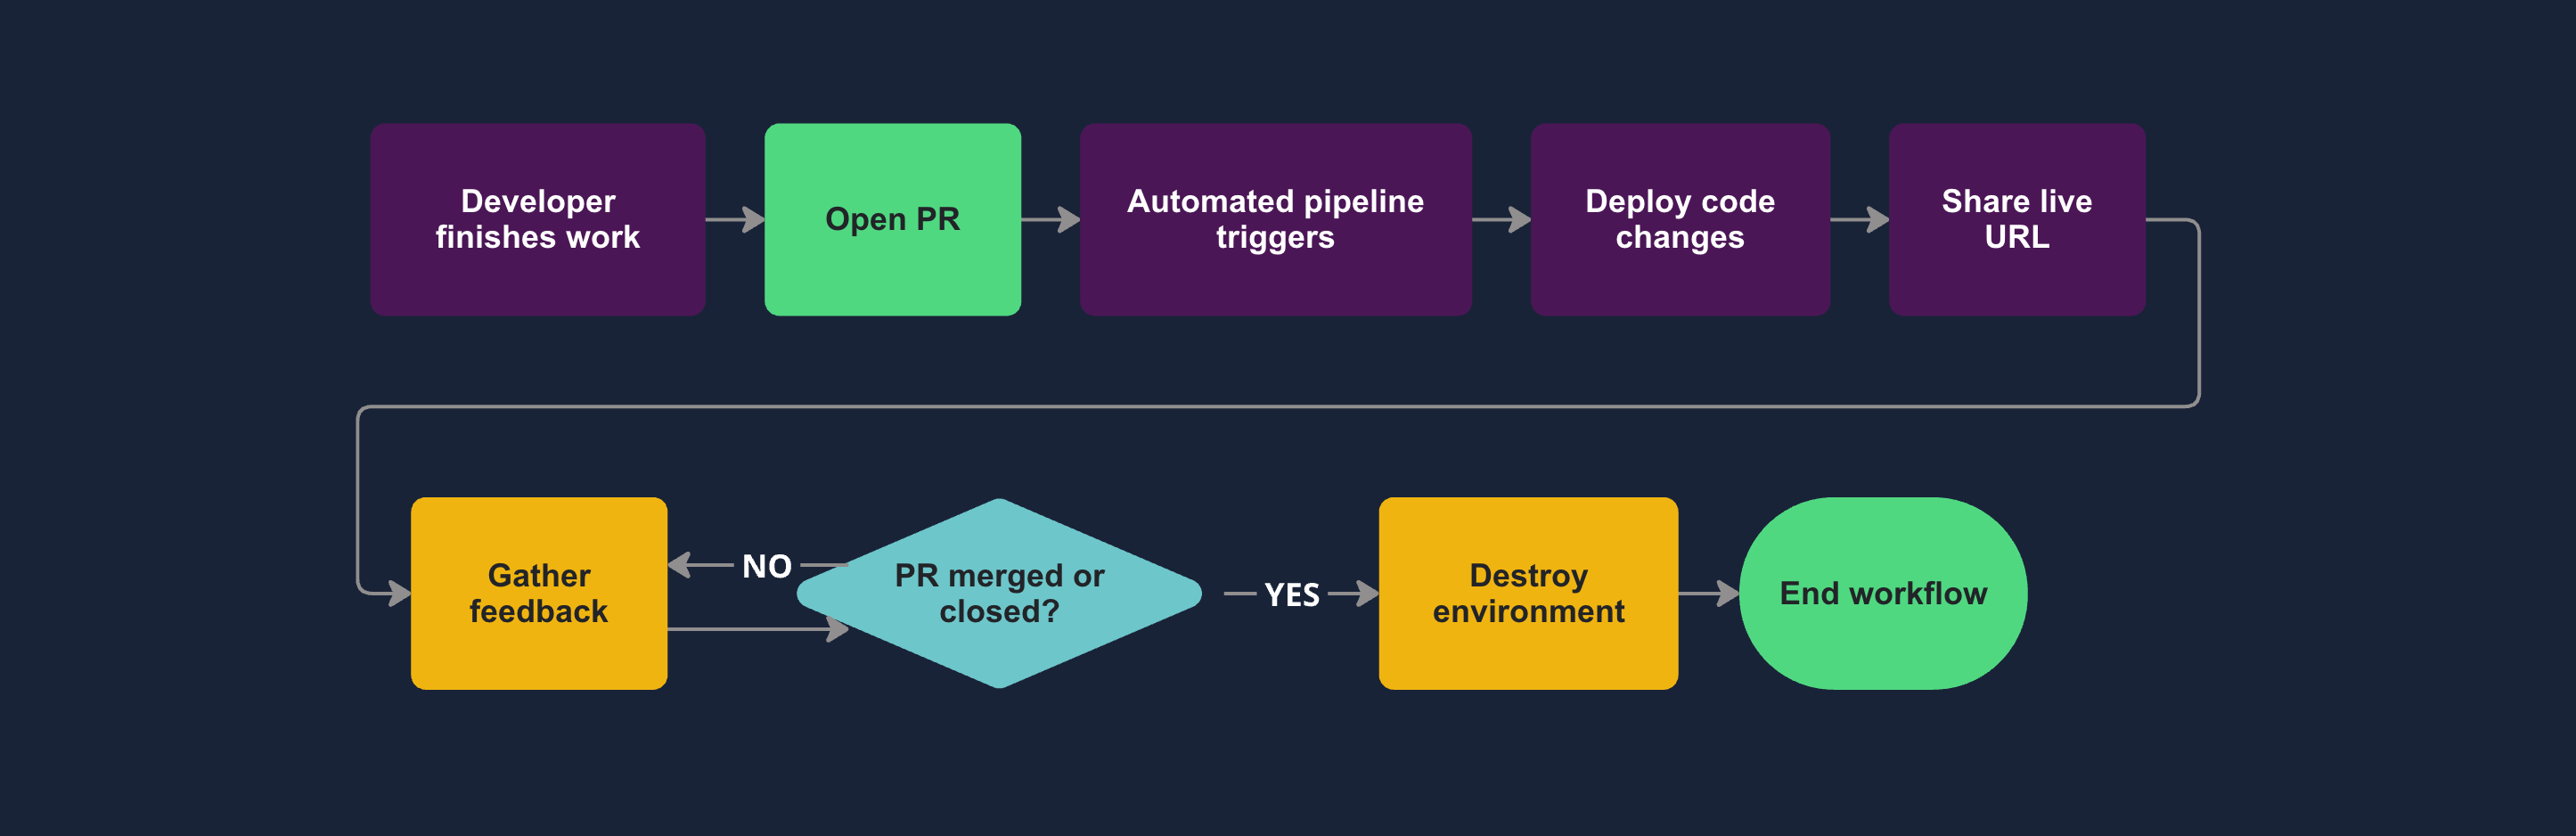
- A developer finishes work on a feature branch and opens a PR
- The PR triggers an automated pipeline that spins up a new preview environment
- The feature's code changes are deployed to that environment
- Stakeholders, QA engineers, product managers, and designers get a live URL to review the feature
- Feedback is gathered from different perspectives, in a real environment, not a local build
- When the PR is merged or closed, the preview environment is automatically destroyed
This workflow removes the coordination overhead of shared staging, gives reviewers a real environment to test against, and shortens the time between writing code and getting feedback.
Northflank supports full-stack preview environments that are built directly into your deployment pipeline. You can include databases, message queues, background jobs, and microservices in a preview, not just the frontend or backend service. A full breakdown of what you can include is covered after the setup steps.
You also have the option to use Northflank's managed infrastructure or bring your own cloud (BYOC) if you want environments deployed into your own cloud account.
Preview environments on Northflank are defined using blueprints, which makes them reproducible and easy to manage at scale. The blueprint specifies the Git trigger, naming convention, included services, and lifecycle rules.
Here is how to get set up:
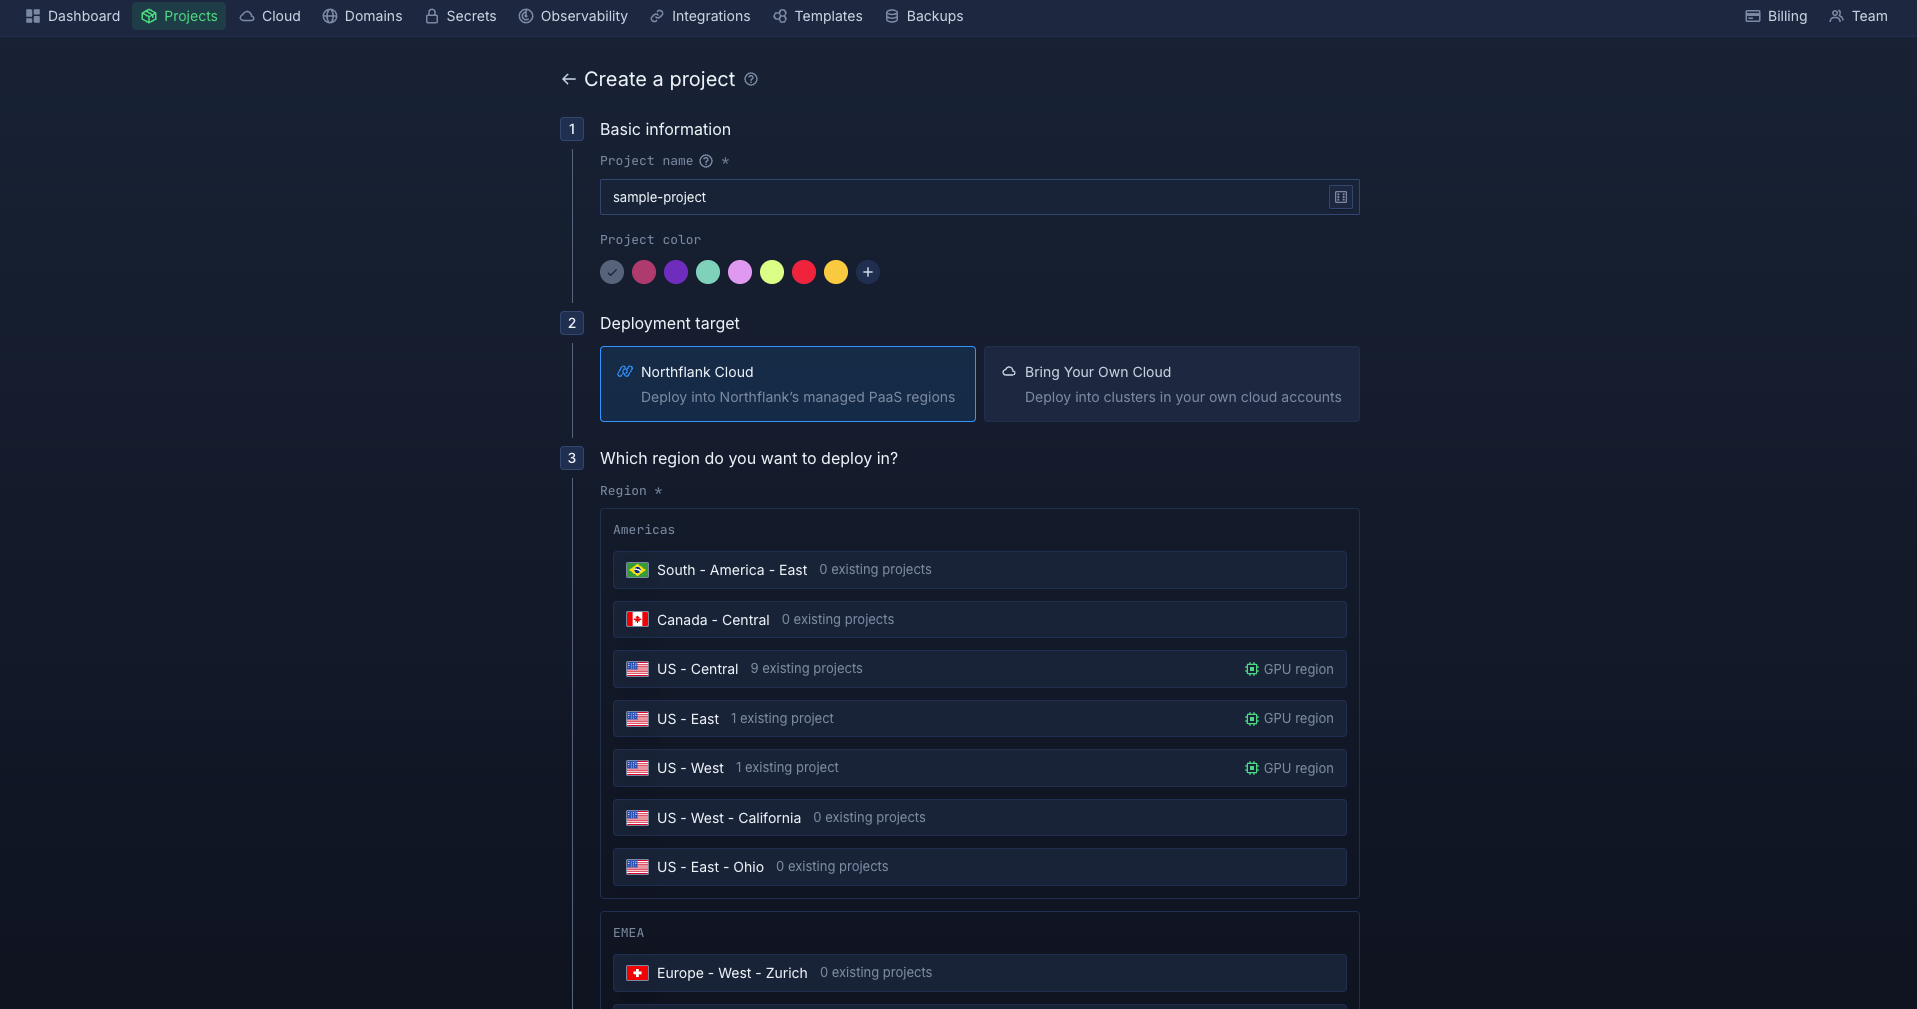
Sign up for a Northflank account if you have not already. Before creating resources, link your Git account so Northflank can watch your repositories for pull request triggers.
Then create a new project and add the resources your application needs, such as services or addons like a database.
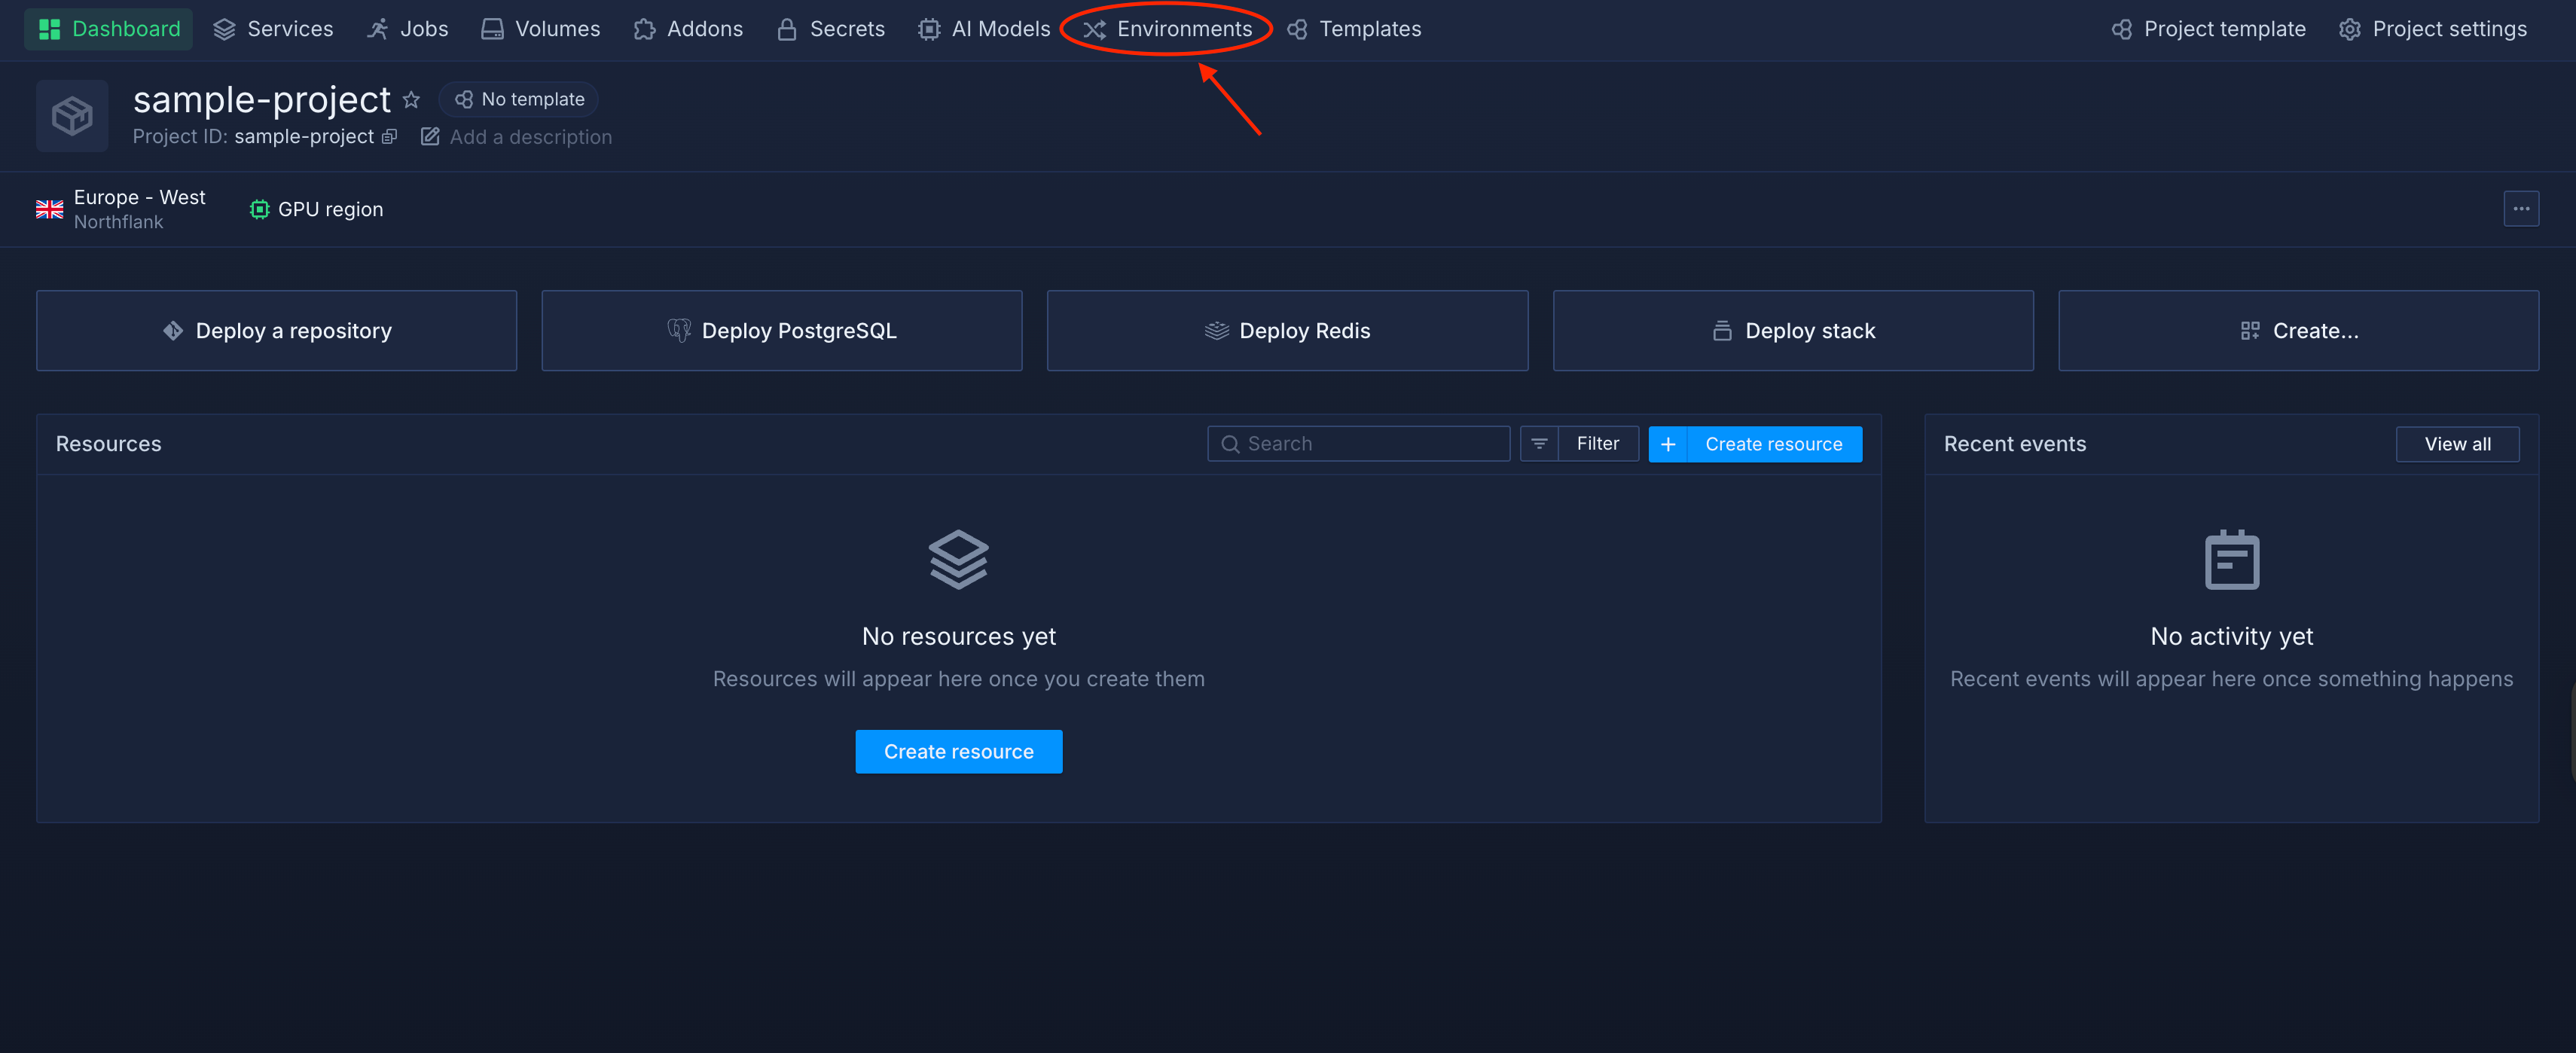
Inside your project, click the Environments tab in the top navigation. This takes you to the Environments board, where you can manage your preview environments and workflows.
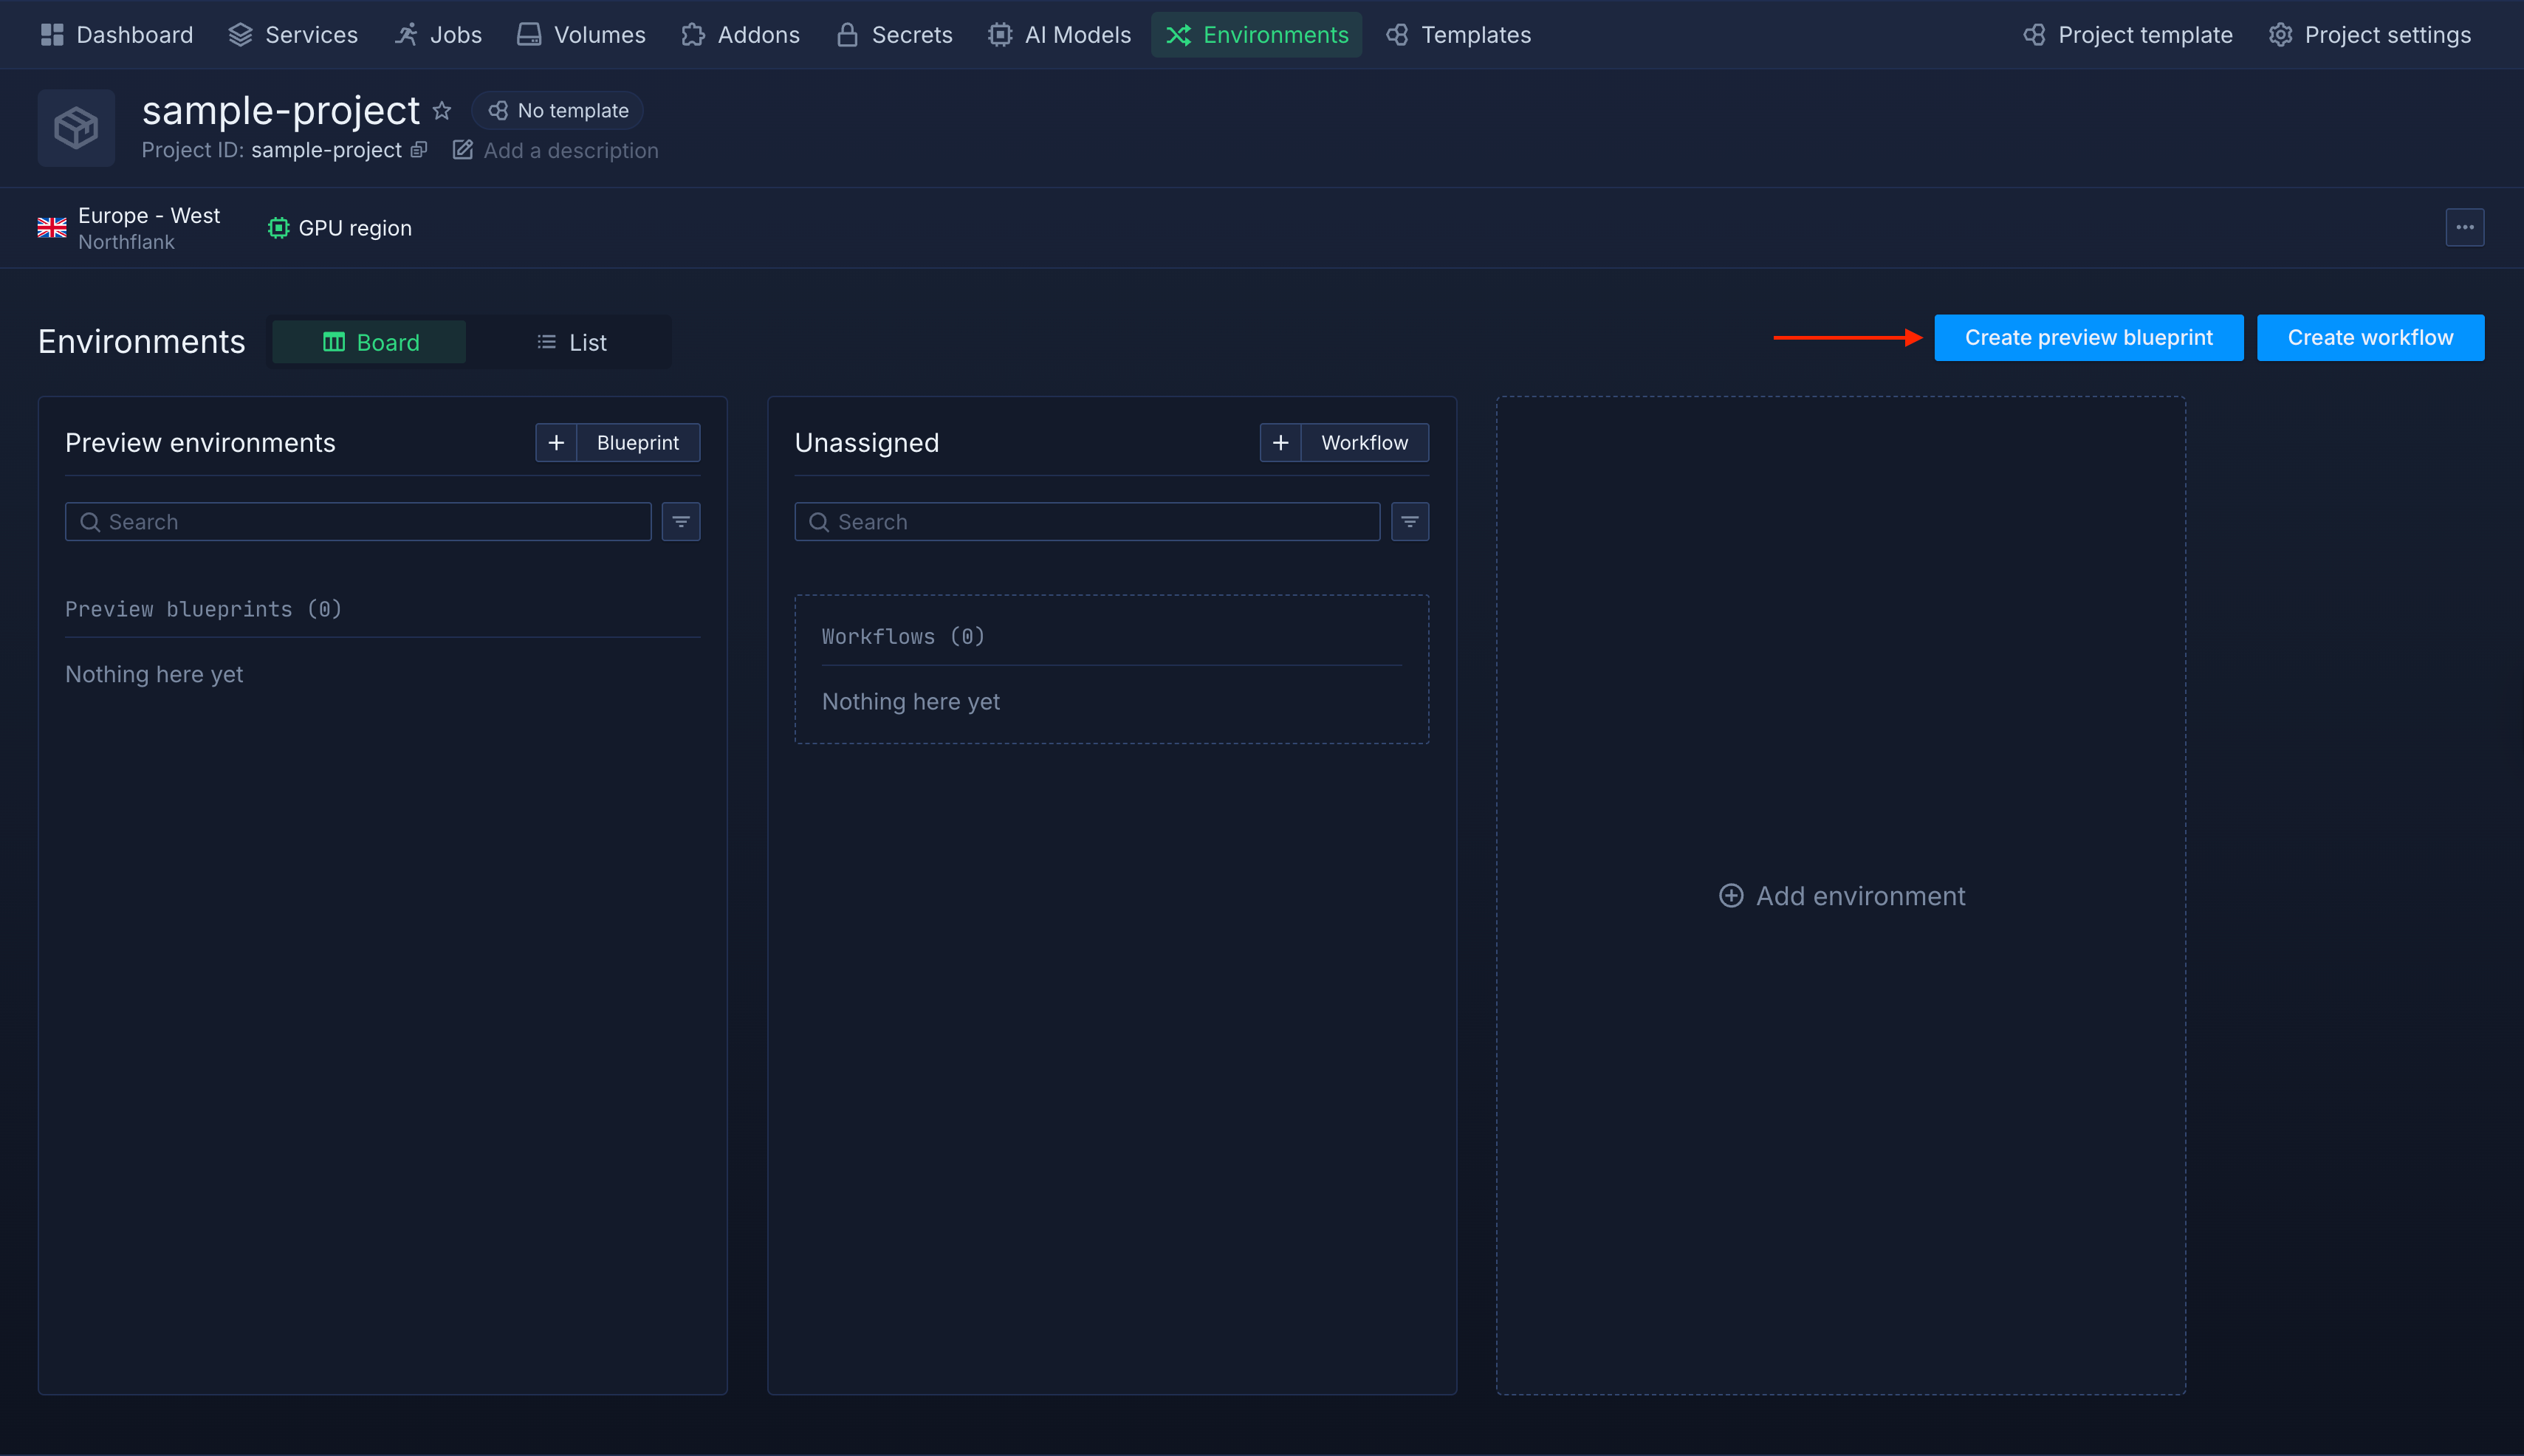
From the Environments board, click Create preview blueprint in the top right corner. This opens the blueprint editor, where you define the rules for how preview environments should be automatically created.
In the Set up a preview blueprint modal, start by giving your blueprint a name under Basic information (for example, previews), then set the Naming convention to Pull request ID so each environment is named after its PR number (e.g., pr-1234).
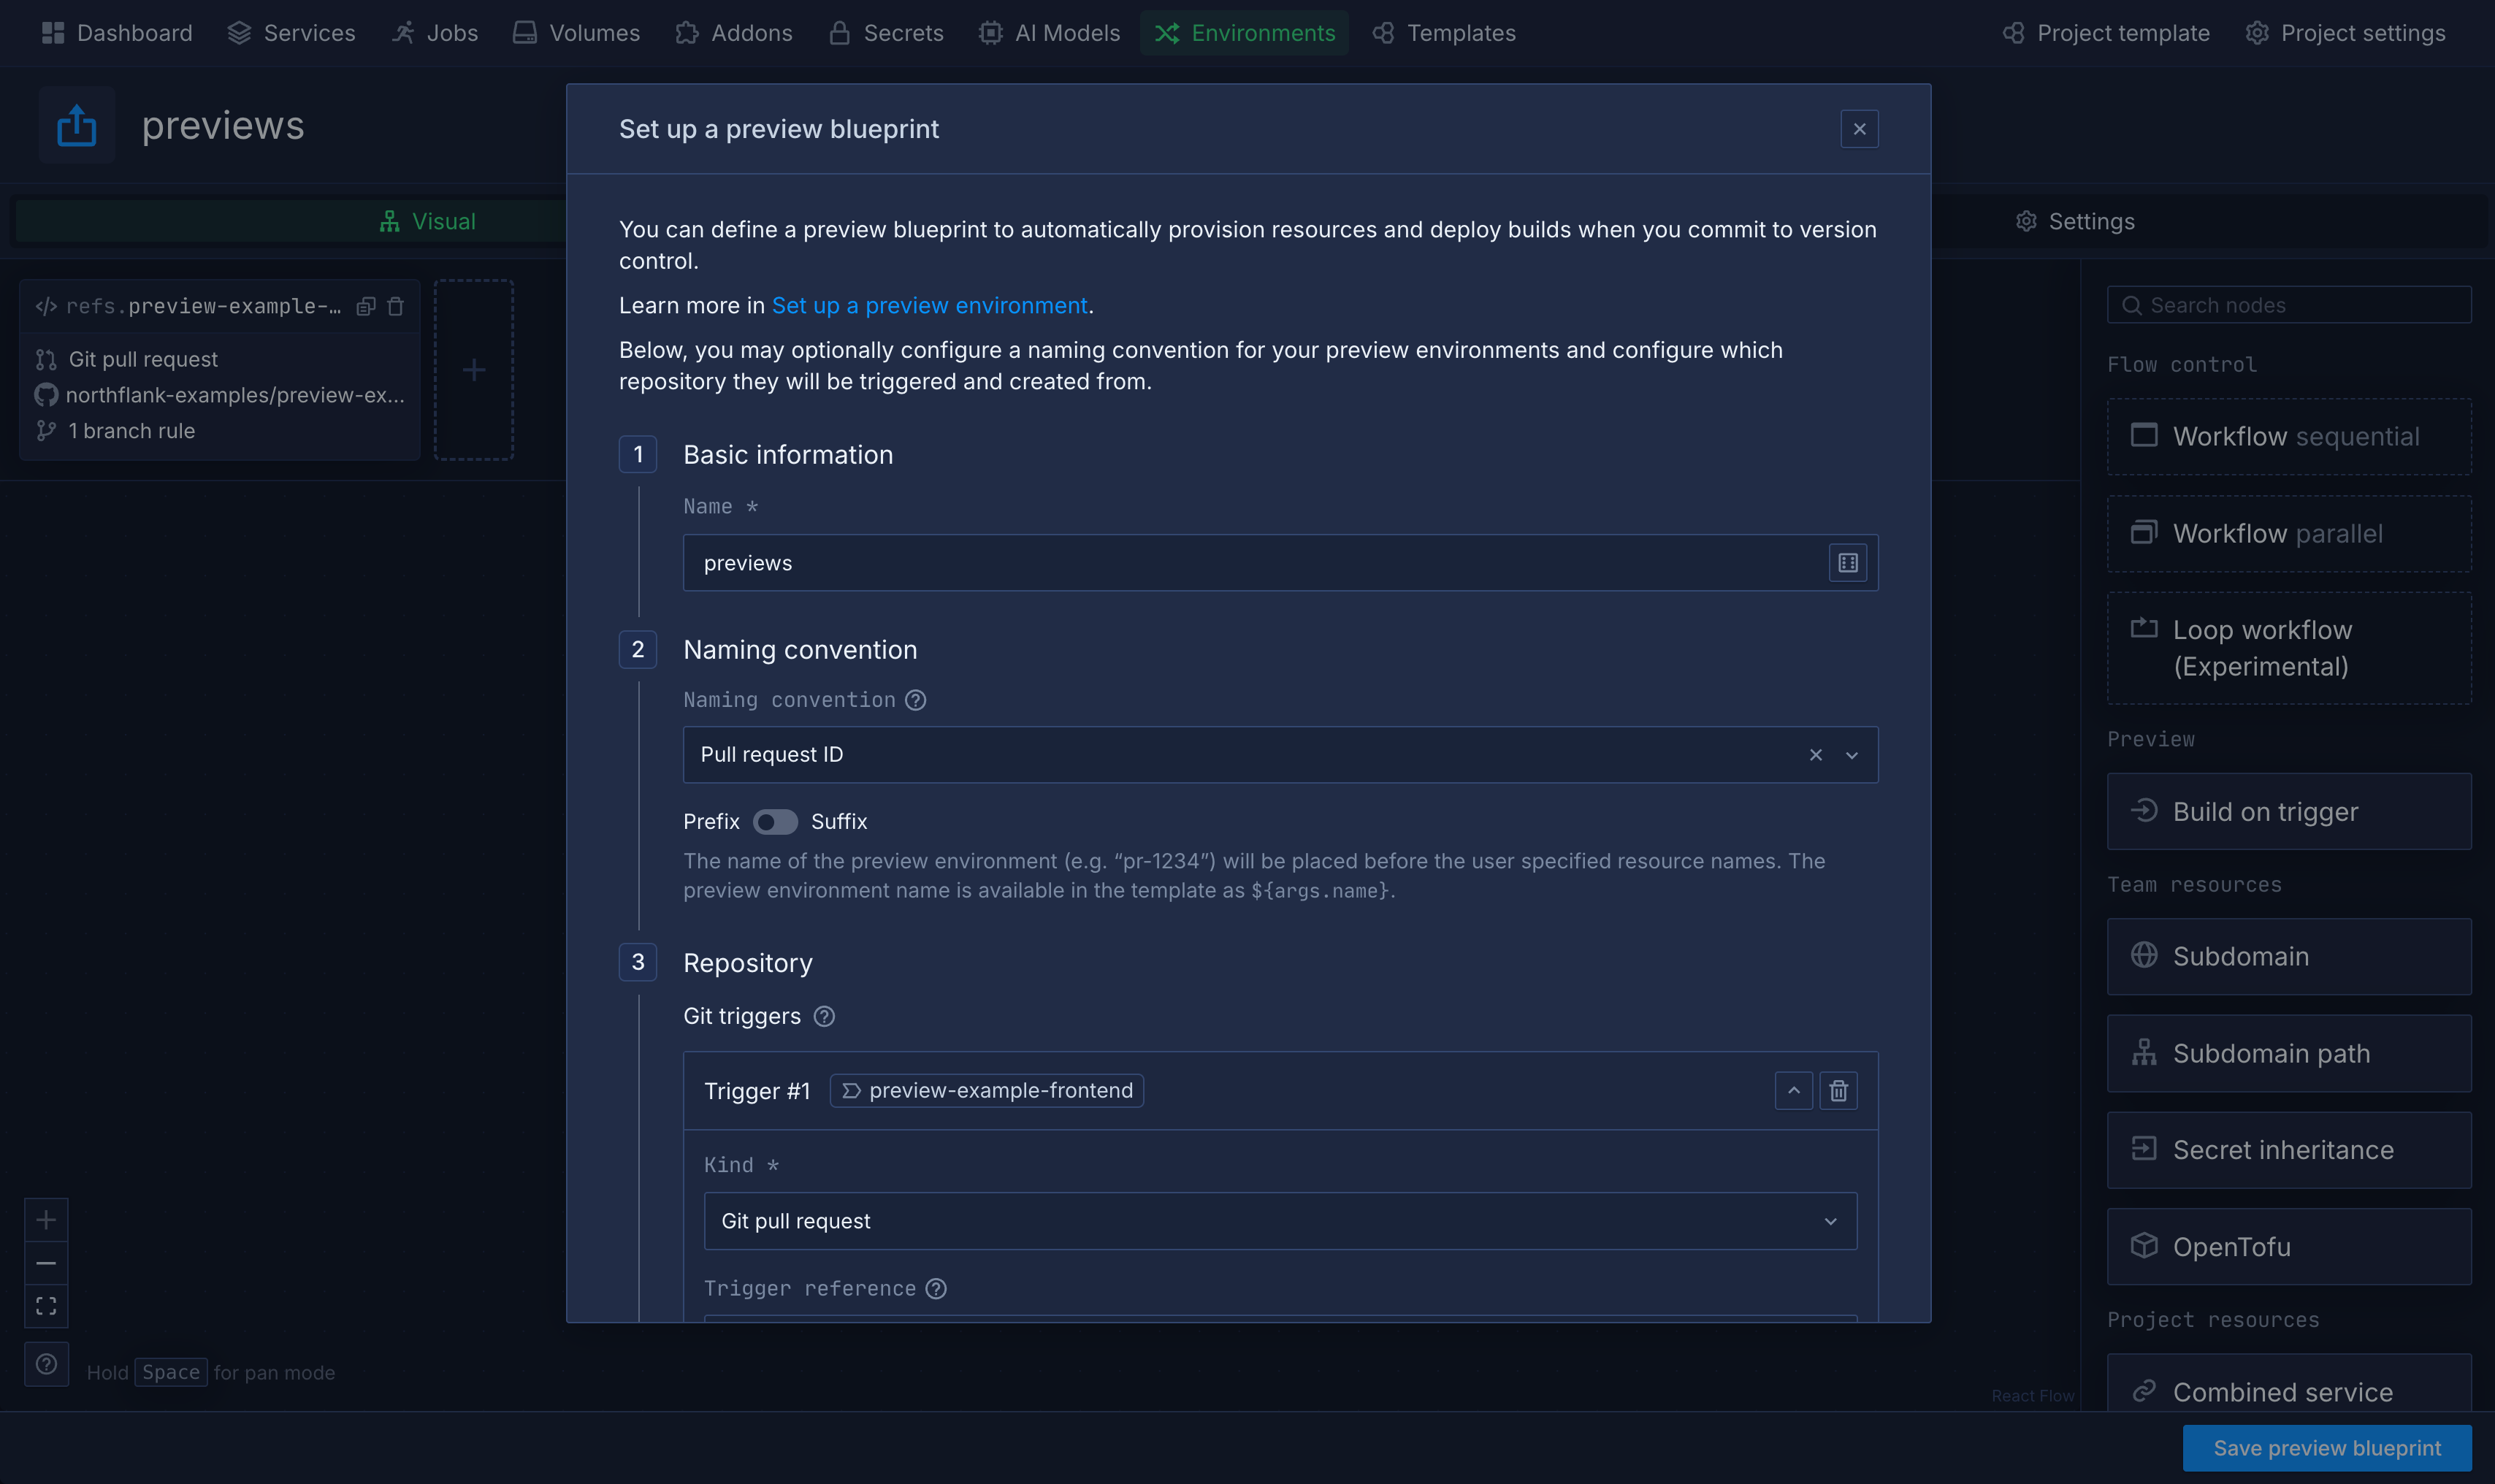
Next, under Repository, click + Add trigger, set the Kind to Git pull request (marked as recommended), select your repository, and leave the branch trigger rule as * so it fires on pull requests from any branch.
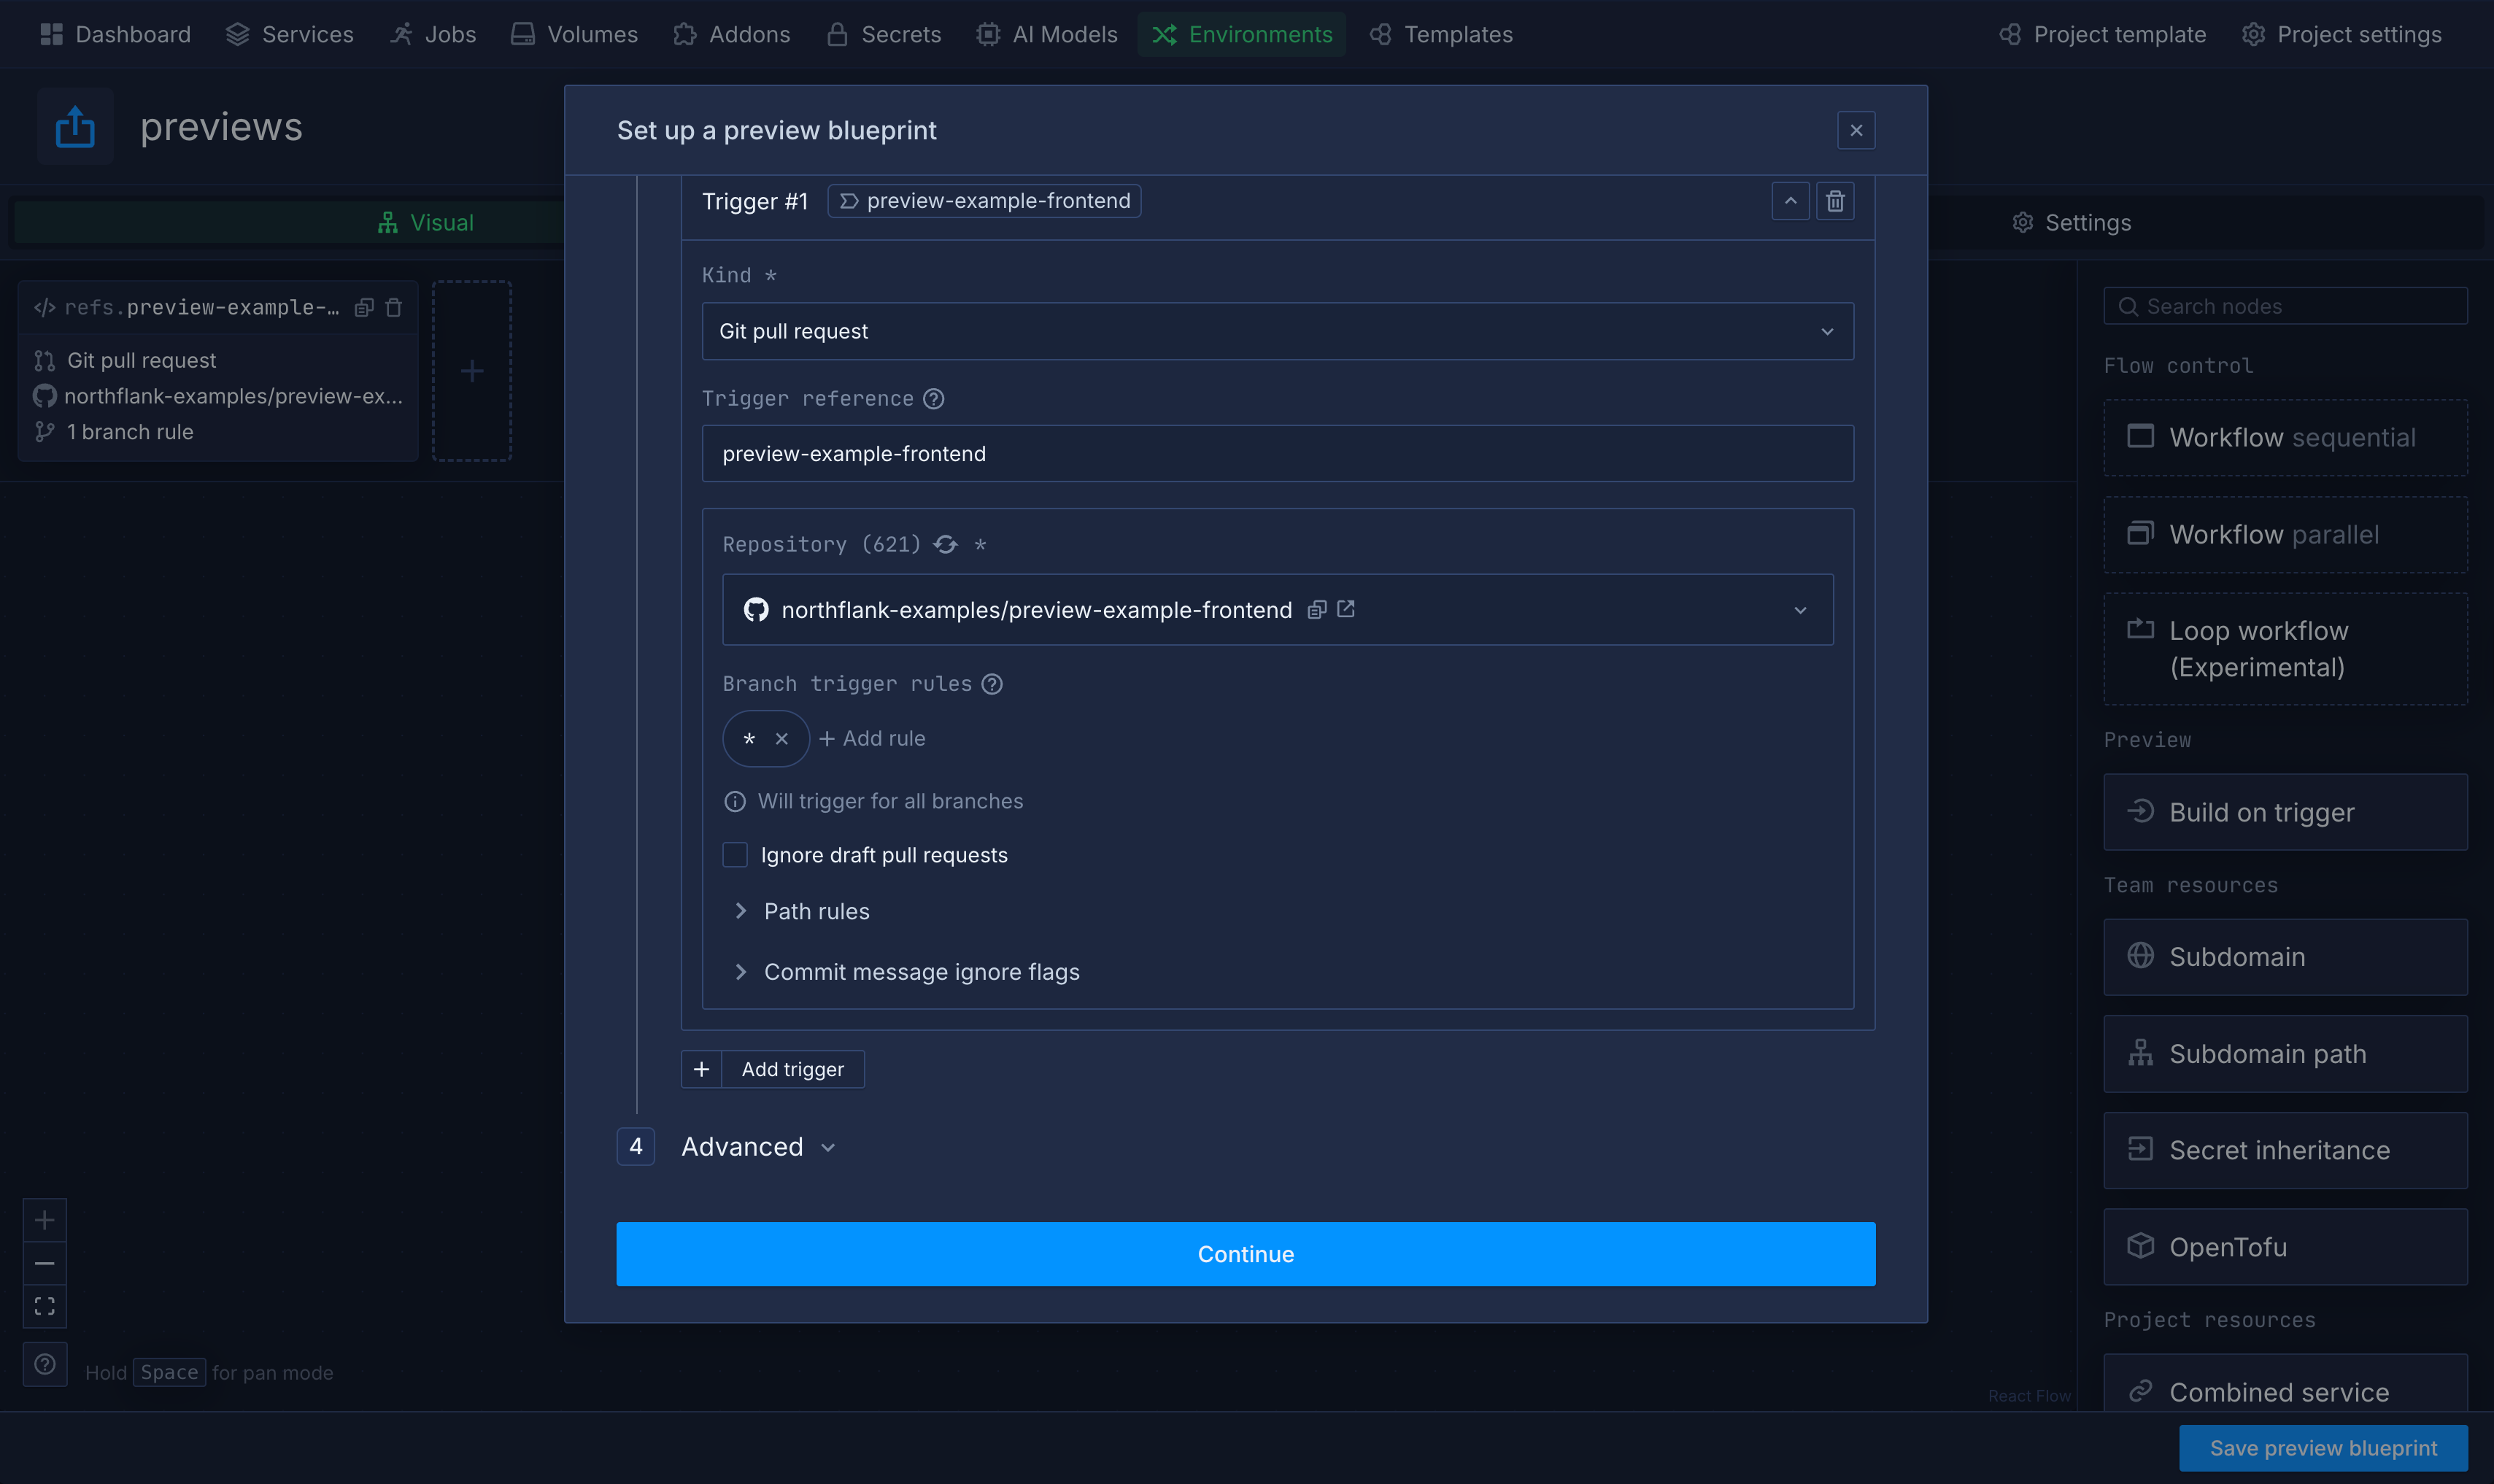
Once that is done, click Continue.
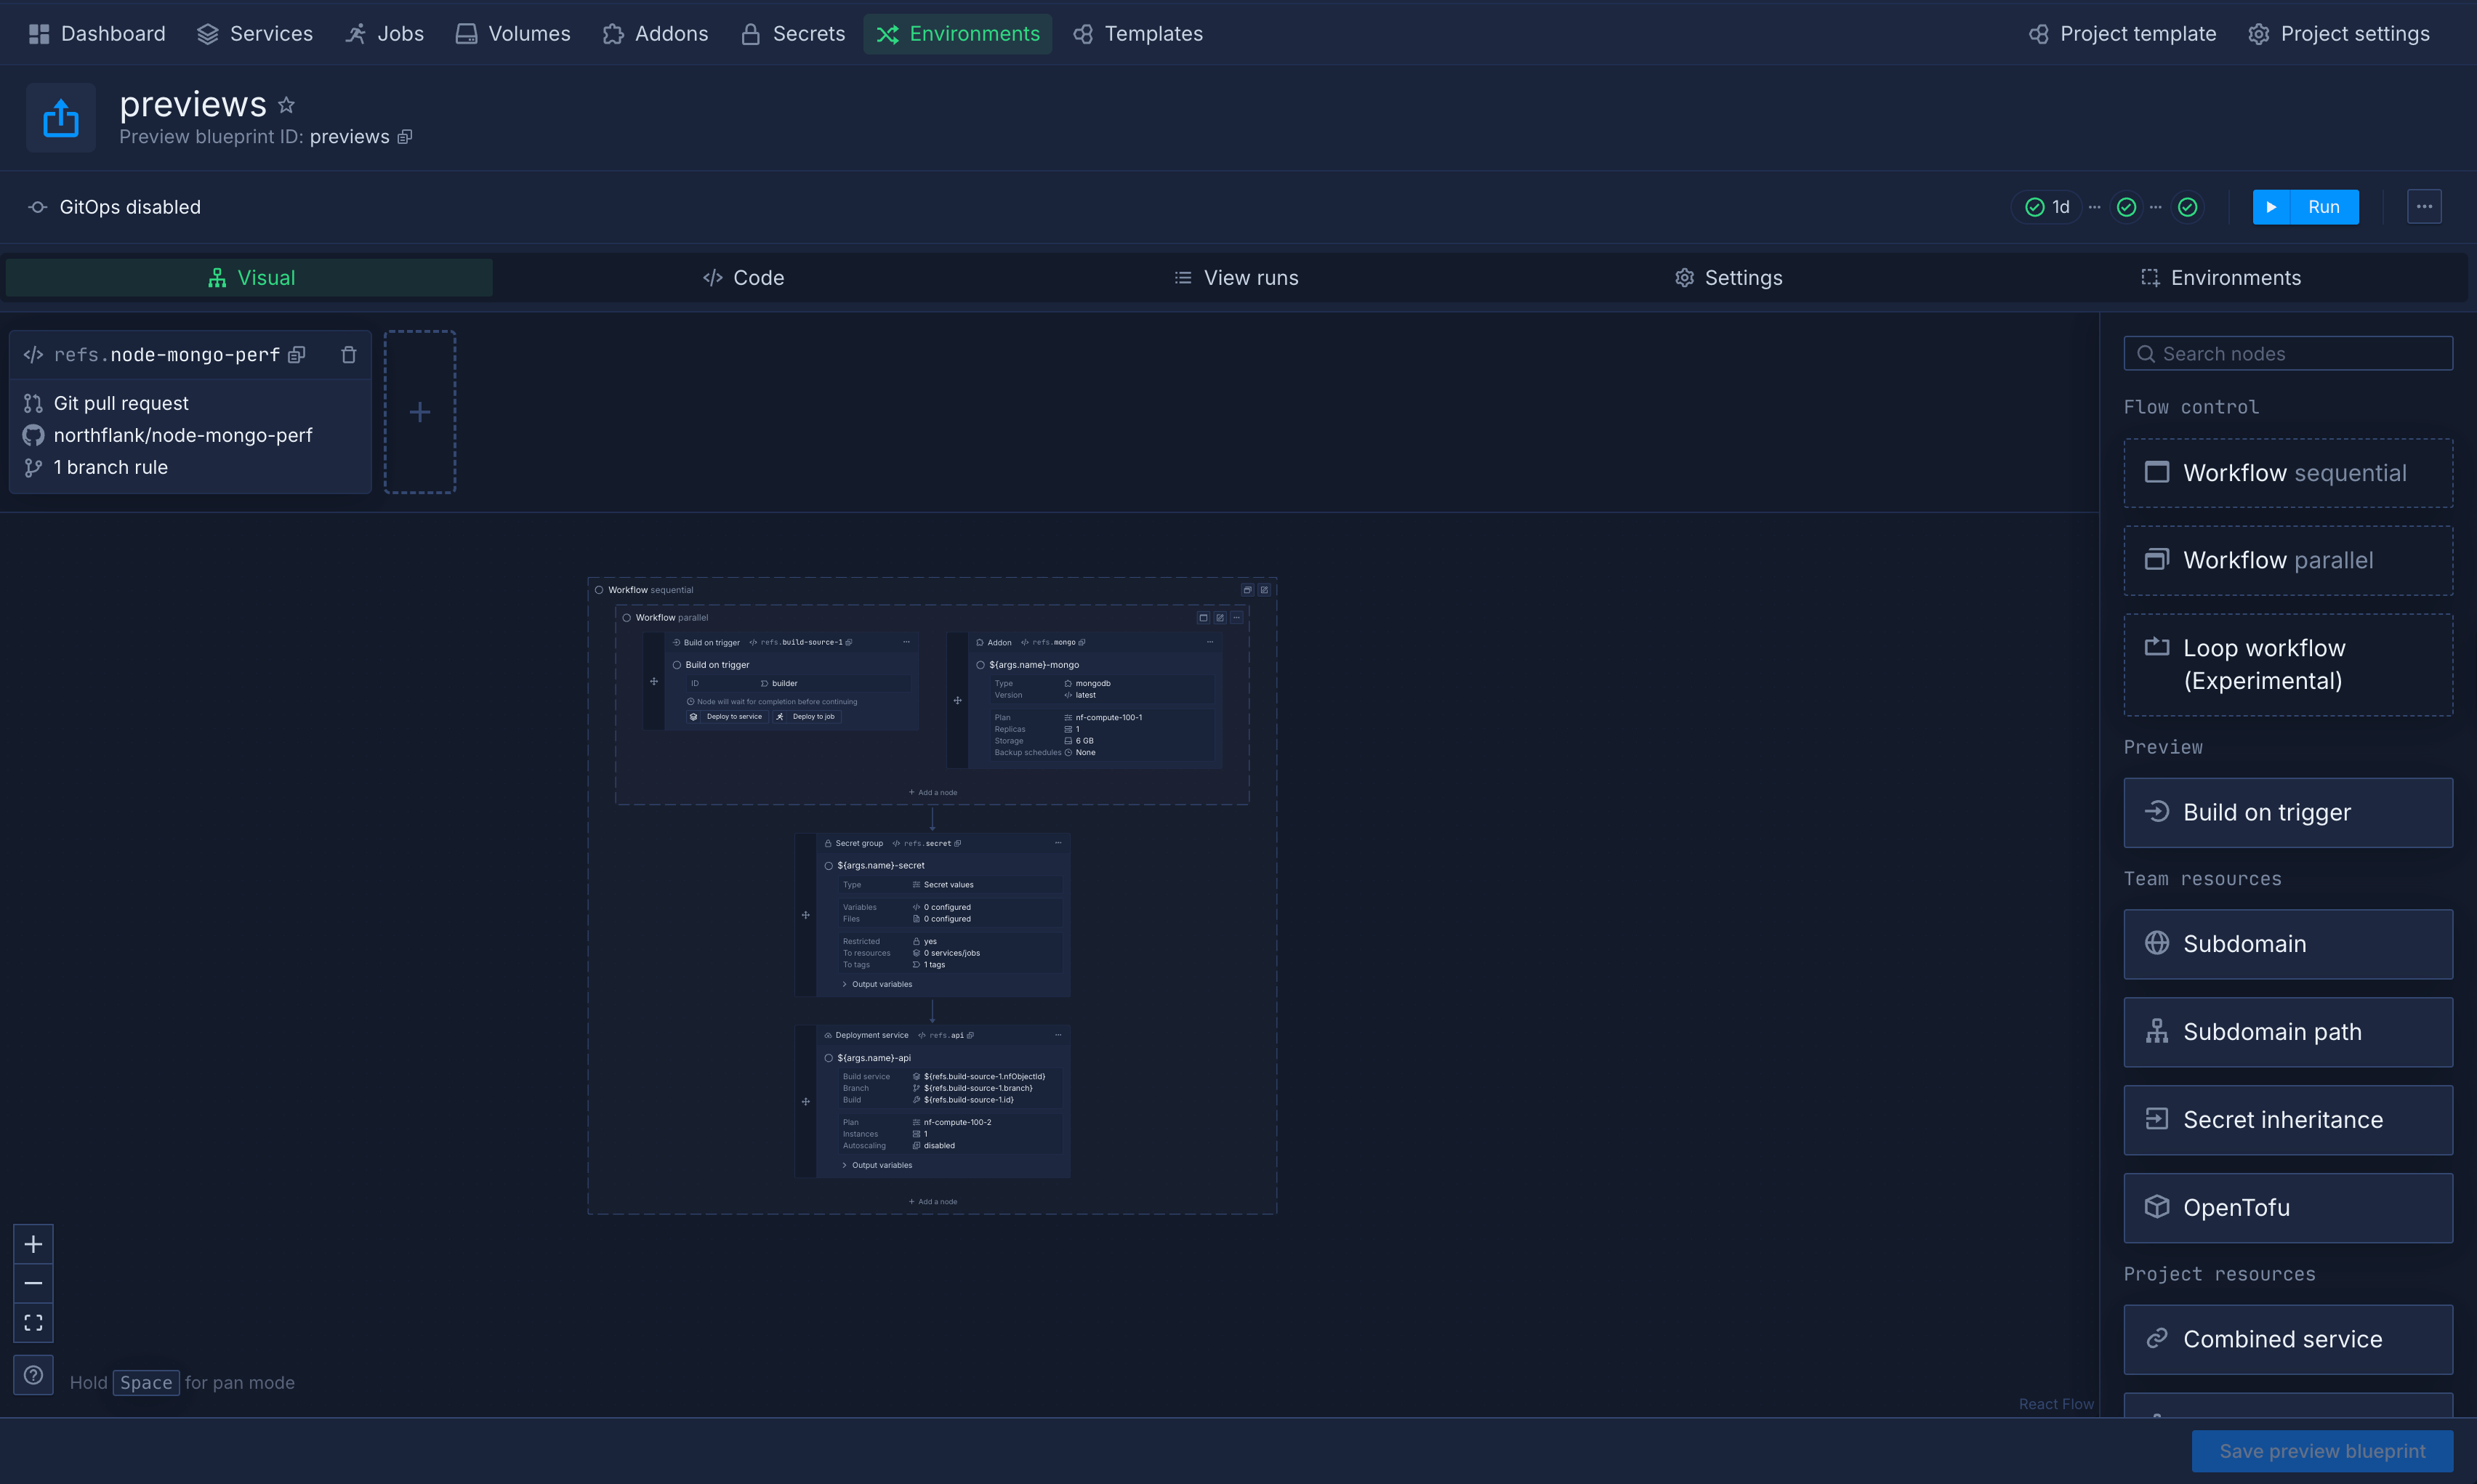
Once you click Continue, you land in the visual blueprint editor. This is where you build out the workflow that runs every time a PR triggers your blueprint.
From the panel on the right, you can drag nodes onto the canvas to define what happens when a preview environment is created.
Most blueprints start with a Build on trigger node, which builds your code when the PR is opened, followed by a deployment service node that runs the built image.
From there, you can add more nodes depending on what your application needs, such as a database addon, a subdomain for public access, or a secret group to manage environment variables.
For a full reference on available nodes and configuration options, see the preview environments documentation.
The screenshot below shows an example of a fully configured blueprint with a build service, a MongoDB addon, and a secret group already set up:
Northflank also supports snapshot and caching mechanisms to speed up environment creation on subsequent PRs.
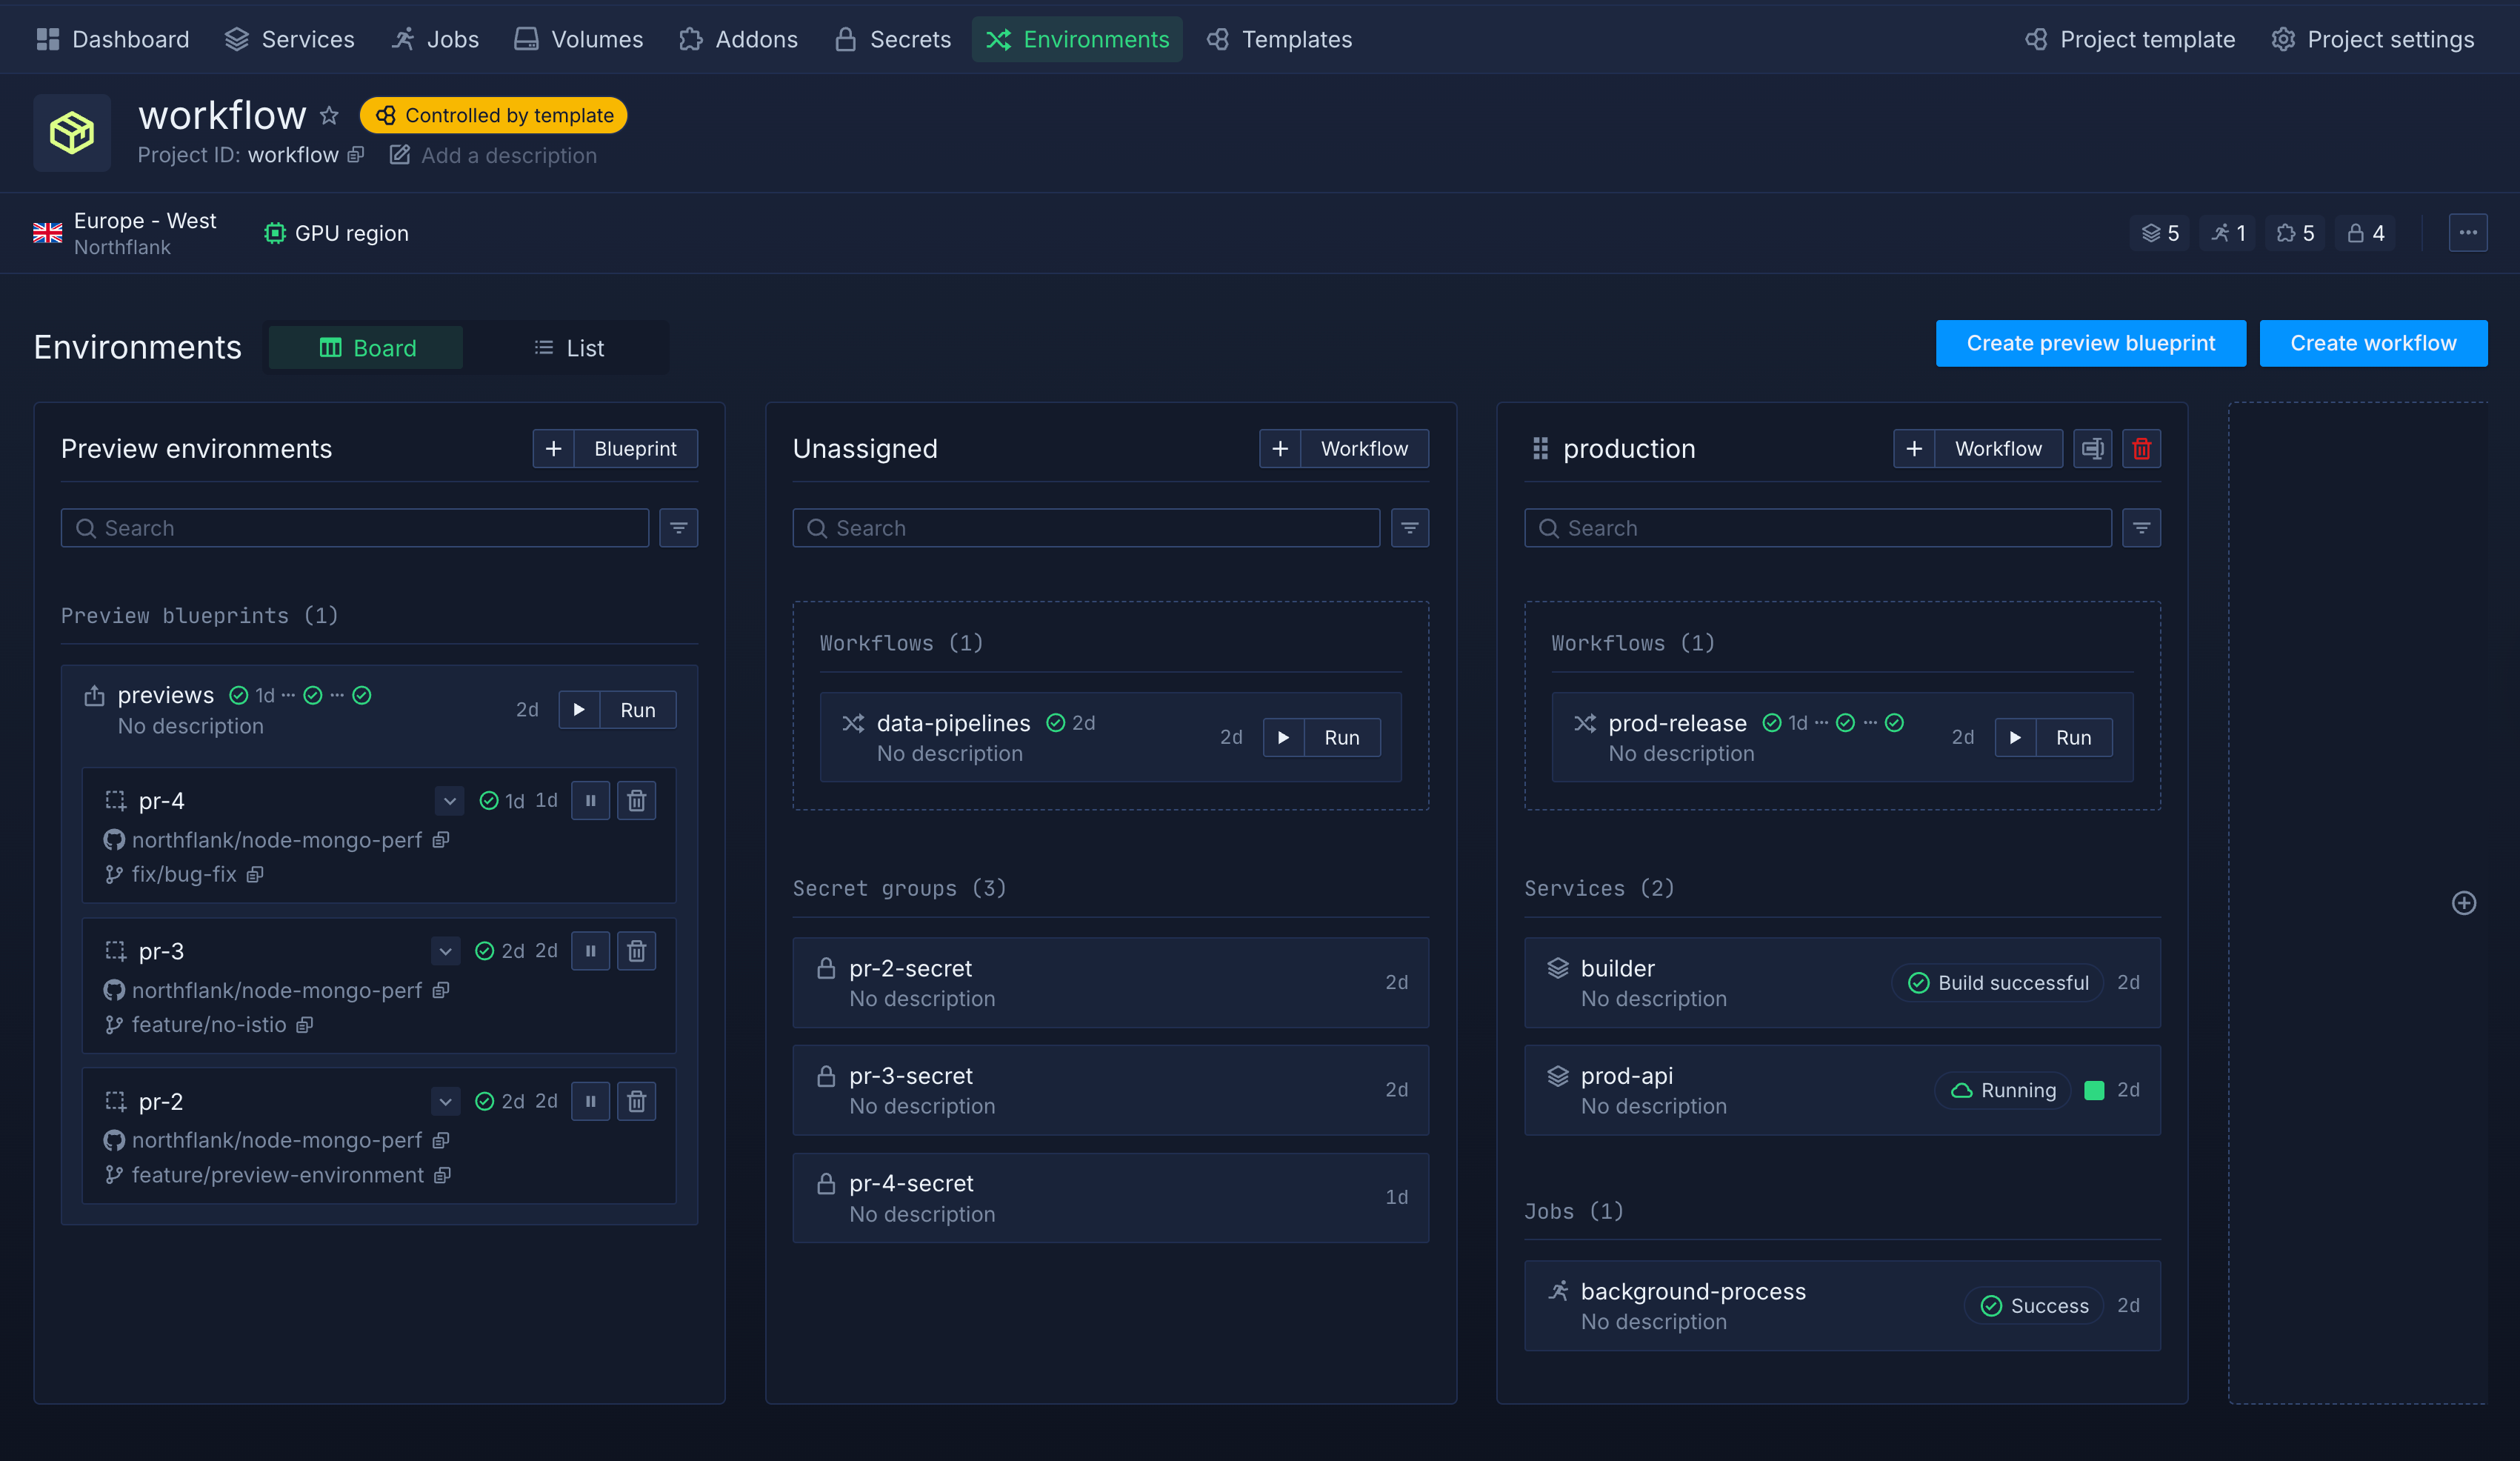
Click Save preview blueprint. Your blueprint will now appear under the Preview environments column in the Environments board.
From this point on, every new PR against the configured repository will automatically trigger the creation of a preview environment.
You can also trigger the creation of a preview environment manually by selecting Run next to your blueprint, which is useful for testing your setup before you open a real PR.
Here is what a project looks like with preview environments actively running across multiple open PRs:
Because Northflank preview environments are full-stack, you are not limited to just deploying your application code. A single preview can include:
- Services for your frontend, backend, or API
- Database addons like PostgreSQL, MySQL, or MongoDB, either fresh instances or seeded with test data
- Caches and message queues like Redis or RabbitMQ
- Background jobs and cron tasks
- Other microservices your application depends on
This means your preview environment reflects how your application actually runs in production, not a stripped-down version of it. Reviewers are testing the real thing.
For a full reference on configuring preview blueprints, see the Northflank preview environments documentation and the API reference for running and listing previews.
Preview environments compress the feedback loop in a few concrete ways.
First, they make code reviewable by non-engineers. When a designer, product manager, or QA engineer can click a URL and see the feature running in a real environment, they do not have to wait for a staging deployment or ask an engineer to set something up locally. They can test immediately.
Second, they catch integration bugs earlier. Because each preview environment mirrors production with all its services and dependencies, issues that only surface in a real environment, like a broken API integration or an edge case in the database layer, are found before the code is merged, not after.
Third, they remove the queueing bottleneck of shared staging. Multiple PRs can have their own environments running in parallel, so no team is waiting on another.
For more on the mechanics behind this approach, see The what and why of ephemeral preview environments and a comparison of preview environment platforms.
The concern that comes up most often about preview environments is cost: if you are spinning up a full stack for every PR, does that get expensive quickly?
The answer is that Northflank gives you several mechanisms to keep costs in check:
- Automatic teardown: environments are destroyed when the PR is merged or closed, so they never run longer than necessary
- Active time windows: you can configure a schedule for when the environment should be running, for example, only during business hours
- TTL (time-to-live): you can set a maximum duration for any preview environment, after which it is shut down regardless of PR status
- Idle shutdown policies: Northflank can detect when an environment is inactive and shut it down automatically
These controls mean you are not paying for idle environments over the weekend or for PRs that were opened and abandoned.
On Northflank, the most common trigger is opening a pull request. You configure this in the preview blueprint by setting the trigger kind to Git pull request and specifying the repository. You can also trigger preview environment creation manually from the Environments board or via the Northflank API.
Yes. Northflank preview environments are full-stack, so you can include database addons (PostgreSQL, MySQL, MongoDB, and others), message queues, background jobs, and other services. Each preview environment gets its own isolated instances of these services.
A staging environment is persistent and shared across your team, meaning everyone deploys to the same place. A preview environment is ephemeral and isolated to a single PR or branch, so each developer gets their own clean space to test. With staging, you do final validation before a release; with preview environments, you validate every change before it is even merged. See Northflank's preview environments overview for a full feature breakdown.
Northflank sits in a category of platforms that support automated PR preview environments with full-stack capabilities. For detailed comparisons, see Northflank vs Render for preview environments, Northflank vs Railway for preview environments, and Kubernetes preview environment platform comparisons.
Yes. Northflank supports a bring-your-own-cloud (BYOC) model, which means preview environments can be deployed into your own AWS, GCP, or Azure account rather than Northflank's managed infrastructure.
Preview environments close the gap between writing code and getting real feedback on it. Every PR gets its own isolated, full-stack environment, spun up automatically, available to the whole team, and torn down when it is no longer needed.
If you want to set up preview environments for pull requests today, Northflank's blueprint system gives you the automation and control to do it without writing custom scripts or managing infrastructure by hand. Create an account, and you can have your first preview environment running on the next PR your team opens.