Templates consist of nodes within workflows. Nodes specify resources to create or update, or actions to take on existing resources within your team. You can create simple templates to create a project and deploy a service, or more complex templates with team account integrations, multiple projects, many resources, and different actions.
To write a template you can replicate your manual workflow to set up a project. Generally, the flow of the template should be the same as the steps to achieve a task using the Northflank application. For example, you would create a database addon, link it to a secret group, build your repository, and then deploy your service when the addon is ready.
You can also write separate templates for different stages of your workflow, for example one template to create an integration with a cloud provider and deploy a new cluster, and another template to create a project with your build and deployments.
The JSON that underlies Northflank templates is always accessible, so you can view and edit a template as code if you prefer.
You should understand how to create a new template before reading this section.
Structure a template
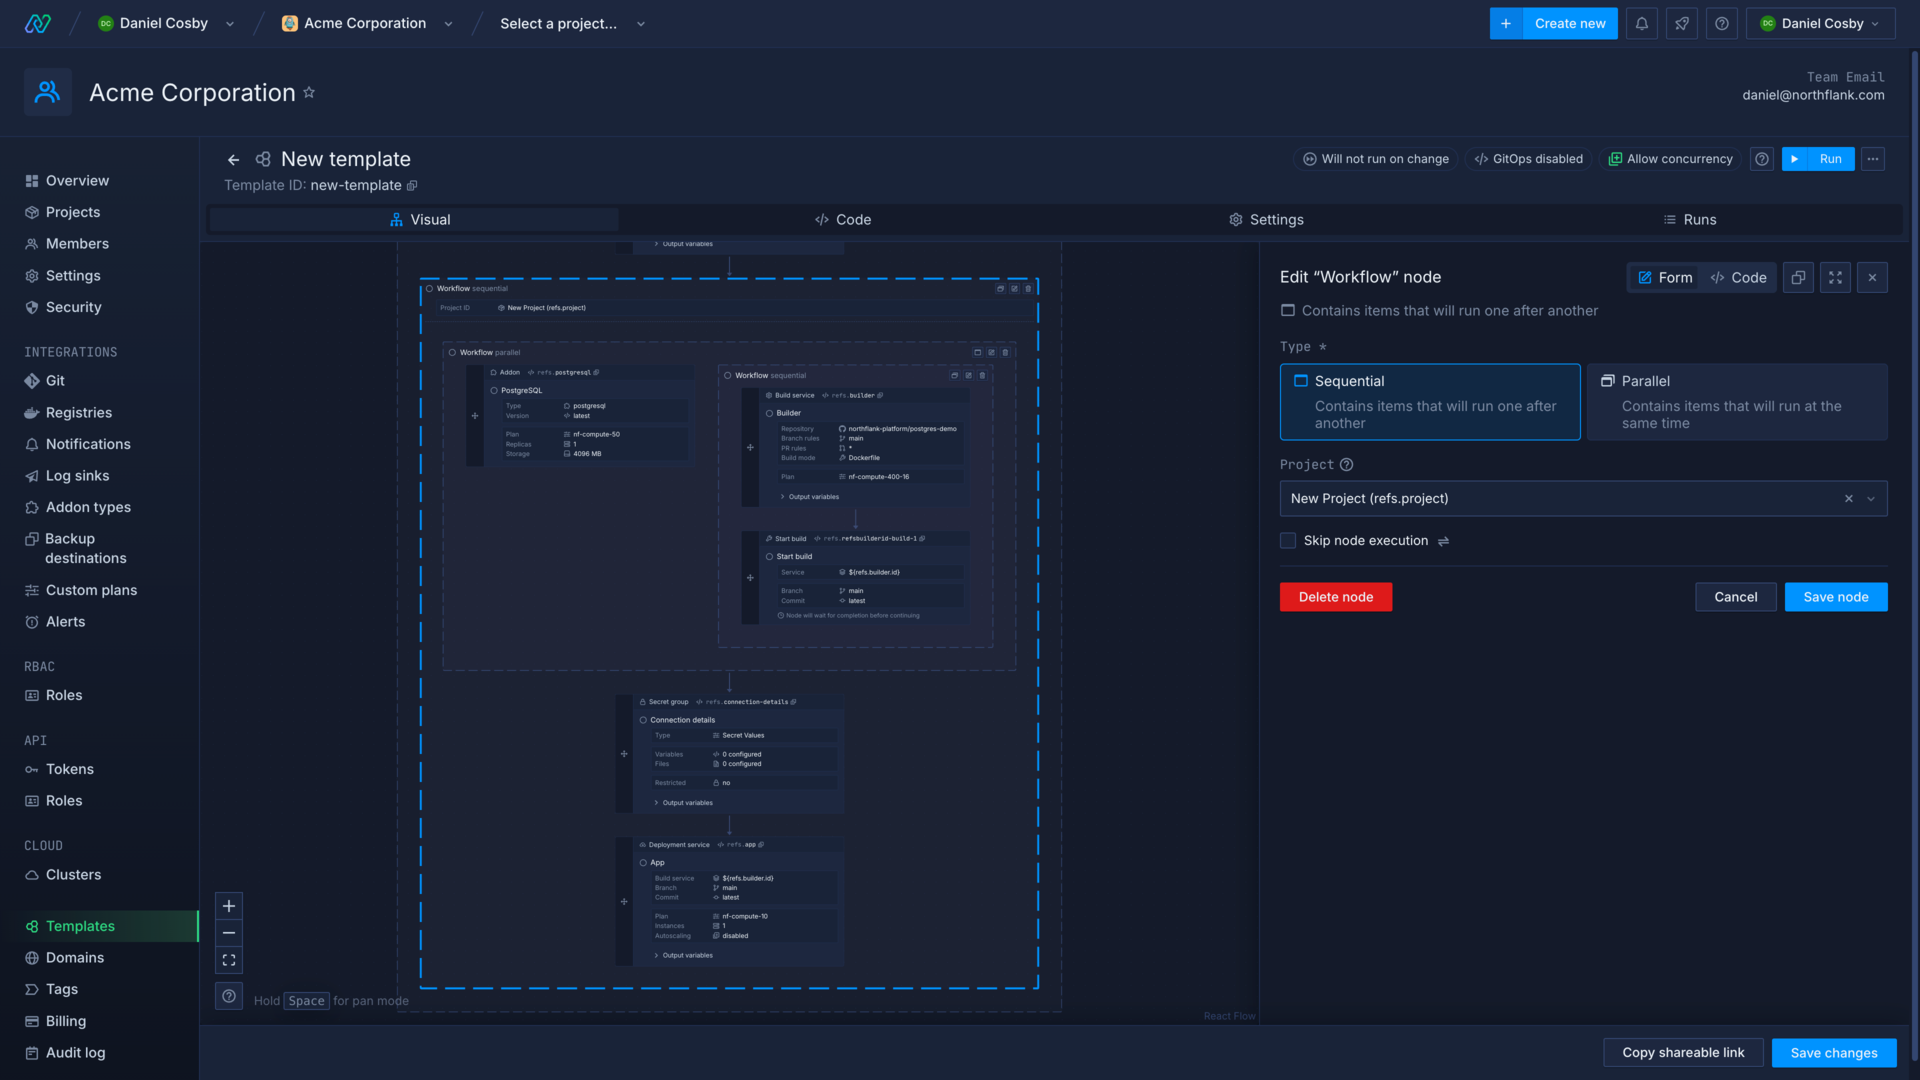
Templates consist of workflows and nodes. Workflows determine the order that other workflows and nodes within them are executed, and the entire template specification must be contained in a parent workflow.
Workflows
Nodes must be nested in workflows, which define whether nodes contained run in sequence (sequential), or at the same time (parallel). Click the switch button in the workflow node to change to a parallel or sequential flow.
Workflows can be nested within other workflows to create more efficient templates. For example, you can group tasks that have to be executed in sequence in sequential workflows, but then place these within a parallel workflow if they can all be performed at the same time. This can help you avoid bottlenecks. For example, waiting for an addon to become ready may take a few minutes so it makes sense to create other services and build images at the same time, where possible.
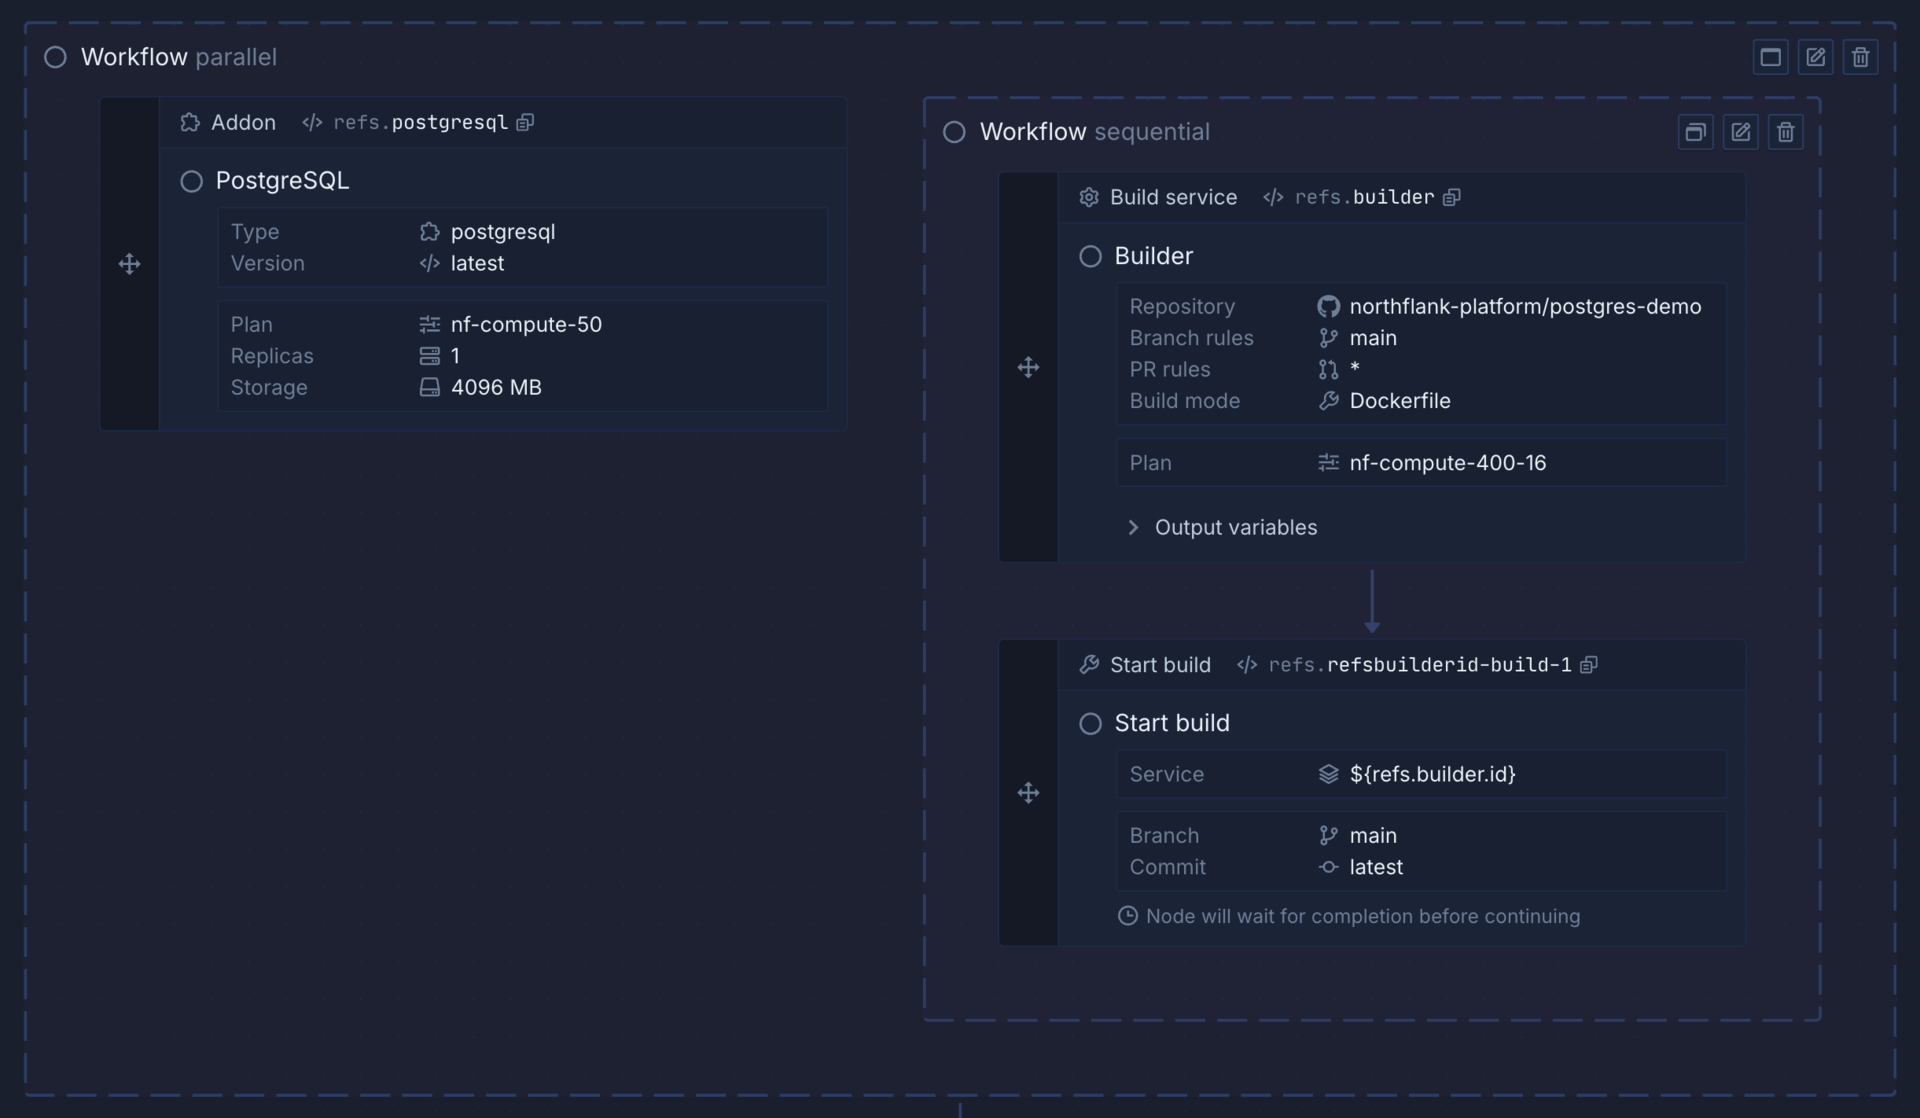
Nodes
Nodes can create or update team integrations or resources, projects, and project resources. They can also perform actions on resources in the template or an existing project, such as cloning a repository, starting a build, executing a command in a running deployment, backing up a database, and much more.
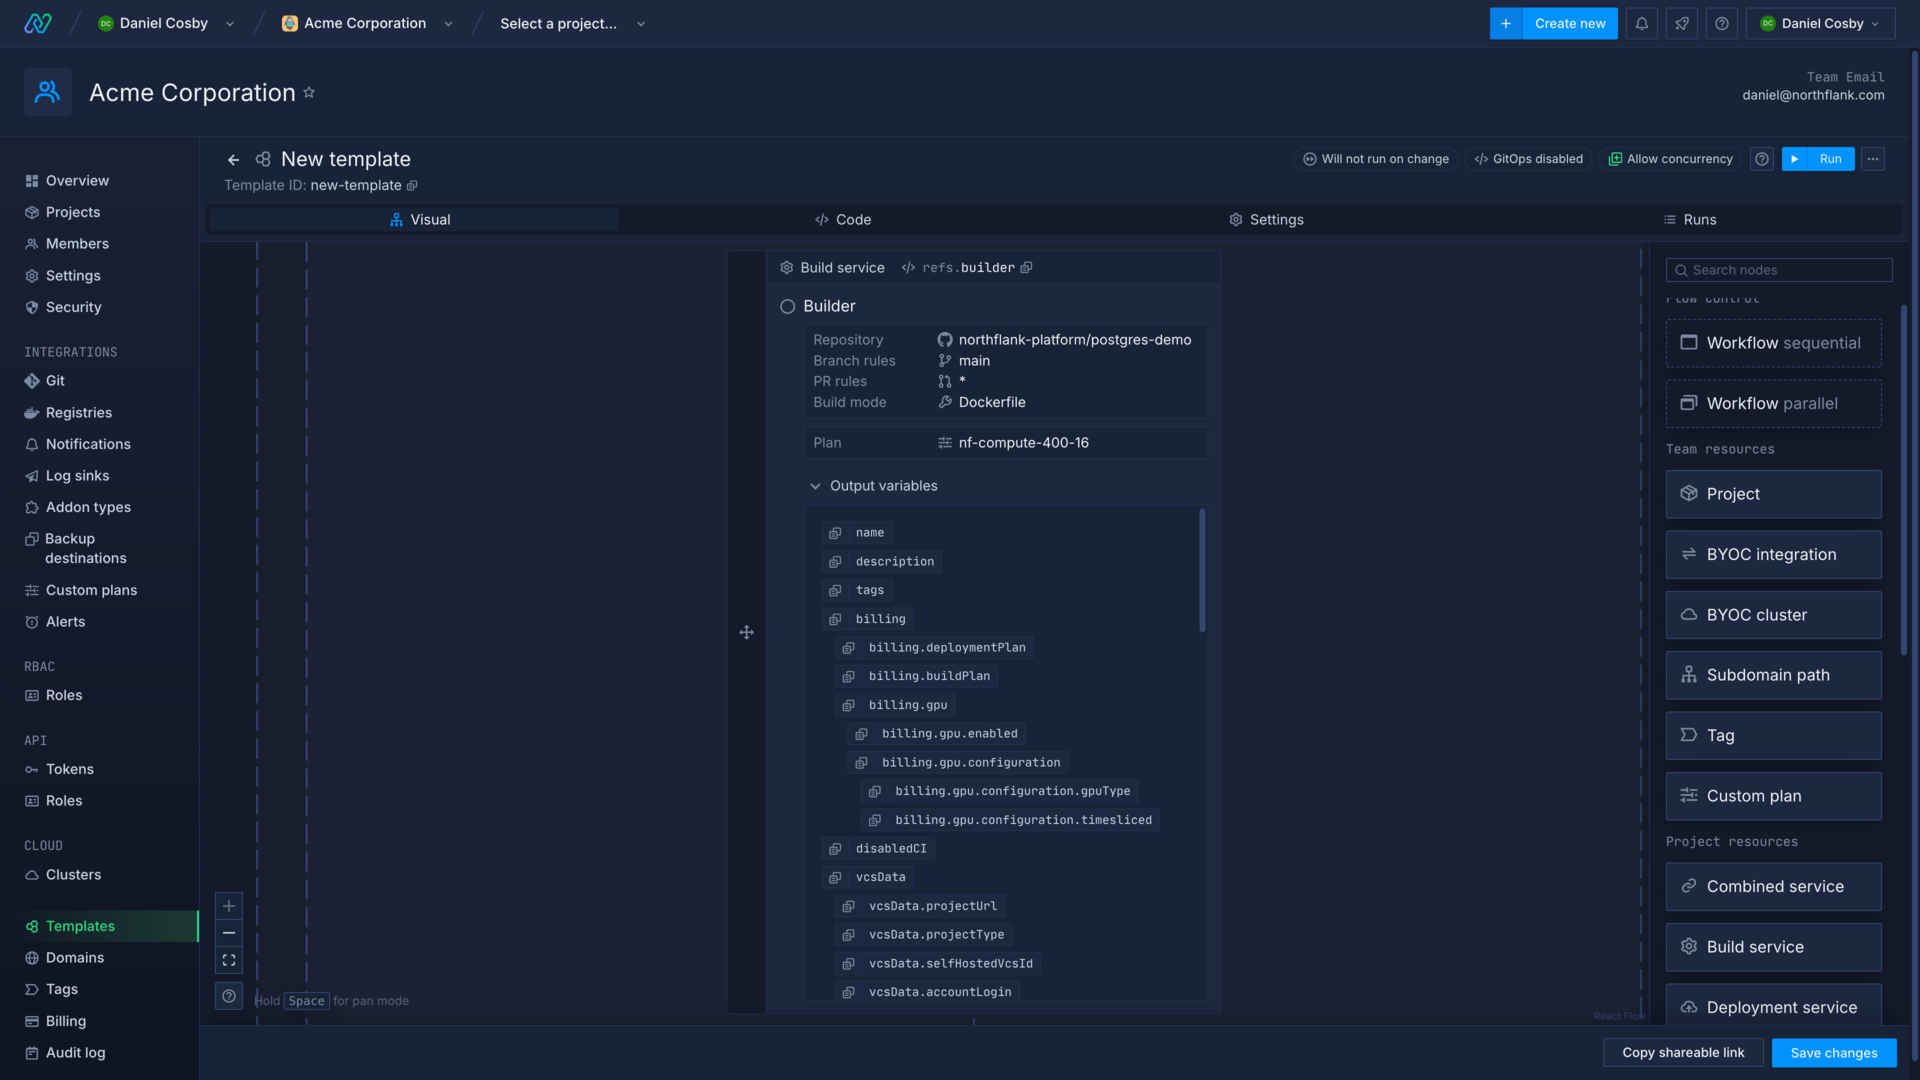
To add a node, find the relevant node from the list, or use the search box, and drag the node into your workflow. You can then configure the node using the form, or the code view.
If a node is inserted into a sequential workflow, it will be placed before, between, or after other nodes depending on where it is dropped, with arrows showing the sequence the template will run in. Nodes dropped into a parallel workflow will be added without any order, as they will be executed simultaneously. You can drag and drop nodes to re-order them, or move them into and out of workflows.
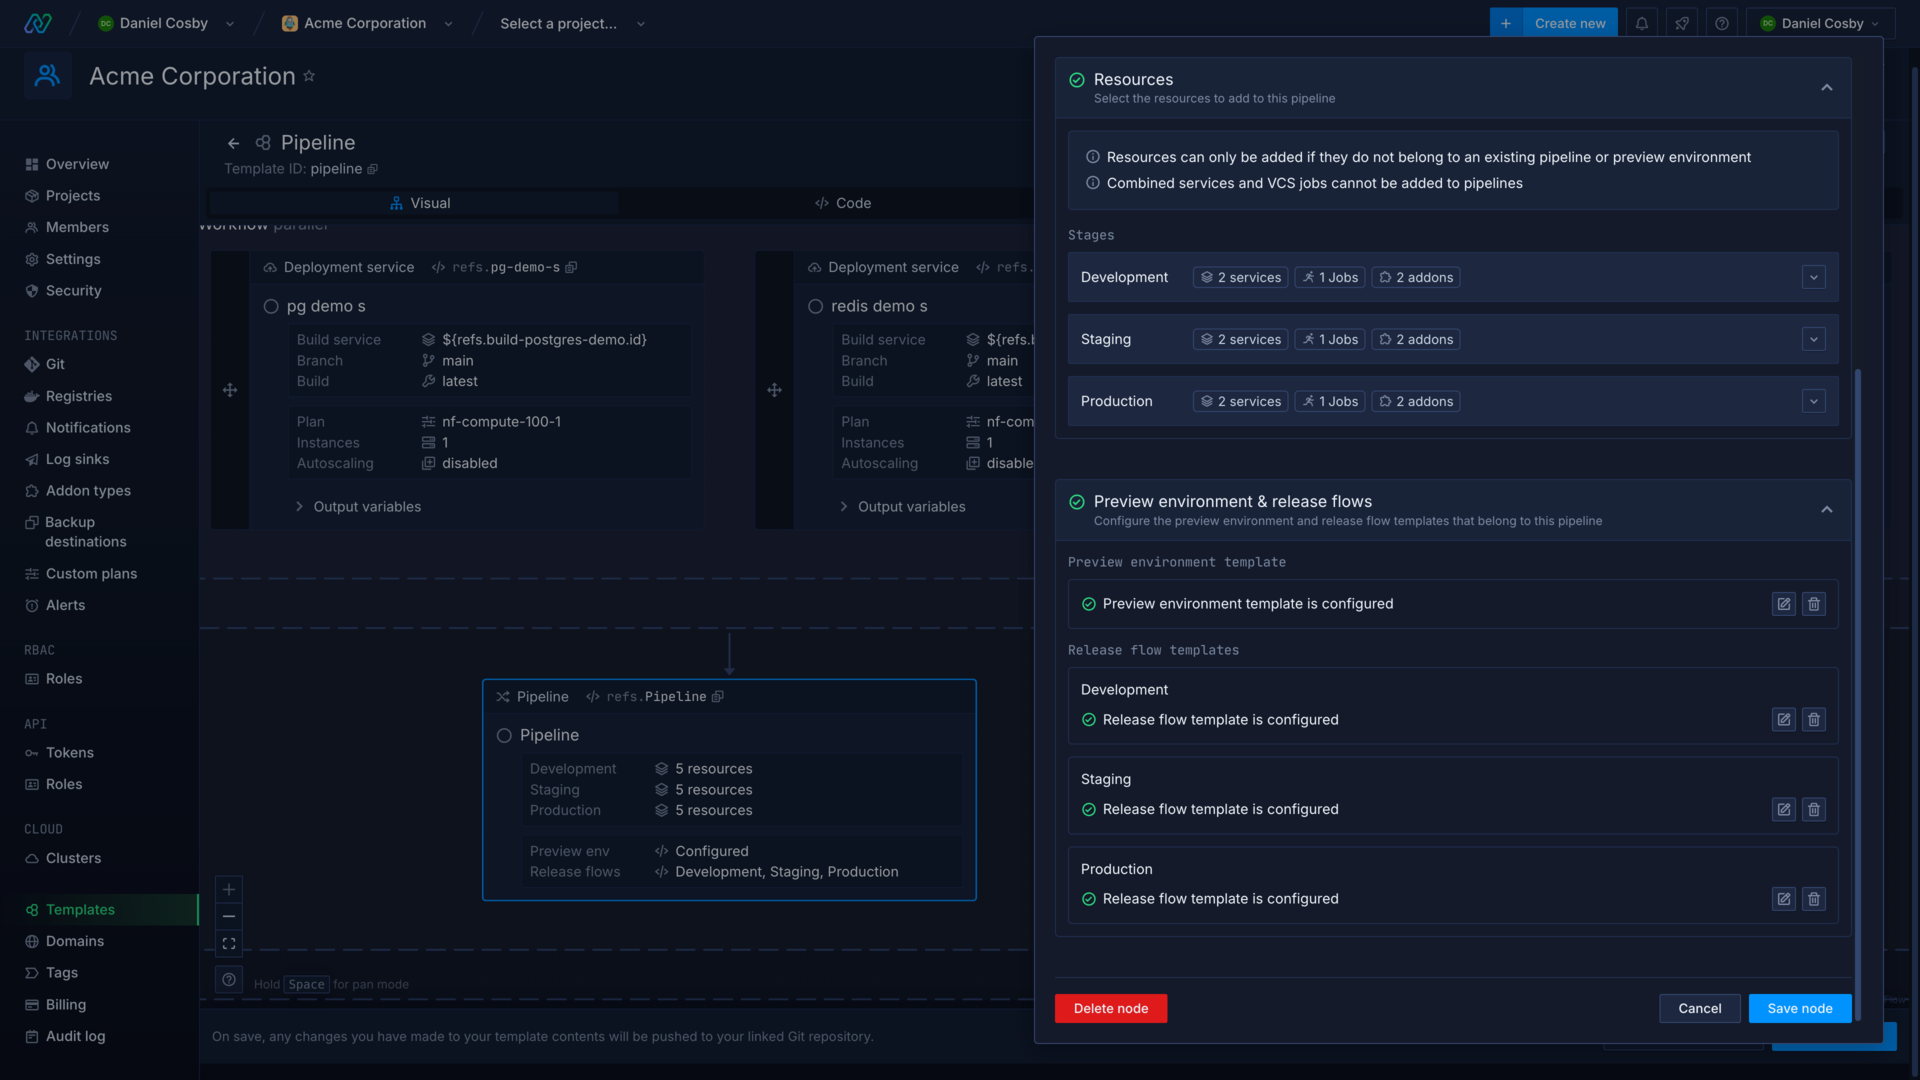
Click save node to finish editing an individual node, cancel to discard your changes, or delete node to remove it.
Set project context
Every node for a project resource must have a project context. You can either set the project context directly in the resource node specification, or the node can inherit the project context from a parent workflow. You can override the inherited project context by setting another project context on a nested node or workflow.
You can create and update resources across multiple projects by setting different project contexts for workflows or nodes.
You can set the context as an existing project from your team, or create a new project in the template. If you use a reference to set the project context, the project node must run before the reference is used in the template.
If you run a template with nodes that require, but do not have, a project context, the template run will fail.
The example below creates a new project with a reference, before defining a workflow with that project as the context. Any resources included in this workflow will be created in that project.
{
  "apiVersion": "v1.2",
  "spec": {
    "kind": "Workflow",
    "spec": {
      "type": "sequential",
      "context": {},
      "steps": [
        {
          "kind": "Project",
          "ref": "project",
          "spec": {
            "name": "New Project",
            "description": "This is a new project.",
            "color": "#0A5BA5",
            "region": "europe-west"
          }
        },
        {
          "kind": "Workflow",
          "spec": {
            "type": "sequential",
            "context": {
              "projectId": "${refs.project.id}"
            },
            "steps": []
          }
        }
      ]
    }
  }
}
Project context can be supplied to nodes in the specification, either as a hardcoded project ID, or as a reference. This will override the project context inherited from a workflow, if any exists.
{
  "kind": "DeploymentService",
  "spec": {
    "name": "nginx",
    "projectId": "my-project",
    "billing": {
      "deploymentPlan": "nf-compute-50"
    },
    "deployment": {
      "instances": 1,
      "external": {
        "imagePath": "library/nginx:latest"
      }
    },
    "ports": [
      {
        "name": "port-01",
        "internalPort": 80,
        "public": true,
        "protocol": "HTTP"
      }
    ]
  }
}
Get node outputs
A reference is automatically generated for each node you create, and you can manually edit node references in the template section of a node form. Some nodes display their output variables in a list that you can expand in the template editor.
You can refer to the output of a previous node by selecting the node reference from the drop-down menu in another node, which will display relevant resources. You can use this to create sequences of actions, such as creating a build service, starting a build on that service, and then deploying the build image in a deployment service.
You can also check the values a node outputs by viewing a template run and expanding the node you want to view. The node's outputs that are accessible via the reference are contained in the data object within response.
Control node execution
While you can configure a template to perform tasks in parallel to ensure it runs quickly, you also need to ensure that prerequisite steps have been completed, or tasks have finished, before some nodes are executed.
If you try to reference a node before that node has been executed, you will not be able to run your template. Similarly, if you attempt to execute a command in a service that has not finished deploying, or need to run a job against a database that is not in a ready state, your template run will fail. In other cases your template run may succeed, but your jobs and deployments may have failed to execute or initialise properly.
You should not only put your nodes and workflows in the correct order, but also ensure that you're creating and awaiting the necessary conditions for each node to succeed.
Trigger actions
You can use action nodes to trigger actions in existing resources, including resources created previously in your template.
For example, you may need to run a job, create a new build in a build service, or restart a running deployment.
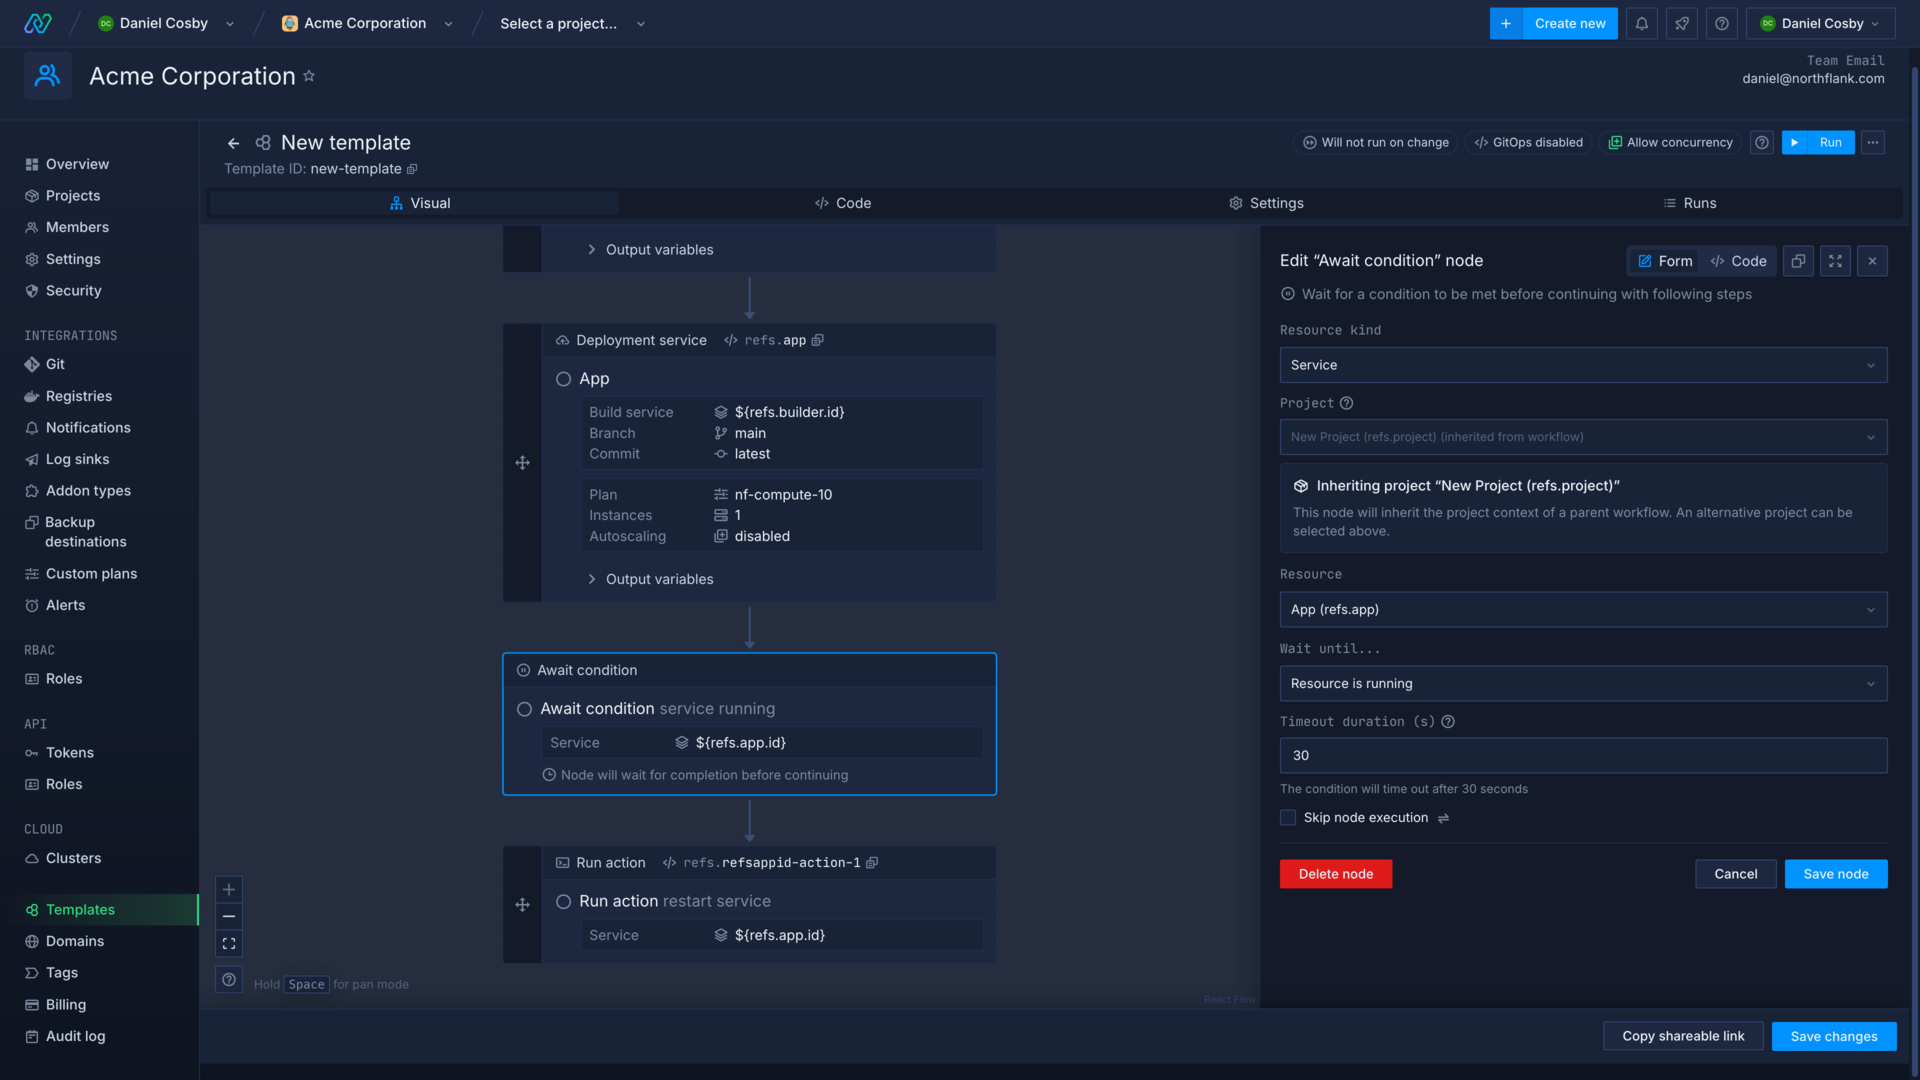
Await condition
You can use condition nodes to delay the execution of subsequent nodes until a condition has been successfully met, such as the completion of a build or an addon backup. Actions nodes also have conditions built in, but you can still use separate condition nodes elsewhere in the template to ensure nodes are executed at the right time.
You can set the timeout duration (in seconds) which will fail a condition node if the check fails to pass within the deadline. You can use this to make sure you get timely feedback about the state of a template run.
Conditionally skip node execution
You can add a condition to nodes and workflows that will be checked before they are executed in the template. You can use this to include nodes or entire workflows that you don't want to be executed on every template run.
Include workflows and preview blueprints
Environment nodes include the ability to create and edit workflows and preview blueprint templates within the template editor.
Editing a workflow or preview blueprint within a template will open the specific editors for those templates, and return you to the template editor when you save or exit the nested editor.
Workflow and preview blueprint templates have some unique nodes and behaviour to consider when creating them.
Template specification
A Northflank template includes metadata about the template itself, such as apiVersion, name, arguments, and more.
The spec object contains the body of the template, the workflows, conditions, resources, and actions that will be executed during a template run.
If you create or edit a template using the Northflank application you can configure all the template options on the settings page.
Properties not mentioned in the Northflank application documentation may only be applicable to templates created using the API and should not be included in templates managed using the Northflank application or a Git repository.
If you are writing a template as a JSON file the required fields, listed in the attributes below, must be included. You can also add a $schema property to have code hints and error checking in your IDE.
If you enable GitOps it will add an object to the template containing the link data.
- {object}
apiVersion
string requiredThe version of the Northflank API to run the template against.one ofv1.2name
string requiredName of the template.description
stringDescription of the template.arguments
{object}A set of arguments that can be referenced in a template using '${args.argumentName}'.argumentOverrides
{object}Argument overrides stored outside of the template. If GitOps is enabled, these will not be saved in version control.options
{object}Additional options for the template creation.autorun
booleanIf true, the template will run automatically whenever it is updated.concurrencyPolicy
stringDefines the concurrency behaviour of the template with respect to parallel runs.one offorbid, allow, queuespec
{object} requiredContains nodes representing actions to be performed as part of the template.
{
  "apiVersion": "v1.2",
  "name": "template-name",
  "description": "Your template description",
  "arguments": {},
  "argumentOverrides": {},
  "options": {
    "autorun": true,
    "concurrencyPolicy": "queue"
  },
  "spec": {}
}
Example template
This template example will guide you through building a template to deploy Payload CMS . In this example you will:
- Create a new template
- Deploy an addon and a combined service that builds from a Git repository
- Create a secret group to store required environment variables and addon connection details
- Configure template settings
- Run the template
- Await conditions and restart the service (optional)
Each step also has the template code for reference.
Create a new template
First, create a new template in your team and select the visual editor.
When you create a new template in Northflank it is populated with a project node and a sequential workflow. The workflow node uses the reference to the project node to get the project context from the project node ("${refs.project.id}"). All nodes that create or update project resources within this workflow will execute in this project, unless they are given another context.
The project node form will automatically open, or you can click on the node to enter the editor. Enter Payload as the name for your project, select a region, and save the node.
{
  "apiVersion": "v1.2",
  "spec": {
    "kind": "Workflow",
    "spec": {
      "type": "sequential",
      "steps": [
        {
          "kind": "Project",
          "ref": "project",
          "spec": {
            "name": "Payload",
            "region": "europe-west",
            "networking": {
              "allowedIngressProjects": []
            }
          }
        },
        {
          "kind": "Workflow",
          "spec": {
            "type": "sequential",
            "context": {
              "projectId": "${refs.project.id}"
            },
            "steps": []
          }
        }
      ]
    }
  }
}
Deploy an addon and combined service
You can now add project resources to your workflow, they will be created in the project when the template runs.
First, drag and drop an Addon node into the sequential workflow. Select MongoDB, name it Database and select latest as the version before saving the node.
Next, drag and drop a Combined service node into the workflow after the addon. Name it Payload, enter https://github.com/northflank-guides/deploy-payload-on-northflank as the repository and select the master branch. You can replace this with your own repository, if you have one. Select Dockerfile as the build type and Northflank will automatically configure a port for it. Click save the node to finish.
{
  "apiVersion": "v1.2",
  "spec": {
    "kind": "Workflow",
    "spec": {
      "type": "sequential",
      "steps": [
        {
          "kind": "Project",
          "ref": "project",
          "spec": {
            "name": "Payload",
            "region": "europe-west",
            "networking": {
              "allowedIngressProjects": []
            }
          }
        },
        {
          "kind": "Workflow",
          "spec": {
            "type": "sequential",
            "context": {
              "projectId": "${refs.project.id}"
            },
            "steps": [
              {
                "kind": "Addon",
                "spec": {
                  "externalAccessEnabled": false,
                  "type": "mongodb",
                  "billing": {
                    "replicas": 1,
                    "storage": 6144,
                    "storageClass": "nvme",
                    "deploymentPlan": "nf-compute-50"
                  },
                  "tlsEnabled": true,
                  "name": "Database",
                  "version": "latest"
                },
                "ref": "database"
              },
              {
                "kind": "CombinedService",
                "spec": {
                  "deployment": {
                    "instances": 1,
                    "storage": {
                      "ephemeralStorage": {
                        "storageSize": 1024
                      },
                      "shmSize": 64
                    },
                    "docker": {
                      "configType": "default"
                    }
                  },
                  "runtimeEnvironment": {},
                  "runtimeFiles": {},
                  "buildArguments": {},
                  "buildFiles": {},
                  "billing": {
                    "deploymentPlan": "nf-compute-10",
                    "buildPlan": "nf-compute-400-16"
                  },
                  "name": "Payload",
                  "vcsData": {
                    "projectType": "github",
                    "projectUrl": "https://github.com/northflank-guides/deploy-payload-on-northflank",
                    "projectBranch": "master"
                  },
                  "ports": [
                    {
                      "internalPort": 3000,
                      "protocol": "HTTP",
                      "name": "p01",
                      "public": true,
                      "domains": [],
                      "security": {
                        "policies": [],
                        "credentials": []
                      },
                      "disableNfDomain": false
                    }
                  ],
                  "buildSettings": {
                    "dockerfile": {
                      "buildEngine": "kaniko",
                      "useCache": false,
                      "dockerWorkDir": "/",
                      "dockerFilePath": "/Dockerfile",
                      "buildkit": {
                        "useInternalCache": false,
                        "internalCacheStorage": 16384
                      }
                    }
                  }
                },
                "ref": "payload"
              }
            ]
          }
        }
      ]
    }
  }
}
Create a secret group
New you can add a secret group in the workflow to contain environment variables that the Payload application requires. Drag and drop a Secret group node after your combined service and name it Secrets.
In the secrets section of the form, switch to the env editor and copy and paste the following variables:
PAYLOAD_PUBLIC_BASE_DNS="https://${refs.payload.ports.0.dns}"
PAYLOAD_SECRET="${args.PAYLOAD_SECRET}"
PAYLOAD_PUBLIC_BASE_DNS gets the Northflank-generated domain name for the Payload port using the reference "https://${refs.payload.ports.0.dns}" with the required https:// protocol added. This is only available after the service has been created, so the secret group needs to be added after the combined service.
PAYLOAD_SECRET is a random secret value used to encrypt Payload API keys. The value in the secret group is obtained from the template arguments object, using "${args.PAYLOAD_SECRET}". We'll add this argument in the template settings later.
Next click show addons in the linked addons section. Configure the database we added to the template, and then click MONGO_SRV to link this connection detail to the secret group. Add an alias of MONGODB_URI, as this is the environment variable key expected by Payload. Save the node.
{
  "apiVersion": "v1.2",
  "spec": {
    "kind": "Workflow",
    "spec": {
      "type": "sequential",
      "steps": [
        {
          "kind": "Project",
          "ref": "project",
          "spec": {
            "name": "Payload",
            "region": "europe-west",
            "networking": {
              "allowedIngressProjects": []
            }
          }
        },
        {
          "kind": "Workflow",
          "spec": {
            "type": "sequential",
            "context": {
              "projectId": "${refs.project.id}"
            },
            "steps": [
              {
                "kind": "Addon",
                "spec": {
                  "externalAccessEnabled": false,
                  "type": "mongodb",
                  "billing": {
                    "replicas": 1,
                    "storage": 6144,
                    "storageClass": "nvme",
                    "deploymentPlan": "nf-compute-50"
                  },
                  "tlsEnabled": true,
                  "name": "Database",
                  "version": "latest"
                },
                "ref": "database"
              },
              {
                "kind": "CombinedService",
                "spec": {
                  "deployment": {
                    "instances": 1,
                    "storage": {
                      "ephemeralStorage": {
                        "storageSize": 1024
                      },
                      "shmSize": 64
                    },
                    "docker": {
                      "configType": "default"
                    }
                  },
                  "runtimeEnvironment": {},
                  "runtimeFiles": {},
                  "buildArguments": {},
                  "buildFiles": {},
                  "billing": {
                    "deploymentPlan": "nf-compute-10",
                    "buildPlan": "nf-compute-400-16"
                  },
                  "name": "Payload",
                  "vcsData": {
                    "projectType": "github",
                    "projectUrl": "https://github.com/northflank-guides/deploy-payload-on-northflank",
                    "projectBranch": "master"
                  },
                  "ports": [
                    {
                      "internalPort": 3000,
                      "protocol": "HTTP",
                      "name": "p01",
                      "public": true,
                      "domains": [],
                      "security": {
                        "policies": [],
                        "credentials": []
                      },
                      "disableNfDomain": false
                    }
                  ],
                  "buildSettings": {
                    "dockerfile": {
                      "buildEngine": "kaniko",
                      "useCache": false,
                      "dockerWorkDir": "/",
                      "dockerFilePath": "/Dockerfile",
                      "buildkit": {
                        "useInternalCache": false,
                        "internalCacheStorage": 16384
                      }
                    }
                  }
                },
                "ref": "payload"
              },
              {
                "kind": "SecretGroup",
                "spec": {
                  "type": "secret",
                  "secretType": "environment-arguments",
                  "priority": 10,
                  "secrets": {
                    "variables": {
                      "PAYLOAD_PUBLIC_BASE_DNS": "https://${refs.payload.ports.0.dns}",
                      "PAYLOAD_SECRET": "${args.PAYLOAD_SECRET}"
                    },
                    "files": {}
                  },
                  "addonDependencies": [
                    {
                      "addonId": "${refs.database.id}",
                      "keys": [
                        {
                          "keyName": "MONGO_SRV",
                          "aliases": [
                            "MONGODB_URI"
                          ]
                        }
                      ]
                    }
                  ],
                  "name": "Secrets"
                },
                "ref": "secrets"
              }
            ]
          }
        }
      ]
    }
  }
}
Configure template settings
Open the settings for the template.
Name the template Payload and then select edit in the argument overrides section. Click add variable then enter PAYLOAD_SECRET as the key and ${fn.randomSecret(256)} as the value.
This will generate a random value using the Northflank function. Once generated, it will be securely stored on Northflank and injected into the template arguments on each run. It also ensures that future template runs do not generate new values.
All sensitive secrets should be stored as argument overrides, not within the template or as template arguments.
Finally, create template to save your template.
{
  "apiVersion": "v1.2",
  "name": "Payload",
  "description": "Deploy Payload with MongoDB",
  "options": {
    "autorun": false,
    "concurrencyPolicy": "allow"
  },
  "argumentOverrides": {
    "PAYLOAD_SECRET": "${fn.randomSecret(256)}"
  },
  "spec": {
    "kind": "Workflow",
    "spec": {
      "type": "sequential",
      "steps": [
        {
          "kind": "Project",
          "ref": "project",
          "spec": {
            "name": "Payload",
            "region": "europe-west",
            "networking": {
              "allowedIngressProjects": []
            }
          }
        },
        {
          "kind": "Workflow",
          "spec": {
            "type": "sequential",
            "context": {
              "projectId": "${refs.project.id}"
            },
            "steps": [
              {
                "kind": "Addon",
                "spec": {
                  "externalAccessEnabled": false,
                  "type": "mongodb",
                  "billing": {
                    "replicas": 1,
                    "storage": 6144,
                    "storageClass": "nvme",
                    "deploymentPlan": "nf-compute-50"
                  },
                  "tlsEnabled": true,
                  "name": "Database",
                  "version": "latest"
                },
                "ref": "database"
              },
              {
                "kind": "CombinedService",
                "spec": {
                  "deployment": {
                    "instances": 1,
                    "storage": {
                      "ephemeralStorage": {
                        "storageSize": 1024
                      },
                      "shmSize": 64
                    },
                    "docker": {
                      "configType": "default"
                    }
                  },
                  "runtimeEnvironment": {},
                  "runtimeFiles": {},
                  "buildArguments": {},
                  "buildFiles": {},
                  "billing": {
                    "deploymentPlan": "nf-compute-10",
                    "buildPlan": "nf-compute-400-16"
                  },
                  "name": "Payload",
                  "vcsData": {
                    "projectType": "github",
                    "projectUrl": "https://github.com/northflank-guides/deploy-payload-on-northflank",
                    "projectBranch": "master"
                  },
                  "ports": [
                    {
                      "internalPort": 3000,
                      "protocol": "HTTP",
                      "name": "p01",
                      "public": true,
                      "domains": [],
                      "security": {
                        "policies": [],
                        "credentials": []
                      },
                      "disableNfDomain": false
                    }
                  ],
                  "buildSettings": {
                    "dockerfile": {
                      "buildEngine": "kaniko",
                      "useCache": false,
                      "dockerWorkDir": "/",
                      "dockerFilePath": "/Dockerfile",
                      "buildkit": {
                        "useInternalCache": false,
                        "internalCacheStorage": 16384
                      }
                    }
                  },
                  "disabledCI": false,
                  "buildConfiguration": {
                    "pathIgnoreRules": [],
                    "isAllowList": false,
                    "ciIgnoreFlagsEnabled": false
                  }
                },
                "ref": "payload"
              },
              {
                "kind": "SecretGroup",
                "spec": {
                  "type": "secret",
                  "secretType": "environment-arguments",
                  "priority": 10,
                  "secrets": {
                    "variables": {
                      "PAYLOAD_PUBLIC_BASE_DNS": "https://${refs.payload.ports.0.dns}",
                      "PAYLOAD_SECRET": "${args.PAYLOAD_SECRET}"
                    },
                    "files": {}
                  },
                  "addonDependencies": [
                    {
                      "addonId": "${refs.database.id}",
                      "keys": [
                        {
                          "keyName": "MONGO_SRV",
                          "aliases": [
                            "MONGODB_URI"
                          ]
                        }
                      ]
                    }
                  ],
                  "name": "Secrets",
                  "restrictions": {
                    "restricted": false,
                    "nfObjects": [],
                    "tags": []
                  }
                },
                "ref": "secrets"
              }
            ]
          }
        }
      ]
    }
  }
}
Run your template
Now you can run your template, and watch each step complete. You can click view resource on a node to be taken to the created project resource.
Await conditions and restart the service (optional)
This is a simple template and the combined service should deploy the image after the addon has finished provisioning and when the required secrets are created. When you create more complex templates and use separate build and deployment services, you may find services deploy before other necessary resources are ready.
To solve this you can add await nodes to control the template flow, and action nodes to restart resources when required. As an example, we'll add two condition nodes and an action node to our template.
Drag and drop a parallel workflow after the secret group node, then add an Await condition node to it. Select addon as the resource kind, select database from the template as the resource, and then choose to wait until the resource is running.
Save the node, then add another Await condition to the same parallel workflow. This time select service as the kind, payload as the resource, wait until the resource is running and save the node.
These condition nodes check that the addon is ready to use and that the combined service has built and deployed an image.
Finally, add an Action node after the parallel workflow. Select service as the kind, payload as the resource, and choose restart as the action.
{
  "apiVersion": "v1.2",
  "name": "Payload",
  "description": "Deploy Payload with MongoDB",
  "options": {
    "autorun": false,
    "concurrencyPolicy": "allow",
    "runOnUpdate": false
  },
  "argumentOverrides": {
    "PAYLOAD_SECRET": "${fn.randomSecret(256)}"
  },
  "spec": {
    "kind": "Workflow",
    "spec": {
      "type": "sequential",
      "steps": [
        {
          "kind": "Project",
          "ref": "project",
          "spec": {
            "name": "Payload",
            "region": "europe-west",
            "networking": {
              "allowedIngressProjects": []
            }
          }
        },
        {
          "kind": "Workflow",
          "spec": {
            "type": "sequential",
            "context": {
              "projectId": "${refs.project.id}"
            },
            "steps": [
              {
                "kind": "Addon",
                "spec": {
                  "externalAccessEnabled": false,
                  "type": "mongodb",
                  "billing": {
                    "replicas": 1,
                    "storage": 6144,
                    "storageClass": "nvme",
                    "deploymentPlan": "nf-compute-50"
                  },
                  "tlsEnabled": true,
                  "name": "Database",
                  "version": "latest"
                },
                "ref": "database"
              },
              {
                "kind": "CombinedService",
                "spec": {
                  "deployment": {
                    "instances": 1,
                    "storage": {
                      "ephemeralStorage": {
                        "storageSize": 1024
                      },
                      "shmSize": 64
                    },
                    "docker": {
                      "configType": "default"
                    }
                  },
                  "runtimeEnvironment": {},
                  "runtimeFiles": {},
                  "buildArguments": {},
                  "buildFiles": {},
                  "billing": {
                    "deploymentPlan": "nf-compute-10",
                    "buildPlan": "nf-compute-400-16"
                  },
                  "name": "Payload",
                  "vcsData": {
                    "projectType": "github",
                    "projectUrl": "https://github.com/northflank-guides/deploy-payload-on-northflank",
                    "projectBranch": "master"
                  },
                  "ports": [
                    {
                      "internalPort": 3000,
                      "protocol": "HTTP",
                      "name": "p01",
                      "public": true,
                      "domains": [],
                      "security": {
                        "policies": [],
                        "credentials": []
                      },
                      "disableNfDomain": false
                    }
                  ],
                  "buildSettings": {
                    "dockerfile": {
                      "buildEngine": "kaniko",
                      "useCache": false,
                      "dockerWorkDir": "/",
                      "dockerFilePath": "/Dockerfile",
                      "buildkit": {
                        "useInternalCache": false,
                        "internalCacheStorage": 16384
                      }
                    }
                  },
                  "disabledCI": false,
                  "buildConfiguration": {
                    "pathIgnoreRules": [],
                    "isAllowList": false,
                    "ciIgnoreFlagsEnabled": false
                  }
                },
                "ref": "payload"
              },
              {
                "kind": "SecretGroup",
                "spec": {
                  "type": "secret",
                  "secretType": "environment-arguments",
                  "priority": 10,
                  "secrets": {
                    "variables": {
                      "PAYLOAD_PUBLIC_BASE_DNS": "https://${refs.payload.ports.0.dns}",
                      "PAYLOAD_SECRET": "${args.PAYLOAD_SECRET}"
                    },
                    "files": {}
                  },
                  "addonDependencies": [
                    {
                      "addonId": "${refs.database.id}",
                      "keys": [
                        {
                          "keyName": "MONGO_SRV",
                          "aliases": [
                            "MONGODB_URI"
                          ]
                        }
                      ]
                    }
                  ],
                  "name": "Secrets",
                  "restrictions": {
                    "restricted": false,
                    "nfObjects": [],
                    "tags": []
                  }
                },
                "ref": "secrets"
              },
              {
                "kind": "Workflow",
                "spec": {
                  "type": "parallel",
                  "steps": [
                    {
                      "kind": "Condition",
                      "spec": {
                        "kind": "Addon",
                        "spec": {
                          "data": {
                            "addonId": "${refs.database.id}"
                          },
                          "type": "running"
                        }
                      }
                    },
                    {
                      "kind": "Condition",
                      "spec": {
                        "kind": "Service",
                        "spec": {
                          "data": {
                            "serviceId": "${refs.payload.id}"
                          },
                          "type": "running"
                        }
                      }
                    }
                  ]
                }
              },
              {
                "kind": "Action",
                "spec": {
                  "kind": "Service",
                  "spec": {
                    "data": {
                      "serviceId": "${refs.payload.id}"
                    },
                    "type": "restart"
                  }
                },
                "ref": "refspayloadid-action-1"
              }
            ]
          }
        }
      ]
    }
  }
}
Next steps
Run a template
Run templates manually or automatically.
Update a template
Update a template and resources within a project.
GitOps on Northflank
Use templates and workflows in a Git repository to trigger changes to your config and resources.
Share a template
Share templates with your team or the public.
Manage template versions on Northflank
Use the template drafts system to review, accept, or reject proposed changes to your team's Northflank templates.