Connect your Amazon Web Services account to manage clusters, access registries, or use other integration features.
To add your AWS account, open Integrations → Cloud providers. In an organization, use Cloud → Provider links. If you already have provider links, select Create provider link. Otherwise, select Add provider link beside your provider.
Use a cross-account role when it supports your selected features. You can also connect with an IAM user access key.
After connecting the account, continue to registry setup or cluster creation.
Northflank also supports AWS European Sovereign Cloud, a separate AWS environment in the European Union with its own accounts and credentials. Access requires account enablement through Northflank support. For sovereign deployments, use the sovereign provider link and cluster creation forms with the AWS procedures below.
Generate and view required permissions
Select the features that your AWS integration needs. Northflank shows the corresponding permissions as a table and a policy that you can copy.
For ECR access, select Docker Registries. To push project builds, also select Docker Registry Push. The generated push policy includes permission to create ECR repositories.
For cluster deployment, select BYOC and any required features, such as BYOC - Custom VPC or BYOC - Static Egress. Registry-only integrations do not require these cluster features.
For a team, open Integrations → Cloud providers. For an organization, open Cloud → Provider links. Select your AWS integration and open its Edit tab.
New BYOC integrations use the latest AWS permissions policy. Existing integrations can retain an older policy. If you see AWS permission update recommended:
- Apply the displayed Standard AWS policy to the IAM role or user for this integration.
- Select Verify all permissions under Credentials.
- Click Update to save the integration.
If you add features, apply the updated policy shown in Northflank before saving the integration. You can use Verify all permissions under Credentials to check an existing integration at any time.
The following policy is a cluster example with custom VPC and static egress permissions. Use the policy shown in Northflank for your current feature selection.
{
  "Version": "2012-10-17",
  "Statement": [
    {
      "Sid": "Northflank",
      "Effect": "Allow",
      "Action": [
        "ec2:AllocateAddress",
        "ec2:AssociateRouteTable",
        "ec2:CreateLaunchTemplate",
        "ec2:CreateLaunchTemplateVersion",
        "ec2:CreateNatGateway",
        "ec2:CreateRoute",
        "ec2:CreateRouteTable",
        "ec2:CreateSubnet",
        "ec2:CreateTags",
        "ec2:DeleteLaunchTemplate",
        "ec2:DeleteLaunchTemplateVersions",
        "ec2:DeleteNatGateway",
        "ec2:DeleteRoute",
        "ec2:DeleteRouteTable",
        "ec2:DeleteSubnet",
        "ec2:DeleteTags",
        "ec2:DescribeAddresses",
        "ec2:DescribeLaunchTemplates",
        "ec2:DescribeLaunchTemplateVersions",
        "ec2:DescribeNatGateways",
        "ec2:DescribeRouteTables",
        "ec2:DescribeSubnets",
        "ec2:DescribeVpcs",
        "ec2:DisassociateRouteTable",
        "ec2:ModifyLaunchTemplate",
        "ec2:ReleaseAddress",
        "ec2:RunInstances",
        "eks:AssociateAccessPolicy",
        "eks:CreateAccessEntry",
        "eks:CreateAddon",
        "eks:CreateCluster",
        "eks:CreateNodegroup",
        "eks:DeleteAccessEntry",
        "eks:DeleteAddon",
        "eks:DeleteCluster",
        "eks:DeleteNodegroup",
        "eks:DescribeAccessEntry",
        "eks:DescribeAddon",
        "eks:DescribeCluster",
        "eks:DescribeNodegroup",
        "eks:DescribeUpdate",
        "eks:DisassociateAccessPolicy",
        "eks:ListAccessEntries",
        "eks:ListAccessPolicies",
        "eks:ListAddons",
        "eks:ListAssociatedAccessPolicies",
        "eks:ListClusters",
        "eks:ListIdentityProviderConfigs",
        "eks:ListInsights",
        "eks:ListNodegroups",
        "eks:ListTagsForResource",
        "eks:ListUpdates",
        "eks:TagResource",
        "eks:UntagResource",
        "eks:UpdateAccessEntry",
        "eks:UpdateAddon",
        "eks:UpdateClusterConfig",
        "eks:UpdateClusterVersion",
        "eks:UpdateNodegroupConfig",
        "eks:UpdateNodegroupVersion",
        "iam:AttachRolePolicy",
        "iam:CreateOpenIDConnectProvider",
        "iam:CreateRole",
        "iam:CreateServiceLinkedRole",
        "iam:DeleteOpenIDConnectProvider",
        "iam:DeleteRole",
        "iam:DeleteRolePolicy",
        "iam:DetachRolePolicy",
        "iam:GetOpenIDConnectProvider",
        "iam:GetRole",
        "iam:ListAttachedRolePolicies",
        "iam:PassRole",
        "iam:PutRolePolicy",
        "iam:SimulatePrincipalPolicy",
        "iam:TagOpenIDConnectProvider",
        "iam:TagRole"
      ],
      "Resource": [
        "*"
      ]
    }
  ]
}
Add your account with a cross-account role
A cross-account role grants Northflank access to your AWS account through temporary credentials. Use this method when it is available for your selected features.
For registry access, select Docker Registries and, for project builds, Docker Registry Push. You do not need to select BYOC unless this integration also manages clusters.
- Open Integrations → Cloud providers. In an organization, use Cloud → Provider links.
- Open the AWS provider link form .
- Under Basic information, enter a Name. Select the features you need under Desired features.
- In Credentials, select Cross-account role.
- Select Copy Custom trust policy.
- Open Roles in the AWS IAM console .
- Select Create role → Custom trust policy.
- Paste the copied policy.
- Name and save the role.
- In Northflank, select Copy AWS inline policy under Required permissions.
- Open the new role's Permissions tab in AWS.
- Select Add permissions → Create inline policy.
- Paste the copied policy into the JSON editor. Save the policy with a name.
- In Northflank, enter the IAM role ARN under Credentials.
- Select Create provider link.
You can now use the integration for its selected features. To deploy a cluster, continue to create a cluster.
You can update the integration's shared secret and role ARN.
Keep access to existing resources when you change the role. Without that access, Northflank cannot manage those resources, and deleting clusters directly in AWS can leave unused resources.
Add your account with an IAM user
You can integrate AWS with an IAM user's access key and secret key. Prefer a cross-account role when it supports your selected features, because it uses temporary credentials.
For registry access, select Docker Registries and, for project builds, Docker Registry Push. You do not need to select BYOC unless this integration also manages clusters.
- Open Integrations → Cloud providers. In an organization, use Cloud → Provider links.
- Open the AWS provider link form .
- Under Basic information, enter a Name. Select the features you need under Desired features.
- In Credentials, select Access key.
- Select Copy AWS inline policy under Required permissions.
- Open Users in the AWS IAM console .
- Create and save a user without console access.
- Open the user's Permissions tab.
- Select Add permissions → Create inline policy.
- Paste the copied policy into the JSON editor. Save the policy with a name.
- Under Security credentials, select Create access key.
- Select the Third-party service use case and continue.
- Enter a description for the access key. Select Create access key.
- In Northflank, enter the Access key and Secret key under Credentials.
- Select Create provider link.
You can update the integration's credentials when required.
Keep access to existing resources when you replace credentials. Without that access, Northflank cannot manage those resources, and deleting clusters directly in AWS can leave unused resources.
Check your quotas
To successfully deploy a cluster on AWS using Northflank you must have the required resources available to your account for your desired region.
Check the node types you wish to deploy and ensure your cluster has access to the relevant resources. The specific quotas for each provider may differ, you will need to ensure you have sufficient quotas for your required node type, vCPU, and disk type for your desired regions.
You can change your AWS service quotas by selecting the relevant region in the console and navigating to the service quotas page. You may need to opt-in to a region first. Choose the relevant AWS service from the dashboard, or search for it on the AWS services page, then search for the relevant resource quotas to increase.
For example, to increase the number of node pools you can deploy on AWS using the m5.large node type select the relevant region in the console, search for and open the AWS service Amazon Elastic Compute Cloud (Amazon EC2), search for Running On-Demand Standard (A, C, D, H, I, M, R, T, Z) instances and click request quota increase.
Create a cluster
Open Clusters in your team. In an organization, open Cloud → Clusters. Click Create cluster, or Add cluster for your first cluster.
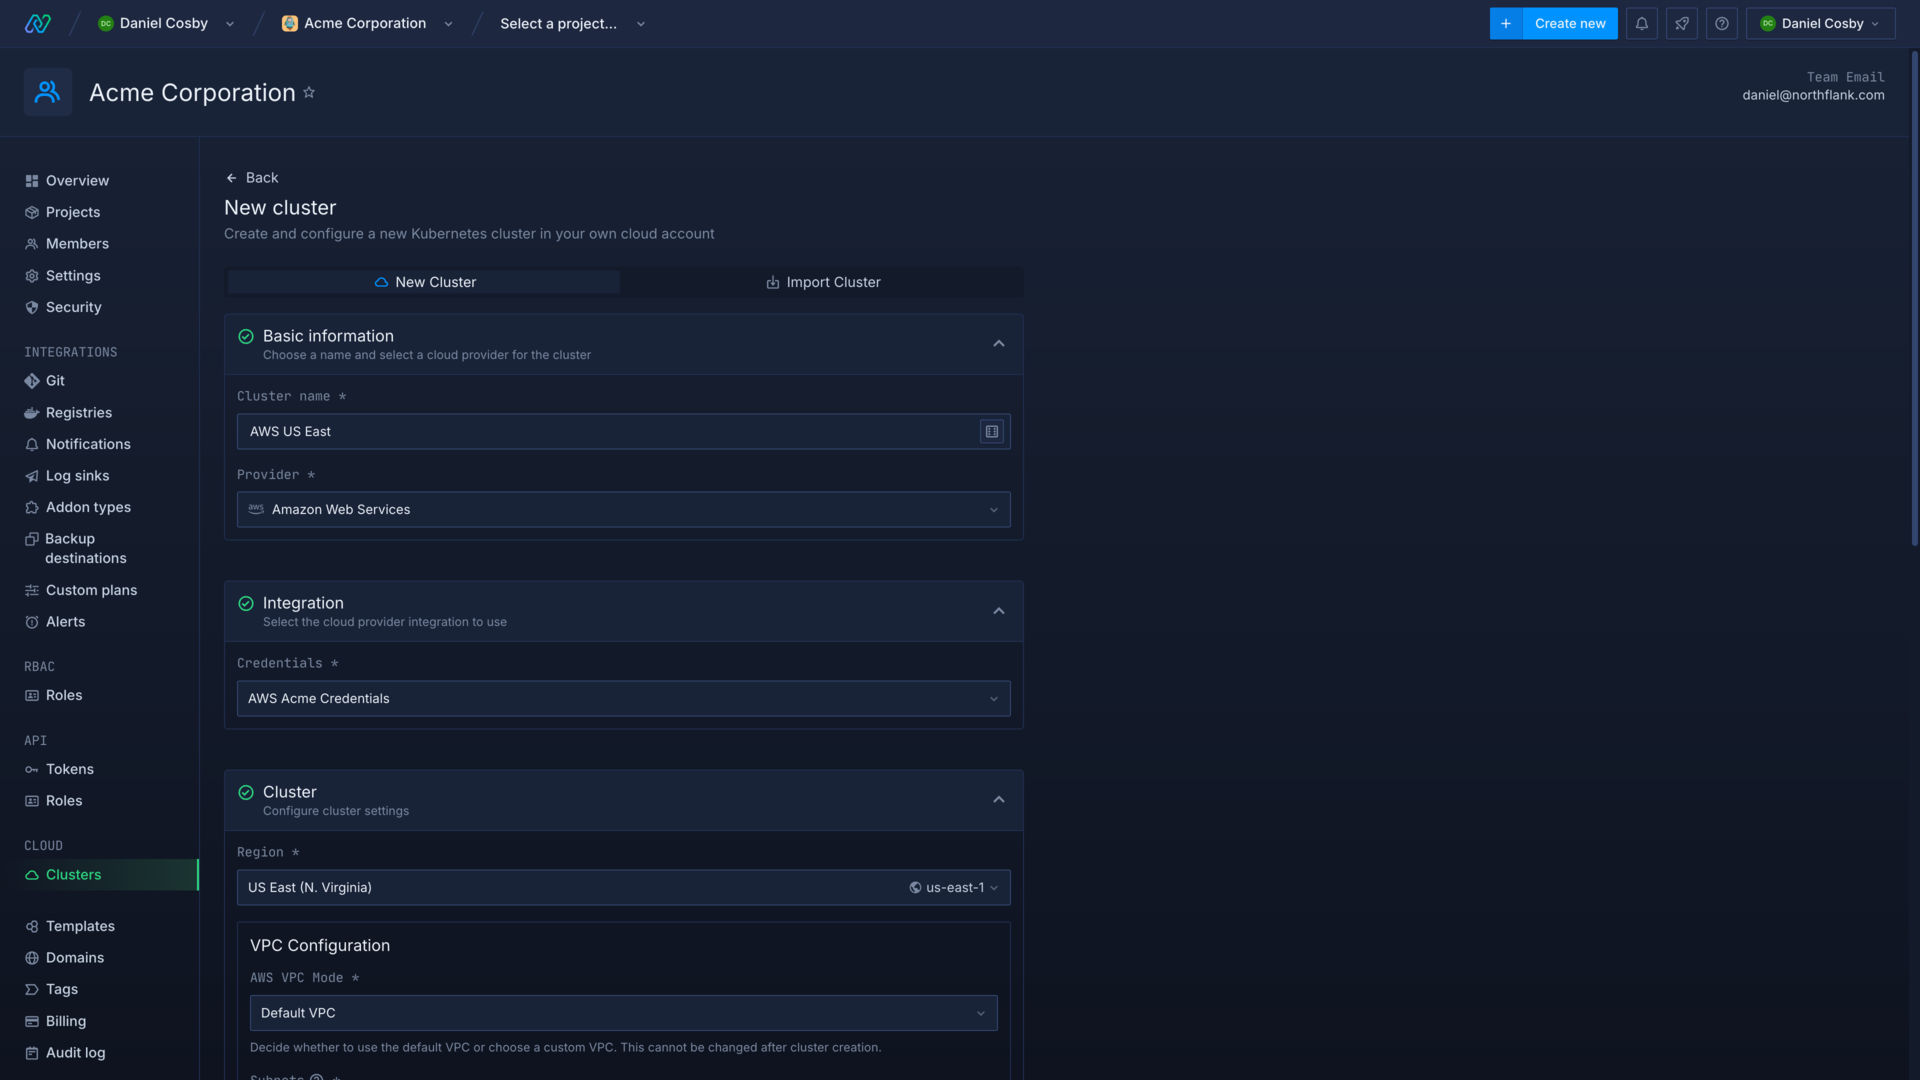
Enter a name for the cluster and select AWS as the cloud provider. Choose your integration credentials and select the region to deploy in.
Select a Virtual Private Cloud
When you create a cluster you can select which Virtual Private Cloud to use. The VPC defines public and private networks in your clusters, allowing access to other AWS services and the internet.
The default VPC includes public subnets for each availability zone, and its components cannot be modified. You should not use the default VPC for production deployments.
For production deployments, use a custom VPC to select private subnets or access other services in your AWS account. Private nodes can still receive workload traffic through public ingress. See Public and VPC ingress for cluster ingress choices. Separate VPCs are defined for each region.
You can select which subnets (and therefore availability zones) will host the control plane components for your cluster, this has no impact on the subnets that you can select for node pools. You should select between 2 and 4 subnets for the cluster's control plane.
Configure node pools
You can now configure the node pools for your cluster. Node pools can also be added, deleted, and updated after creating your cluster. Click add node pool to add another pool.
Each cluster requires at least one node pool, and a combined minimum of 8 vCPU and 16GB memory across all node pools.
The number of pods that can be scheduled on each node is determined by networking and node scheduling limits.
Cluster networking limits
The AWS Load Balancer only allows a maximum of 500 targets per availability zone. This total includes each node pool deployed to the availability zone for that cluster.
To help avoid issues with networking capacity you should create node pools with fewer, larger nodes rather than lots of smaller nodes.
See deploy and scale node pools for more information on configuring nodes and node pools.
Configure advanced options
After adding your initial node pools you can configure advanced options for the cluster, such as build infrastructure, resource request modifiers, and volume deletion options.
When you create the cluster Northflank will begin installing system components in node pools according to their capacity. This may take up to 20 minutes.
Use a custom VPC
When you create a new cluster you can select a custom VPC that you have defined in your account and selected region. You can create and manage your VPCs in the AWS console . You must create a subnet in each availability zone that you want to use, and your VPC must include at least one public subnet.
Learn more about Amazon EKS networking requirements for VPC and subnets .
Subnets
Public subnets require an internet gateway. Private subnets require a NAT gateway for internet egress. A NAT gateway lets resources with private addresses initiate internet connections. You can use one NAT gateway for multiple private subnets, but high traffic can exceed its capacity.
Workloads on private nodes can communicate within your VPC and initiate internet connections through the NAT gateway. They can also receive public requests through a public ingress load balancer. See Public and VPC ingress to control workload ingress. Read more about connecting your VPC here .
Security
You can enable the control plane IP allow list option to block all except Northflank’s egress IP from accessing the cluster’s Kubernetes API endpoint.
IP addresses
Subnets need to have sufficient available IPs for pods and load balancers. Northflank requires at least 32 available IPs for public subnets that will host load balancers. Private subnets which will host node pools require a minimum of 64 available IPs, we strongly recommend to allocate much more (CIDR range /22, /21, or /20) depending on the number of workloads you expect to run. The default CIDR ranges provided by Amazon when configuring a subnet should be sufficient for most use-cases.
The default subnets in the default VPC are public, i.e. nodes will be assigned a public IP. In default VPC mode, subnets for the cluster and node pools are selected by availability zone. Northflank will use the default subnet for the selected availability zone.
- You should select between 2 and 4 availability zones for your cluster’s control plane.
- You can create node pools across 2 or more availability zones for high-availability of workloads.
- You should enable the control plane IP allow list option to block all bar Northflank’s egress IP from accessing the cluster’s Kubernetes API endpoint.
VPC setup
- IPv4 CIDR block: 10.0.0.0/16
- No IPv6 CIDR block
- Use 3 or more availability zones
- Add 3 public subnets, one for each availability zone; ensure “auto-assign public IP” is enabled; a /20 CIDR block is recommended
- Add an internet gateway and associate it with the public subnets via route tables
- Add 3 private subnets, one for each availability zone; a /20 CIDR block is recommended
- Add 1 NAT gateway per availability zone (if you want to reduce cost, you can also use just one NAT for the entire VPC)
- Associate each private subnet with a corresponding NAT via route tables
- Enable DNS hostnames
- Enable DNS resolution
Northflank cluster creation
- Select 3 private subnets for your cluster’s control plane
- Create node pools on private subnets.
- Create 2 or more node pools across multiple (private) subnets for high-availability of workloads.
- Enable the control plane IP allow list option to block all bar Northflank’s egress IP from accessing the cluster’s Kubernetes API endpoint.
Cluster subnet selection
You can select which subnets (and therefore availability zones) will host the control plane components for your cluster, this has no impact on the subnets that you can select for node pools. You should select between 2 and 4 subnets for the cluster's control plane.
Keep at least one public subnet in your custom VPC, including for private-only ingress. You do not need to select that public subnet for the cluster.
Enable egress via a static IP
If you are using the default VPC you can enable static egress to route the cluster’s outgoing traffic through a static IP. This is useful if you use external services that only accept requests from specified IP addresses.
If you are using a custom VPC, you must set up your own static egress IP for your cluster in AWS.
Deploy to private nodes
Private subnets prevent direct connections from the internet to your nodes. Workloads on private nodes can still receive traffic through a public ingress load balancer. Subnet placement alone does not make workload ingress private.
To use private nodes, create a cluster with a custom VPC that contains private subnets. Select a private subnet when you create a node pool.
You can then create a project on your cluster. Use node pool labels and Northflank tags to schedule workloads to private nodes.
See Public and VPC ingress for private ingress, client connectivity, and AWS limitations.
Use AWS launch templates
You can use custom AWS launch templates to customize the EC2 instances in your node pools. For example, configure node disks or use Capacity Blocks.
See use AWS launch templates for use cases and setup instructions.
Recommended configuration
When you create an AWS EKS cluster with Northflank, AWS automatically creates a security group to manage traffic between cluster components. This security group is initially permissive to ensure cluster functionality, but you may want to restrict it for production workloads.
How do I harden my EKS security group?
For production deployments, review and restrict your EKS security group according to your use case. AWS provides detailed guidance on which rules are mandatory for cluster operation and which can be restricted.
Common hardening approaches include:
- Restricting inbound traffic to necessary ports and sources (e.g., your VPN or office IP ranges)
- Limiting outbound traffic to specific destinations and ports required by your workloads
- Adding tags and descriptions to security group rules for audit purposes
- Using AWS security groups alongside Northflank's network policies for defense in depth
You can manage your cluster's security group in your AWS console under EC2 security groups, or programmatically using AWS APIs and infrastructure-as-code tools.
Learn more about Amazon EKS security group requirementsNext steps
Configure your Kubernetes cluster
Deploy node pools
Deploy workloads to your cluster
Run GPU workloads