You can create an AWS launch template to customize the EC2 instances in a node pool. You select this custom template when configuring the pool. Its settings override some of the node pool options in Northflank.
Common uses for custom launch templates include:
- Configuring node disks, such as volume type, IOPS, and throughput, or using local SSDs
- Configuring Capacity Blocks to reserve GPU nodes for a specific time period
- Enabling microVM support on eligible non-metal instances when using a custom template
Custom AWS launch templates are available on enterprise plans. Contact Northflank if the feature is not enabled on your account.
Configure Northflank permissions
To use a custom launch template, add BYOC - Custom Launch Templates to your AWS integration.
For an existing integration, apply the updated AWS policy to its IAM role or user. Then click Update in Northflank to save the integration changes. For a new integration, follow the AWS account setup guide.
ec2:DescribeLaunchTemplateVersions
ec2:DescribeLaunchTemplates
ec2:RunInstances
Create a launch template
If you use a custom launch template, create it in the same region as your AWS cluster. You can create one in the EC2 dashboard in the AWS console , from the Launch templates page under instances:
- Click Create launch template and enter a name for the launch template
- Do not select an Amazon Machine Image unless Northflank has enabled custom AMI support for your account. Contact support@northflank.com if you require a custom AMI.
- Optionally, select an instance type. If selected, it will override the instance type that you specify for a node pool on Northflank.
- Under Storage (volumes), click Add new volume and configure the node boot disk. You must define at least one volume in the launch template:
- Set the device name to exactly
/dev/xvda. If you use a different device name, the volume will be attached as a secondary disk instead of replacing the boot disk. - Enter a suitable size. We suggest
100 GiBas a minimum. For larger instances, you may want to increase this. - Select
gp3as the volume type, or another volume type if your use case requires it - Select Yes for Delete on termination
- Enable Encrypted if required
- Set the device name to exactly
- Configure the template for your use case: node disks, Capacity Blocks, or microVM support
- Click Create launch template
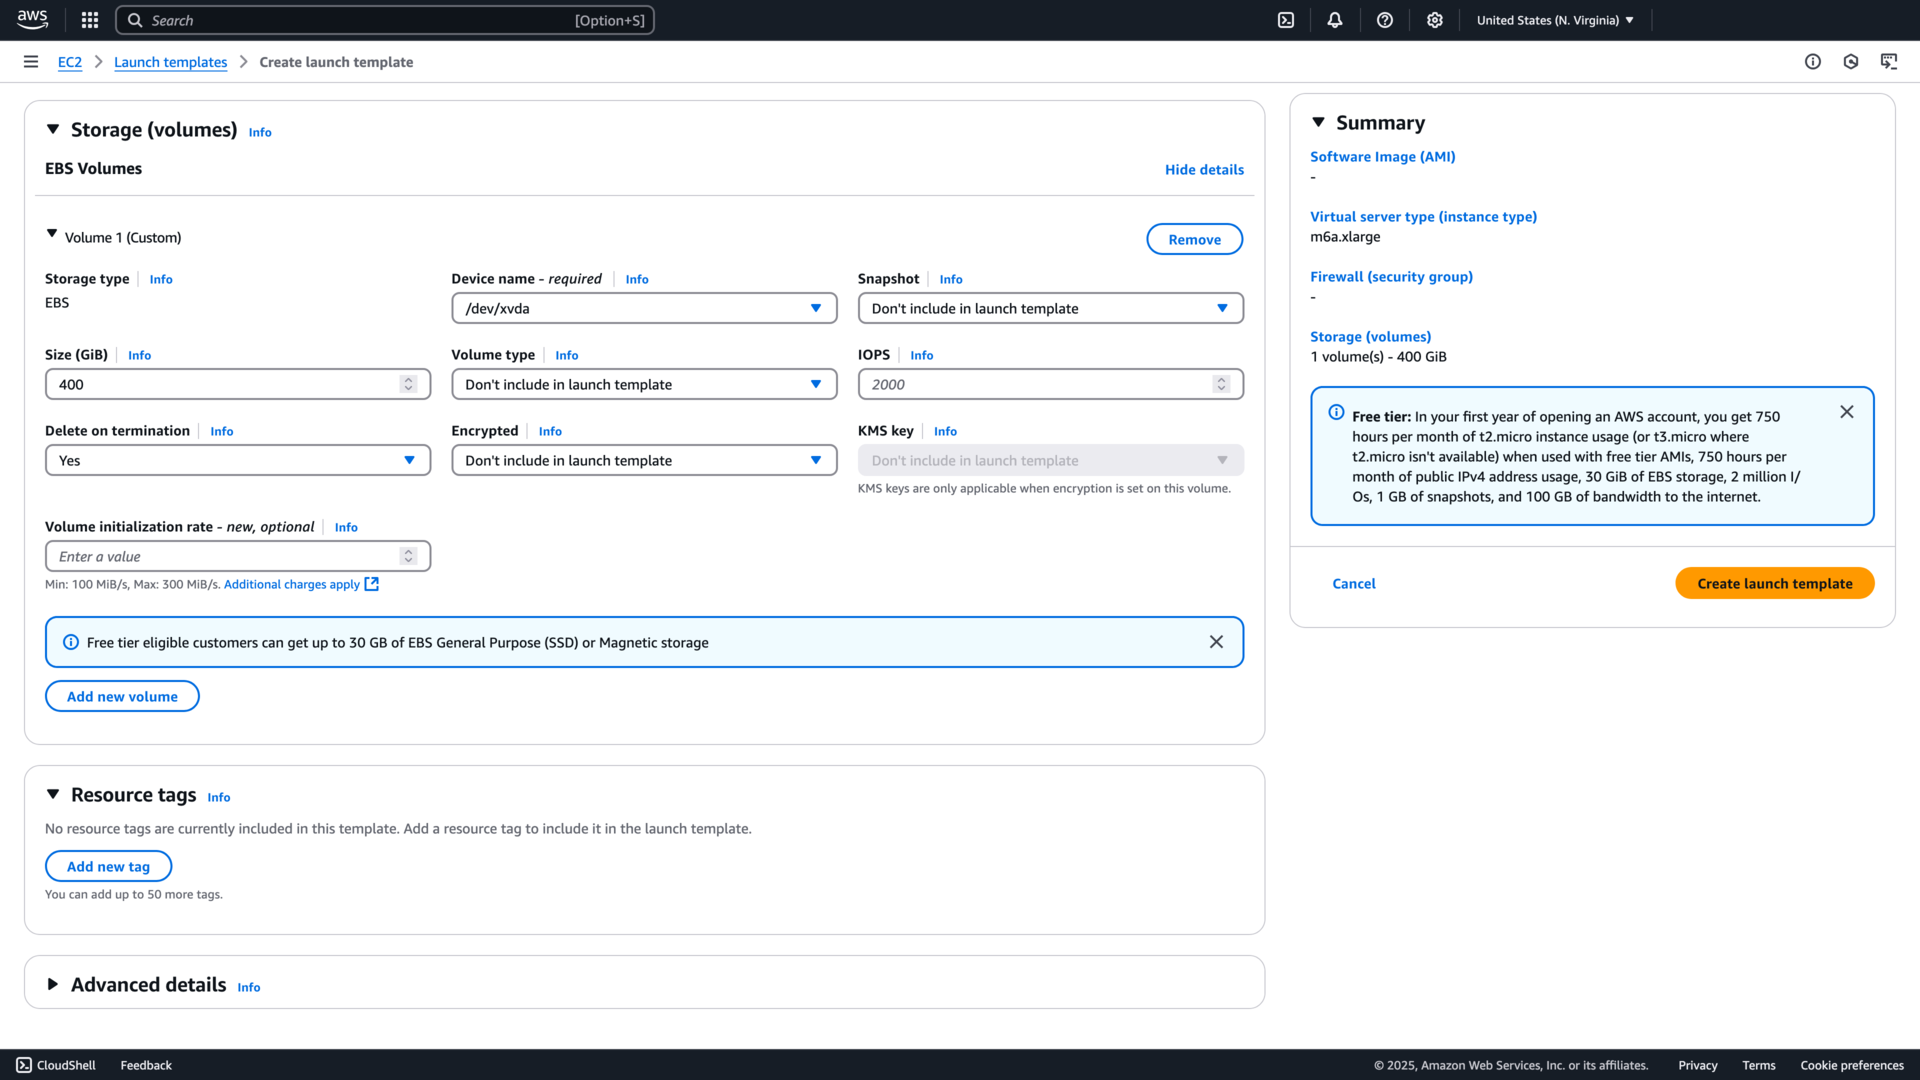
The volume defined in the launch template will override the disk specified for a node pool on Northflank.
Do not configure the subnets, shutdown behaviour, or IAM instance profile in the launch template, as these are handled by Northflank. Configuring resources not mentioned in this guide may cause issues scheduling and managing nodes with Northflank. Learn more about launch template configuration or contact support@northflank.com to discuss other use cases.
Configure node disks
Use a launch template to customise node storage beyond the options available in Northflank, for example to configure provisioned IOPS and throughput.
Configure the volume in your launch template as described above, and select the volume type, size, IOPS, and throughput as required.
Use local SSDs
To use the local NVMe SSDs of instance types that have them as node storage, configure the node to combine them into a RAID0 array. Under Advanced details, locate the User data input box and enter:
MIME-Version: 1.0
Content-Type: multipart/mixed; boundary="==BOUNDARY=="

--==BOUNDARY==
Content-Type: application/node.eks.aws

---
apiVersion: node.eks.aws/v1alpha1
kind: NodeConfig
spec:
  instance:
    localStorage:
      strategy: RAID0

--==BOUNDARY==--
Local NVMe storage is ephemeral: data on the instance store is lost when a node is stopped, replaced, or terminated, and RAID0 provides no redundancy. Do not use it for persistent application data.
Configure Capacity Blocks
You can use launch templates to take advantage of Capacity Blocks for ML training , which allow you to reserve GPU nodes for a specific time period at a known price, up to 8 weeks in advance.
First, complete the common launch template configuration, including the required node boot volume. Then select an instance type that matches the reserved instances. Under purchasing options, choose Capacity Blocks and enter your Capacity Block reservation ID. See the EKS documentation on Capacity Blocks for more information.
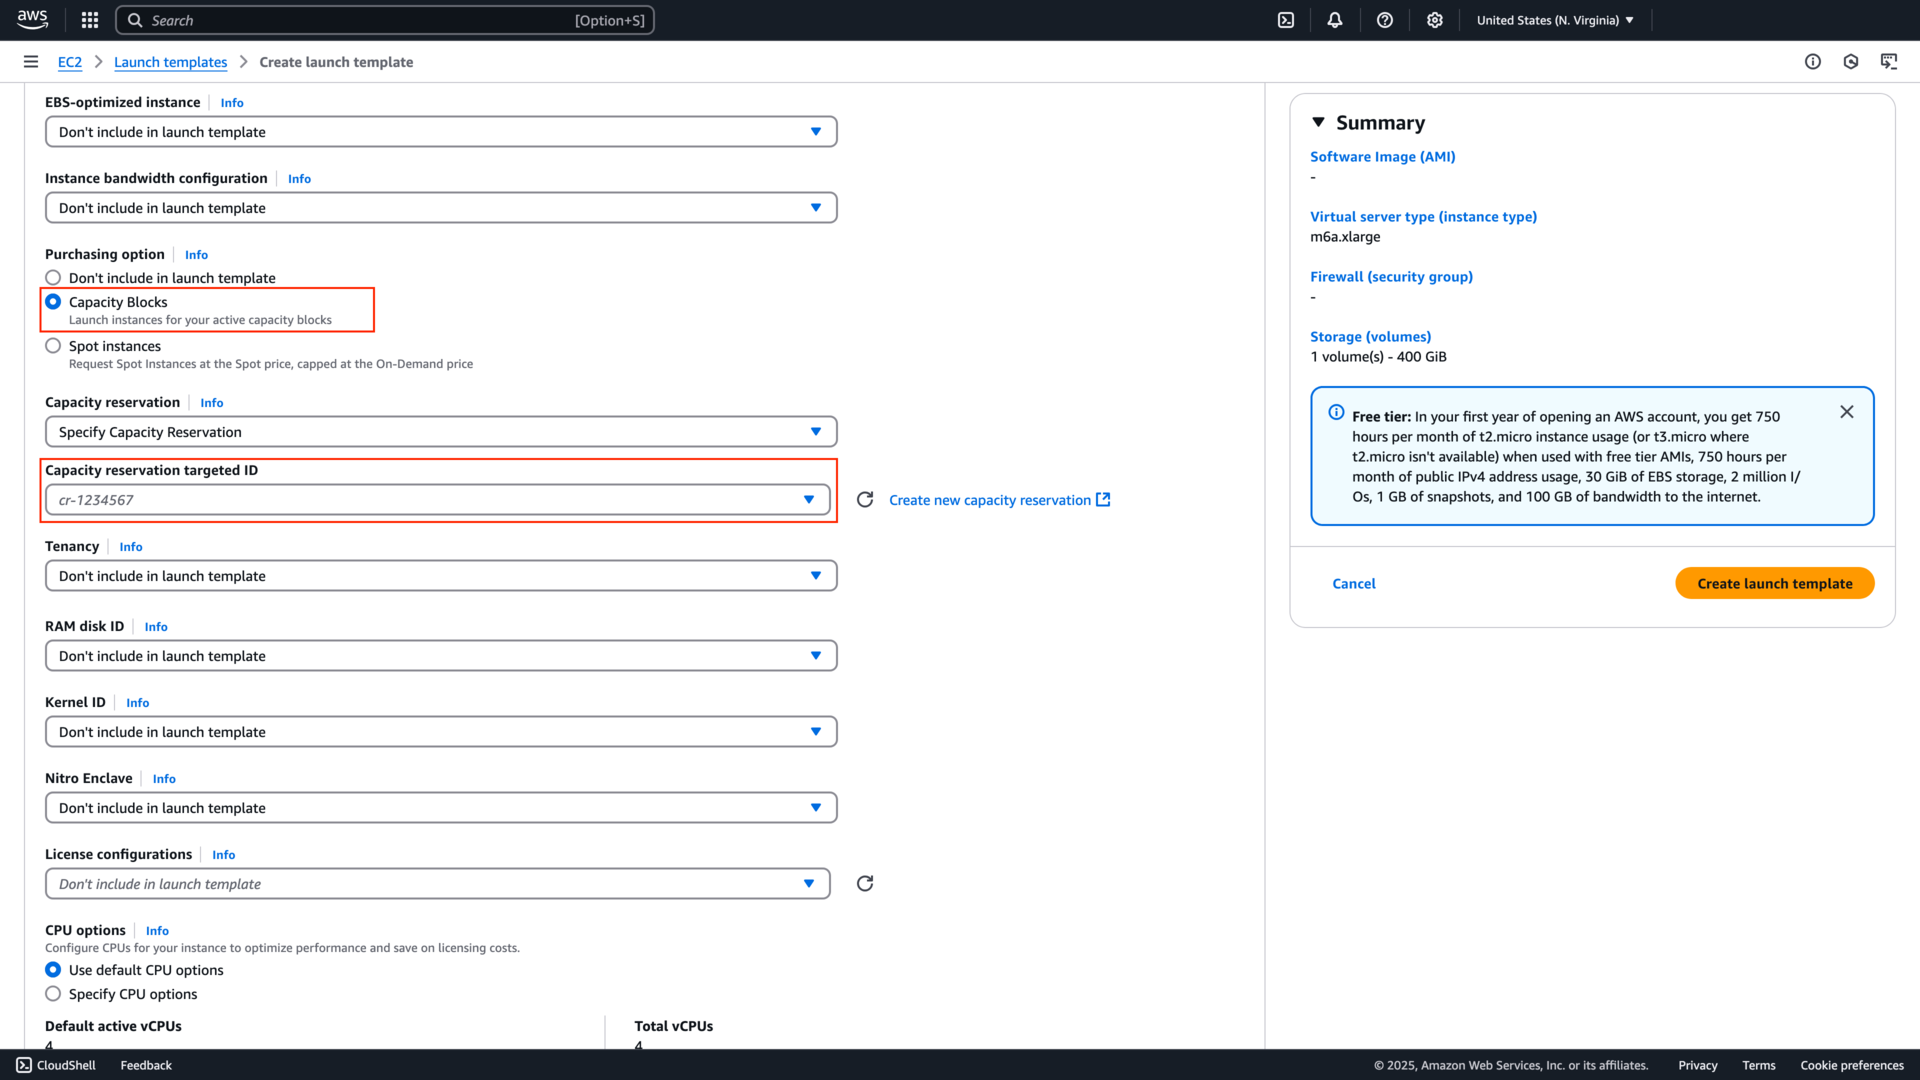
Capacity Block reservations are zonal: configure your node pool with the availability zone and instance type of the reservation.
Nodes will not join the node pool until the date and time of the capacity reservation. If you create the node pool before the reservation becomes active, set the node count to 0 and scale the pool up when the reservation becomes active. Otherwise, provisioning nodes will fail until the reservation is active.
EKS begins draining nodes and scales the node pool to zero 40 minutes before the reservation expires. EC2 begins terminating instances 30 minutes before expiry. Checkpoint or move workloads before draining begins. If your cluster has no other node pools with nodes that these workloads can schedule on, they will remain unscheduled until the required capacity is added.
Enable microVM support
MicroVM workloads require bare-metal instances or eligible non-metal instances with nested virtualization enabled. Nested virtualization lets a virtual machine run other virtual machines. Northflank enables it automatically for eligible new node pools that do not use a custom launch template.
The m8i, c8i, r8i, and m7i families include instance types that support nested virtualization. See the AWS documentation for supported types. For a non-metal node pool, every instance type it uses must support nested virtualization.
At the time of writing (September 2026), AWS is investigating a hypervisor
issue observed on virtualized m8i instances running approximately 50–60 or
more nested VMs on one node. The issue can cause the EC2 instance to reboot,
restarting workloads on that node. Until AWS confirms a fix and supported
density, spread microVM workloads across more nodes and avoid approaching this
density. Contact support@northflank.com for guidance on high-density
deployments.
To use automatic setup on non-metal instances:
- If Northflank recommends an AWS permission update, follow the AWS permissions guide first.
- Add a new node pool with a supported instance type, without selecting a custom launch template.
- For an existing cluster, select Update node pools. For a new cluster, complete the cluster creation form.
Northflank enables nested virtualization for the new pool. Existing node pools keep their configuration.
You can configure the sandbox technology for your workloads globally in your cluster settings, or for specific workloads using tags. See sandboxes in your own cloud for more information.
Use a custom launch template
You can also enable nested virtualization in a custom launch template. First, complete the launch template configuration, including the required node boot volume. Then, in your template:
- Select an instance type that supports nested virtualization, for example
m8i.2xlarge. This will override the instance type you select on the node pool in Northflank. - Under Advanced details, locate Nested virtualization and set the field to Enabled
Use a launch template in Northflank
To use a custom launch template, select an existing AWS cluster on Northflank, or create a new one. Configure the cluster as normal with a node pool for system components, and any other required node pools.
Create a new node pool and configure it as normal, selecting the node type, disk size, and availability zone. Then expand the Advanced section:
- Under External launch template, select the Launch template ID created earlier.
- Select the Launch template version. Updating a launch template in AWS creates a new version. Existing node pools keep using the version they were configured with.
- Update the scheduling rules, if required, for example to reserve the pool for specific workloads.
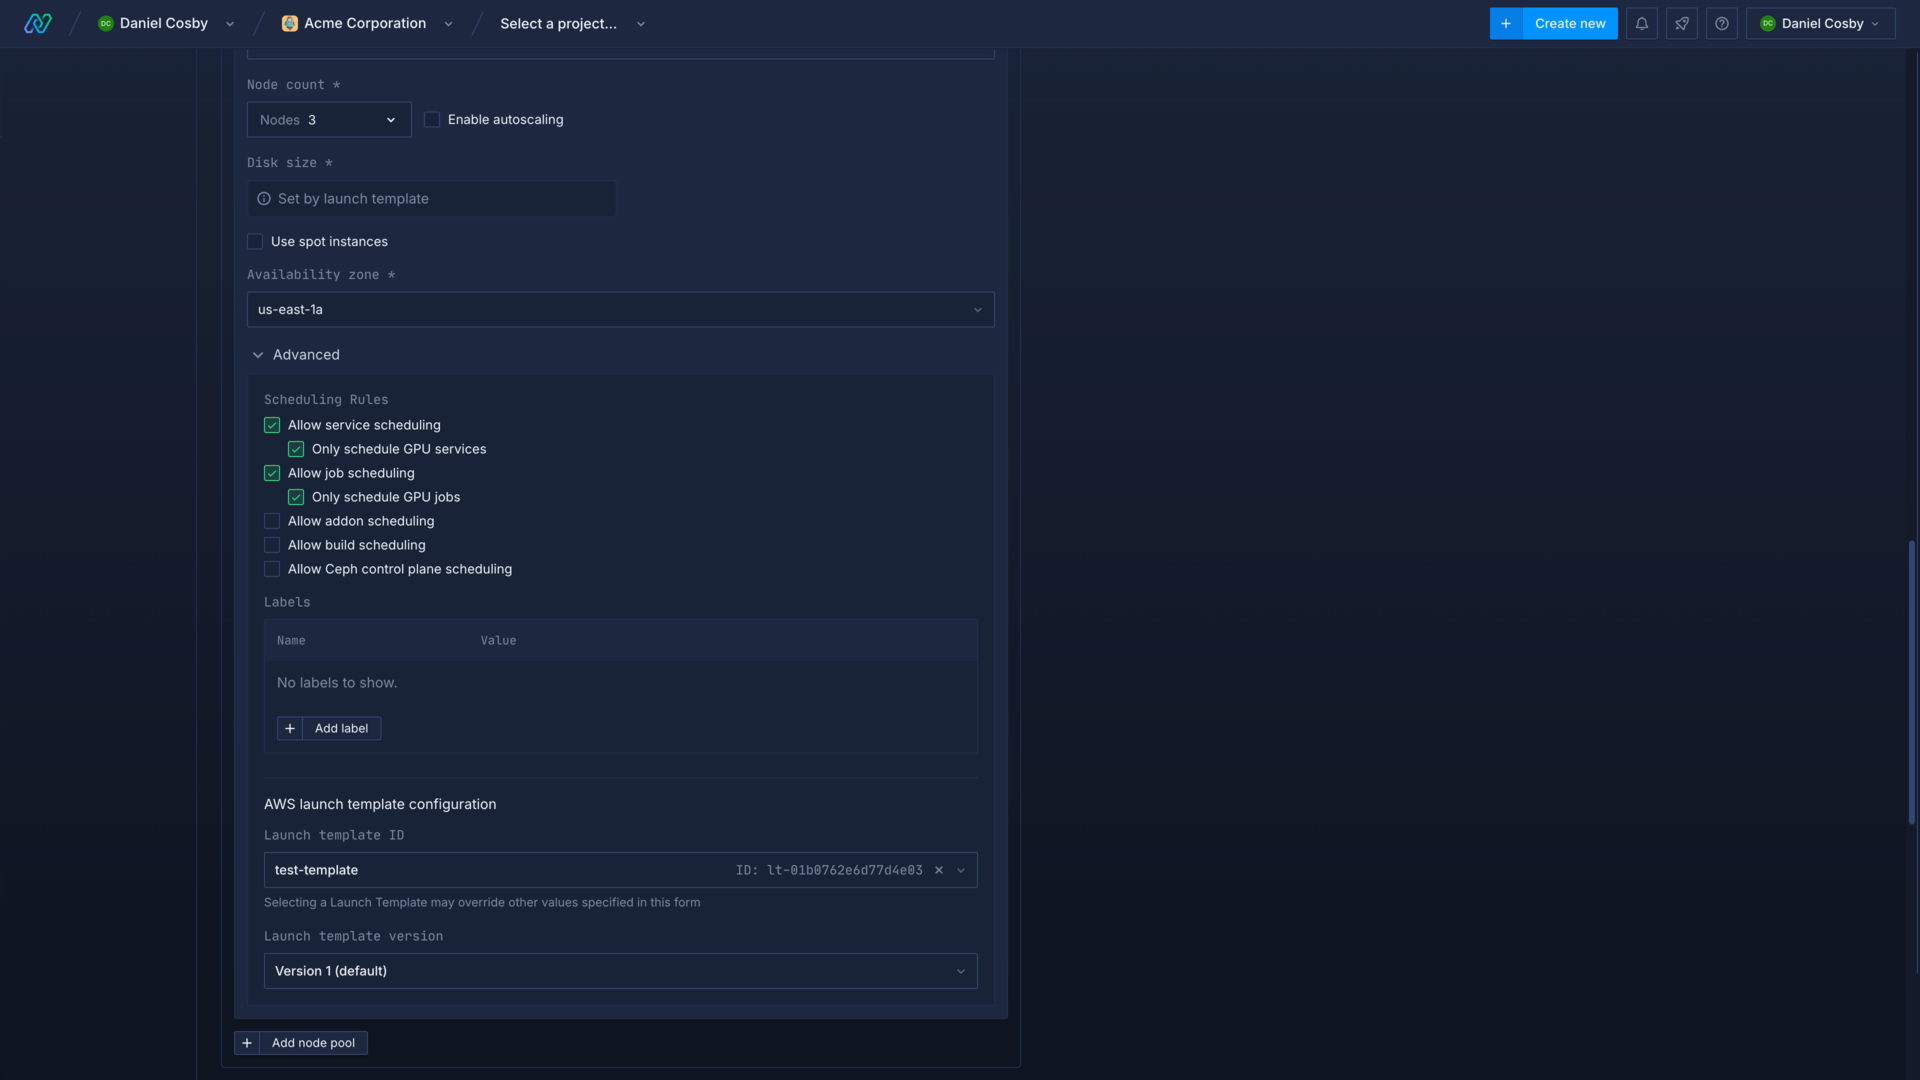
When the node pool is created, the launch template's instance type and boot volume configuration take precedence over the corresponding node pool selections. Other settings are applied subject to Amazon EKS restrictions.
Next steps
Deploy node pools
Deploy workloads to your cluster
Run GPU workloads