You can integrate your preferred log aggregators and observability platforms with your Northflank account.
Log sinks allow you to forward logs from containers in specific projects, or your whole account, allowing you to unify and process logs from your entire operation. You can improve your observability with the features of your preferred log service; analyze and visualise metrics, perform searches, set up real-time alerts, and meet your log auditing requirements.
You can also integrate with your own logging solutions by sending logs to a custom HTTP endpoint or an Amazon S3 bucket.
Supported services
Northflank currently supports the following services and endpoints for log sinks:
- Datadog
- Loki
- Papertrail
- Mezmo (formerly LogDNA)
- Better Stack (formerly Logtail)
- Honeycomb
- Logz.io
- New Relic
- Axiom
- AWS S3
- HTTP (custom endpoint)
Log encoding
By default, logs will be sent as plain text, some log sinks allow you to send logs as JSON instead.
Text
Text logs are sent as a single string containing only the log message itself in the format:
<timestamp: [yyyy-MM-dd’T’HH:mm:ss.SSSSSSSSS’Z’]> <stream [stdout | stderr]> <log line>.
For example:
2022-09-12T09:21:40.817924799Z stdout F Mon Sep 12 09:21:40 UTC 2022: Log item 138051
JSON
JSON logs are sent as an array of objects, with each object representing a single log entry:
  {
    [
      {
        "entity":"<entity_id>",
        "host":"Northflank",
        "message":"<datetime with timezone> <log message>",
        "path":"/",
        "pod":"<service_name>-<pod_id>",
        "project":"<project_name>",
        "service":"<service_name>",
        "source":"Northflank",
        "source_type":"http",
        "timestamp":"<datetime with timezone>",
        "type":"<service|job|addon>"
      },
      {...},
      {...}
    ]
  }
Custom label parsing
Northflank supports custom label parsing for the following services:
You can enable custom label parsing under advanced options when you create or update a log sink integration.
Custom label parsing scans JSON formatted log lines for additional non-protected keys (keys that are not message, ts, or msg) and supplies them to the sink with your log line. We recommend using the message key for your log line message.
You can generate these custom keys in your application and query them in your log provider to gain better insights into your services.
A log sent without custom label parsing
{
  message: "{"message":"my JSON log line", "custom-key":"test", "level":"INFO"}",
  timestamp: 2023-08-31T16:53:00
}
A log sent with custom label parsing
{
  message: "my JSON log line",
  timestamp: 2023-08-31T16:53:00,
  custom-key: "test",
  level: "INFO"
}
Create a log sink
Log sinks can be created on your user or team account in your account settings.
To add a new log sink, select the type of log sink you want and follow the specific instructions below for each type.
You can pause and resume your log sinks as required after they have been created, update the authentication details, and change the projects they target.
Forward logs only from selected projects
By default, Northflank will forward logs from all running containers in all projects within your team. You can enable make log sink target selected projects under advanced options and select specific projects to forward logs from. Only containers running in the selected projects will have their logs forwarded.
If you are creating a log sink on a team account and your role is restricted to specific projects, you will only be able to create log sinks targeting the projects you have access to.
Forward network logs
Northflank will only send runtime logs, produced by your running containers, by default.
You can choose to forward logs from CDNs and the network mesh as well in the advanced options section.
CDN logs
Northflank will forward logs from any CDN services used in your team or selected projects.
Mesh logs
Northflank will forward logs from the Northflank network mesh relevant to resources in your team or selected projects.
Validation log
When you create or update a log sink a validation log is sent to the endpoint to ensure the credentials entered are correct. This validation log will be stored in your sink and takes the following format:
{
  "app-name": "log-forwarder",
  "host": "Northflank",
  "message": "Validating log sink credentials",
  "severity": "info",
  "date": "<datetime with timezone>"
}
Create a Datadog log sink
- Click here , or select the Datadog sink type in your new Northflank log sink
- Select the region your Datadog account exists in by identifying it from the URL that you use to access it:
| Region | Site |
|---|---|
| EU1 | datadoghq.eu |
| US1 | datadoghq.com |
| US3 | us3.datadoghq.com |
| US5 | us5.datadoghq.com |
| US1-FED | ddog-gov.com |
- Navigate to organisation settings, open API keys, and create a new key. Make sure your account has at least the standard role, or a custom role with permissions to write logs .
- Copy the API key and paste it into the field in Northflank
- Select your project restrictions, if any, and add log sink
- You should receive a validation log entry to confirm your credentials are valid, and logs will now be sent to the sink
Create a Loki log sink
You can send your logs to a self-hosted instance of Loki, or to a Loki instance hosted on Grafana cloud .
Grafana cloud
- Click here , or select the Loki sink type in your new Northflank log sink
- Navigate to your Grafana Cloud Dashboard and select your Grafana Cloud Stack, or create a new one
- Create a new Access Policy with the
logs writescope only. Create a token for the access policy and save it somewhere secure. - On the Grafana Stack dashboard view the details for Loki and note your URL and username
- Go to Northflank and enter the information from your Loki configuration: URL, username, and enter your token as the password
- Choose the encoding method for the logs:
text(default) orJSON - Select your project restrictions, if any, and add log sink
- You should receive a validation log entry to confirm your credentials are valid, and logs will now be sent to the sink
Self-hosted
- Click here , or select the Loki sink type in your new Northflank log sink
- Enter the URL of your Loki deployment (HTTPS)
- Enter the username and password you set when configuring your Loki instance
- Choose the encoding method for the logs:
text(default) orJSON - Select your project restrictions, if any, and add log sink
- You should receive a validation log entry to confirm your credentials are valid, and logs will now be sent to the sink
Create a Papertrail log sink
- Click here , or select the Papertrail sink type in your new Northflank log sink
- Navigate to your Papertrail settings and open log destinations
- Create log destination, allow it to
accept logs from unrecognised systems, and leavedelete systems with no eventsenabled - Choose to accept connections via
port(recommended) ortoken(HTTPS). LeaveTLS encryptionenabled for TCP, andplain textenabled for UDP forportconnections. - On Northflank select the authentication method you chose when creating your log destination
- For
portenter the URL and port generated for your log destination, for examplelogs5.papertrailapp.com:12345 - For
tokenenter both theendpointandtokengenerated for your log destination
- For
- Choose the encoding method for the logs:
text(default) orJSON - Select your project restrictions, if any, and add log sink
- You should receive a validation log entry to confirm your credentials are valid, and logs will now be sent to the sink
Create a Mezmo log sink
- Click here , or select the Mezmo (formerly LogDNA) sink type in your new Northflank log sink
- In Mezmo, open settings, navigate to the API keys page under organisation
- Generate a new ingestion key and copy the value
- Return to Northflank and paste the ingestion key into the API key field
- Select your project restrictions, if any, and add log sink
- You should receive a validation log entry to confirm your credentials are valid, and logs will now be sent to the sink
Create a Better Stack log sink
- Click here , or select the Better Stack sink type in your new Northflank log sink
- In your Better Stack account select the Logs & Metrics service, navigate to sources and connect source
- Name your source, select
HTTPas the platform, and create source - Copy the source token, return to Northflank, and enter it into the
source tokenfield for your new log sink - Select your project restrictions, if any, and add log sink
- You should receive a validation log entry to confirm your credentials are valid, and logs will now be sent to the sink
Create a Honeycomb log sink
- Click here , or select the Honeycomb sink type in your new Northflank log sink
- In Honeycomb navigate to environments and manage environments
- View API keys for the environment you want to use with Northflank and copy the API key value
- Return to Northflank and paste the API key value into the form
- Enter the name of your dataset, if it doesn't already exist in Honeycomb it will be created for you
- Select your project restrictions, if any, and add log sink
- You should receive a validation log entry to confirm your credentials are valid, and logs will now be sent to the sink
- You must be a Honeycomb team owner to create and manage API keys
- Your API key must have
send eventsandcreate datasetspermissions
Create a Logz.io log sink
- Click here , or select the Logz.io sink type in your new Northflank log sink
- In Logz.io open your settings and select the manage tokens page
- Open data shipping tokens and copy the default token, or create a new one
- Return to Northflank and paste the API token into the form
- If the
listener URLdisplayed on the data shipping tokens page is different from the defaultlistener.logz.io, copy it and replace thelistener URLin the Northflank form - Select your project restrictions, if any, and add log sink
- You should receive a validation log entry to confirm your credentials are valid, and logs will now be sent to the sink
Create a New Relic log sink
- Click here , or select the New Relic sink type in your new Northflank log sink
- In your New Relic account select your user from the bottom-left and open the API keys page
- Find an existing
Ingest - Licensekey, or create a new one, and copy theaccount IDinto the Northflank form - Return to New Relic, select copy key from the drop-down menu , and paste the key into the
license keyfield on Northflank - Select the region your New Relic account was created in, which can be found in the URL when viewing your New Relic account (for example
one.eu.newrelic.com) - Select your project restrictions, if any, and add log sink
- You should receive a validation log entry to confirm your credentials are valid, and logs will now be sent to the sink
Create an Axiom log sink
- Click here , or select the Axiom sink type in your new Northflank log sink
- In your Axiom account select the organisation you want to use and open the datasets page. Select an existing dataset, or create a new one, and enter the name of the dataset into the Northflank form.
- Open your Axiom settings page, select API tokens from the settings menu, and click new API token
- Give your new API token a name and make sure it has
ingestpermissions. You can also choose to restrict it to a specific Axiom dataset. You can alternatively use an existing token by selecting it and clicking regenerate token. - Copy the token, return to Northflank, and enter it into the
tokenfield for your new log sink - Select your project restrictions, if any, and add log sink
- You should receive a validation log entry to confirm your credentials are valid, and logs will now be sent to the sink
Create an AWS S3 or compatible API log sink
You can create an S3 sink hosted by Amazon Web Services, or another implementation of S3 storage. The following instructions are to integrate S3 hosted by AWS, for other implementations the exact details may differ.
Logs sent to S3 buckets are automatically segmented into directories to help identify and find them, by project, resource type, and resource name. For example:
| Project | Resource category | Resource |
|---|---|---|
| my-project/ | service/ | my-service-1/ |
| my-project/ | service/ | my-service-2/ |
| my-project/ | addon/ | mongo-db/ |
| my-project/ | job/ | db-cleanup-cron/ |
- Click here , or select the AWS S3 sink type in your new Northflank log sink
- Go to your AWS console and select S3 from the storage section in the services menu
- Create a new bucket, or select an existing one, and enter the name of the bucket in Northflank
- Enter the service endpoint, for example
s3.eu-west-1.amazonaws.comfor a bucket in theEU-West-1region - Enter the region for your bucket, as indicated in the endpoint
- Open the IAM console and create a new IAM user with the necessary permissions, or a role containing the necessary permissions
- Copy the
access key IDandaccess key secretto Northflank directly, and/or save them somewhere secure (you will not be able to view them again) - Choose whether to send uncompressed plaintext logs, or logs compressed with gzip to your bucket
- Select your project restrictions, if any, and add log sink
- You should receive a validation log entry to confirm your credentials are valid, and logs will now be sent to the sink
- Northflank will create a folder to store logs each day, with the format
date=YYYY-MM-DD - Each log file will be named with a Unix timestamp in seconds, followed by a UUID:
[timestamp]-[UUID].[file-extension] - Logs will have the file extension
.logif uncompressed, or.log.gzipfor compressed logs - Logs will be sent in batches no greater than 32.7KB, or every second while logs are being generated
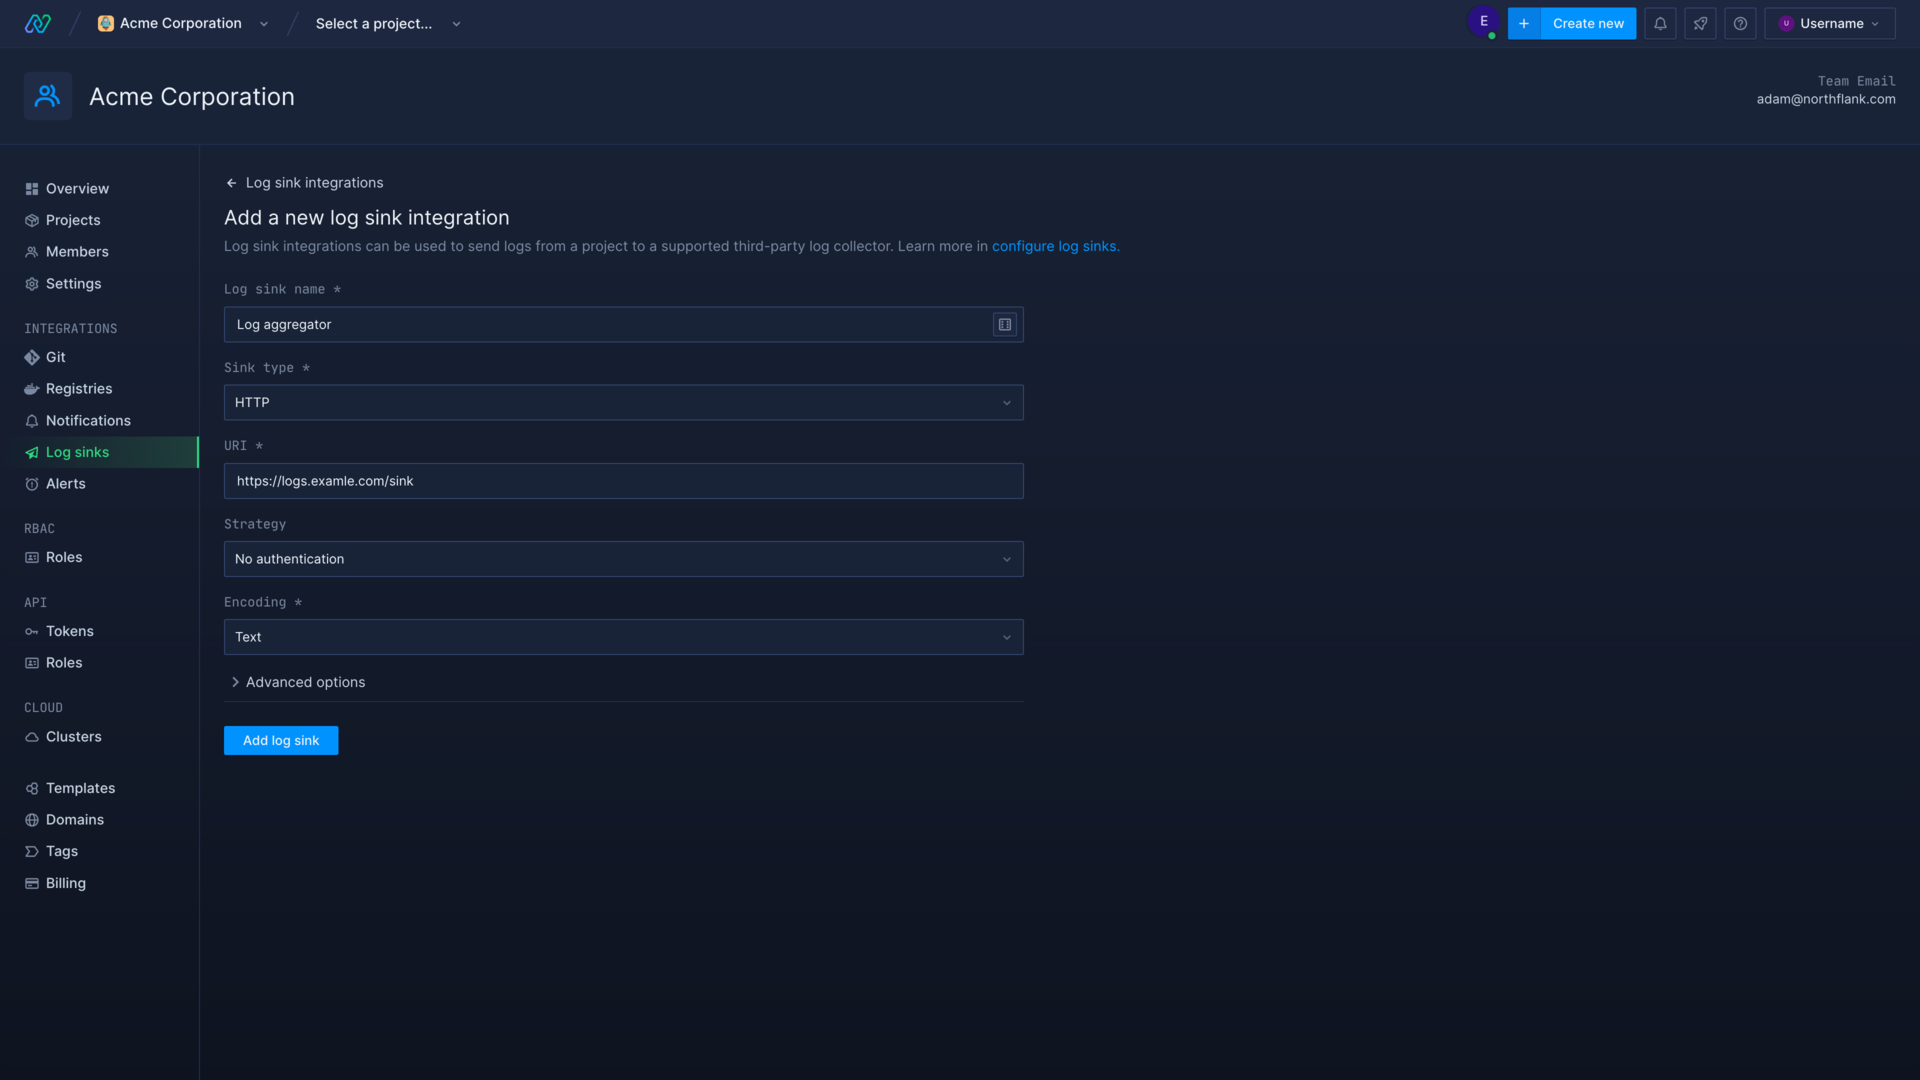
Create a HTTP log sink
You can configure a custom HTTP endpoint to receive your logs from Northflank.
- Click here , or select HTTP
- Enter the URL of your log sink
- Select your authentication strategy:
basic authenticationorbearer token
- Enter your username and password to authenticate using basic authentication
- Enter your token to authenticate using bearer token
- Choose the encoding method for the logs:
textorJSON - Change batch options, if required
- Select your project restrictions, if any, and add log sink
- Your HTTPS endpoint should receive a validation log entry to confirm your credentials are valid, and logs will now be sent to the sink
Authentication strategy
You can secure your endpoint by only accepting requests with either basic authentication or a bearer token. For security your endpoint should require HTTPS, otherwise credentials and logs will be transmitted unencrypted.
- Basic authentication: basic auth requires a password, and optionally a username. This will be encoded using base64 before being sent in the header as
Authorization: "Basic <encoded credentials>" - Bearer token: your bearer token will be encoded using base64 and sent in the header of the request as
Authorization: "Bearer <encoded token>"
Log encoding
Your endpoint will receive logs from Northflank in either text or JSON format.
Text logs will be sent with the header Content-Type: text/plain and the body will consist of a string containing the log line. JSON logs will be sent with the header Content-Type: application/json and the body will consist of a JSON object containing an array of log lines.
Batch options
You can set a maximum size for each batch of logs to be sent to your endpoint. You can reduce or increase the size of batches depending on how much your endpoint can process in a single request.
Batches can be capped by the number of events and size in bytes. Max events will group a number of log entries together, max size will send the batch as soon as it reaches that size (based on the uncompressed size). Max size accepts values as integers (3000000) or with exponential notation (3e+6).
Response
Your endpoint should return a 2xx response code.