Environments on Northflank allow you to automate your release process and preview changes in isolated environments.
By creating workflows, you can automate building and deploying your code, backing up databases, running migrations, and promoting deployments from development through to production. By creating preview blueprints, you can automatically provision complete environments when you push commits or open pull requests.
This guide will walk you through creating a build service, setting up preview environments for pull requests, and creating workflows to automate deployments across development stages.
Create a build service
Before you can deploy code, you need a build service to compile your source code into images. This build service will be shared across your workflows and preview environments, ensuring consistent builds across all deployment stages.
-
Navigate to Services in your project
-
Click Create service → Build
-
Under Basic information enter a service name
-
Under Repository select your repository from the dropdown
- Trigger mode: Select Build rules
- Pull request build rules: Leave empty (configured later in preview blueprint)
- Branch build rules: Leave empty (configured later in preview blueprint)
-
Under Build options select Dockerfile if you have a custom Dockerfile or Buildpack
- If your Dockerfile is not in the root directory, specify the relative paths
-
Under Resources choose a compute plan appropriate for your build workload
-
Under Environment variables add build arguments or runtime variables if required
-
Click Create service
Create a preview blueprint
Preview blueprints automatically create isolated test environments when you open pull requests. Each preview environment gets its own services, databases, and unique URLs, allowing you to test changes before merging to your main branch.
- Navigate to Environments in your project
- Click Create preview blueprint
- Configure the blueprint:
- Name: e.g.
pr-previews - Naming convention: Select Pull request ID
- Enable Suffix to append the pull request number to resource names
- Name: e.g.
- Click Add trigger
- Kind: Select Git pull request or any option of your choice
- Repository: Select the same repository used for the build service
- Click Continue to open the visual editor
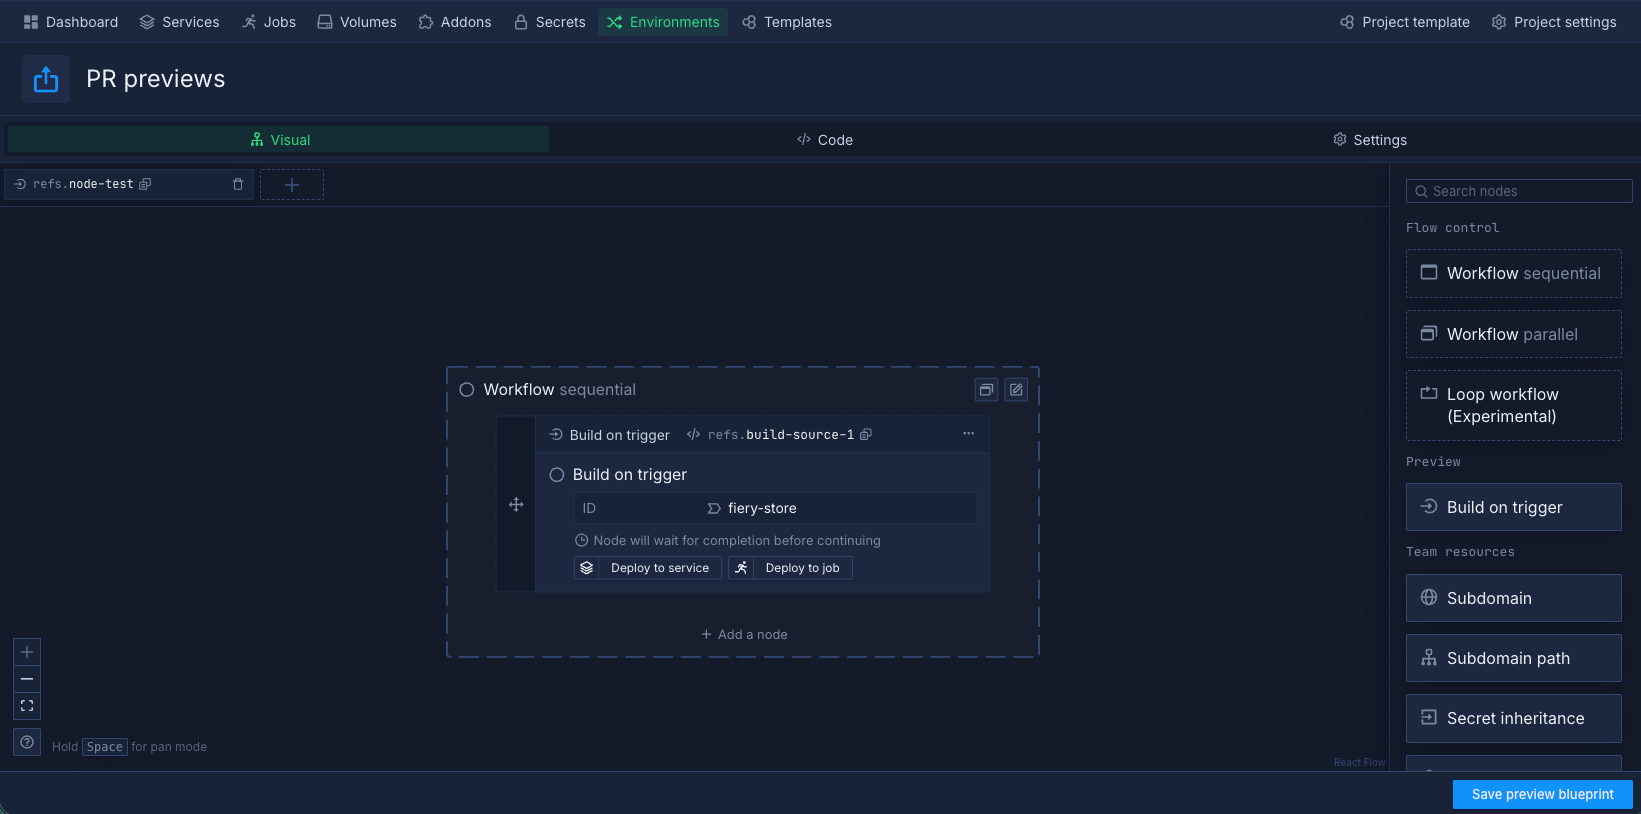
Configure the preview blueprint
The visual editor lets you build the workflow that creates your preview environment. You'll connect nodes together to define what gets deployed: starting with building your code, then deploying it to services, and optionally adding databases or other resources.
- On the Build on trigger node, click Deploy to service to create a Deployment service node
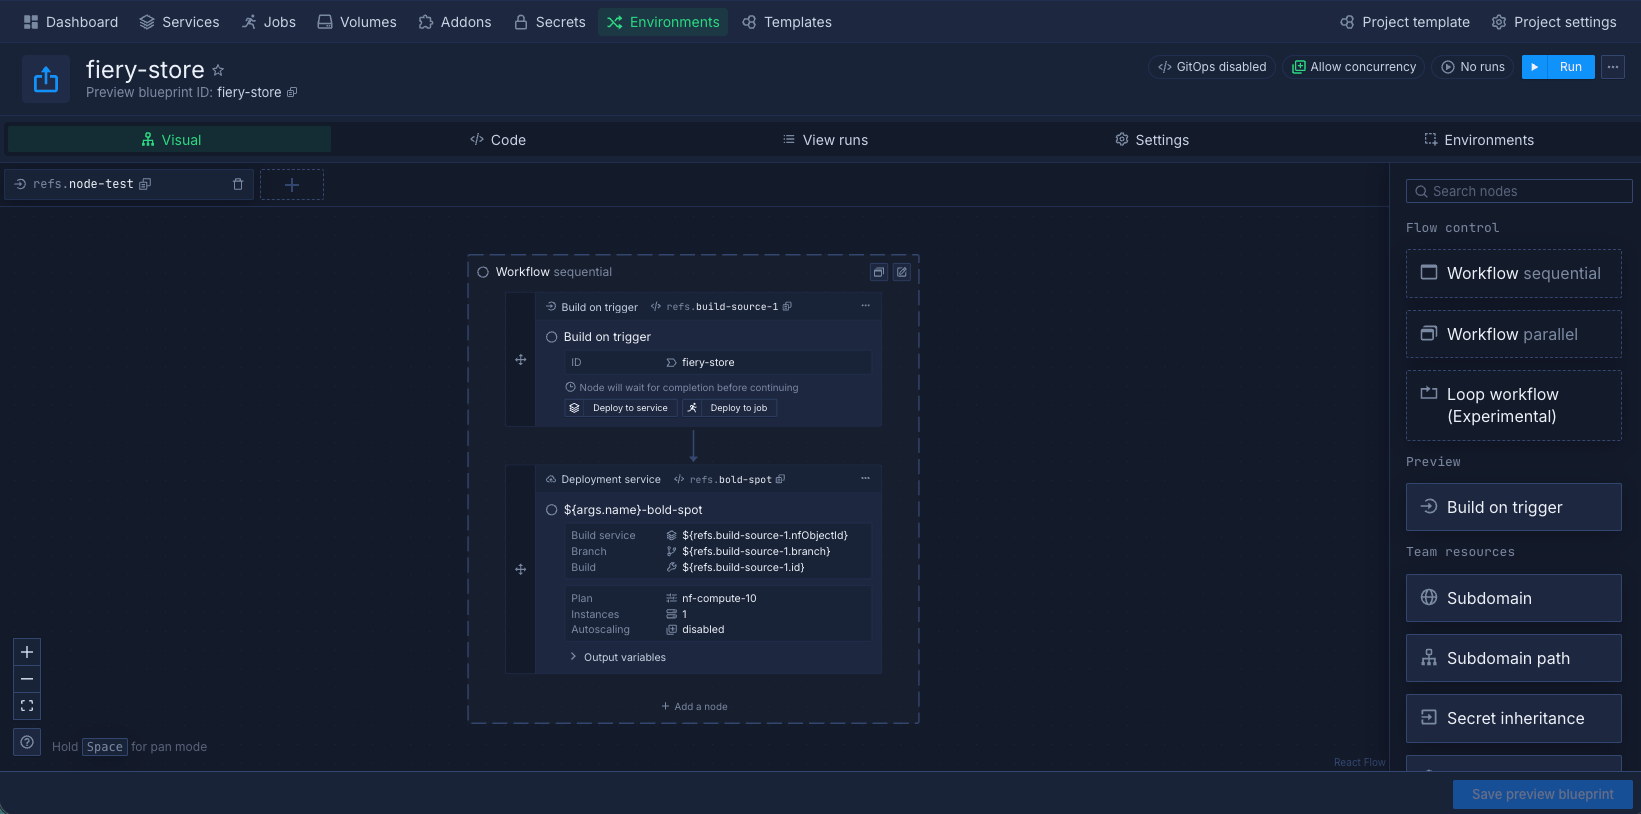
- Select the Deployment service node and configure:
- Basic information: Enter a service name
- Environment variables: Add runtime variables if required
- Networking: Expose public or private ports
- Resources: Select a compute plan
- Click Save preview blueprint
Additional nodes can be added to the workflow, including databases, jobs, and volumes.
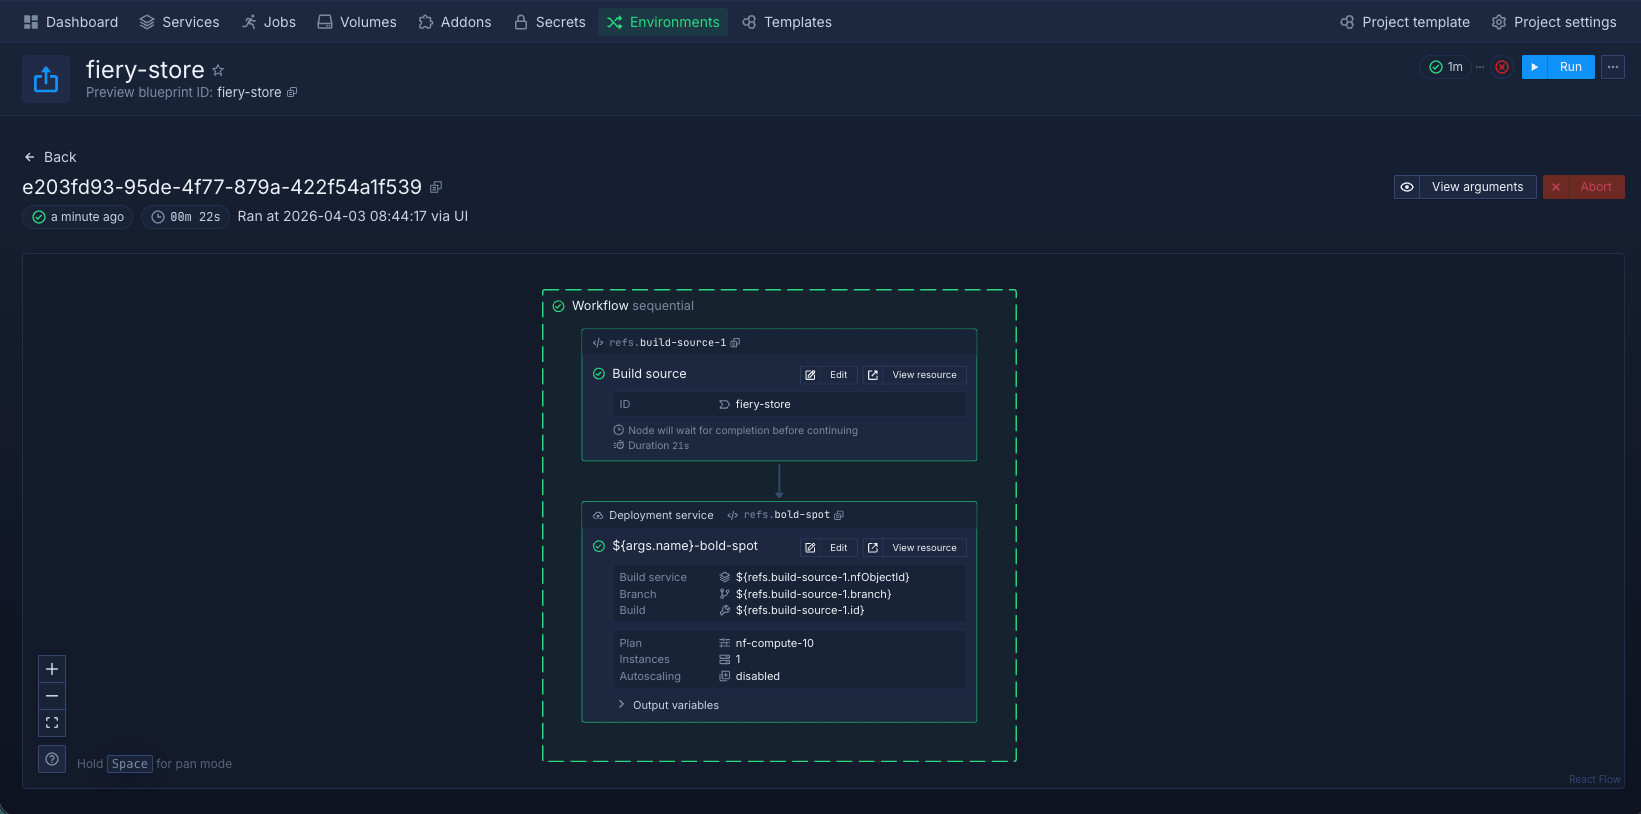
Run the preview blueprint
Test your preview blueprint by running it manually before relying on automatic Git triggers. This lets you verify the workflow creates preview environments correctly.
- Click Run in the header
- Under Git trigger, select a commit
- Click Create
After the workflow completes:
- On the Deployment service click View resource to access the deployed instance
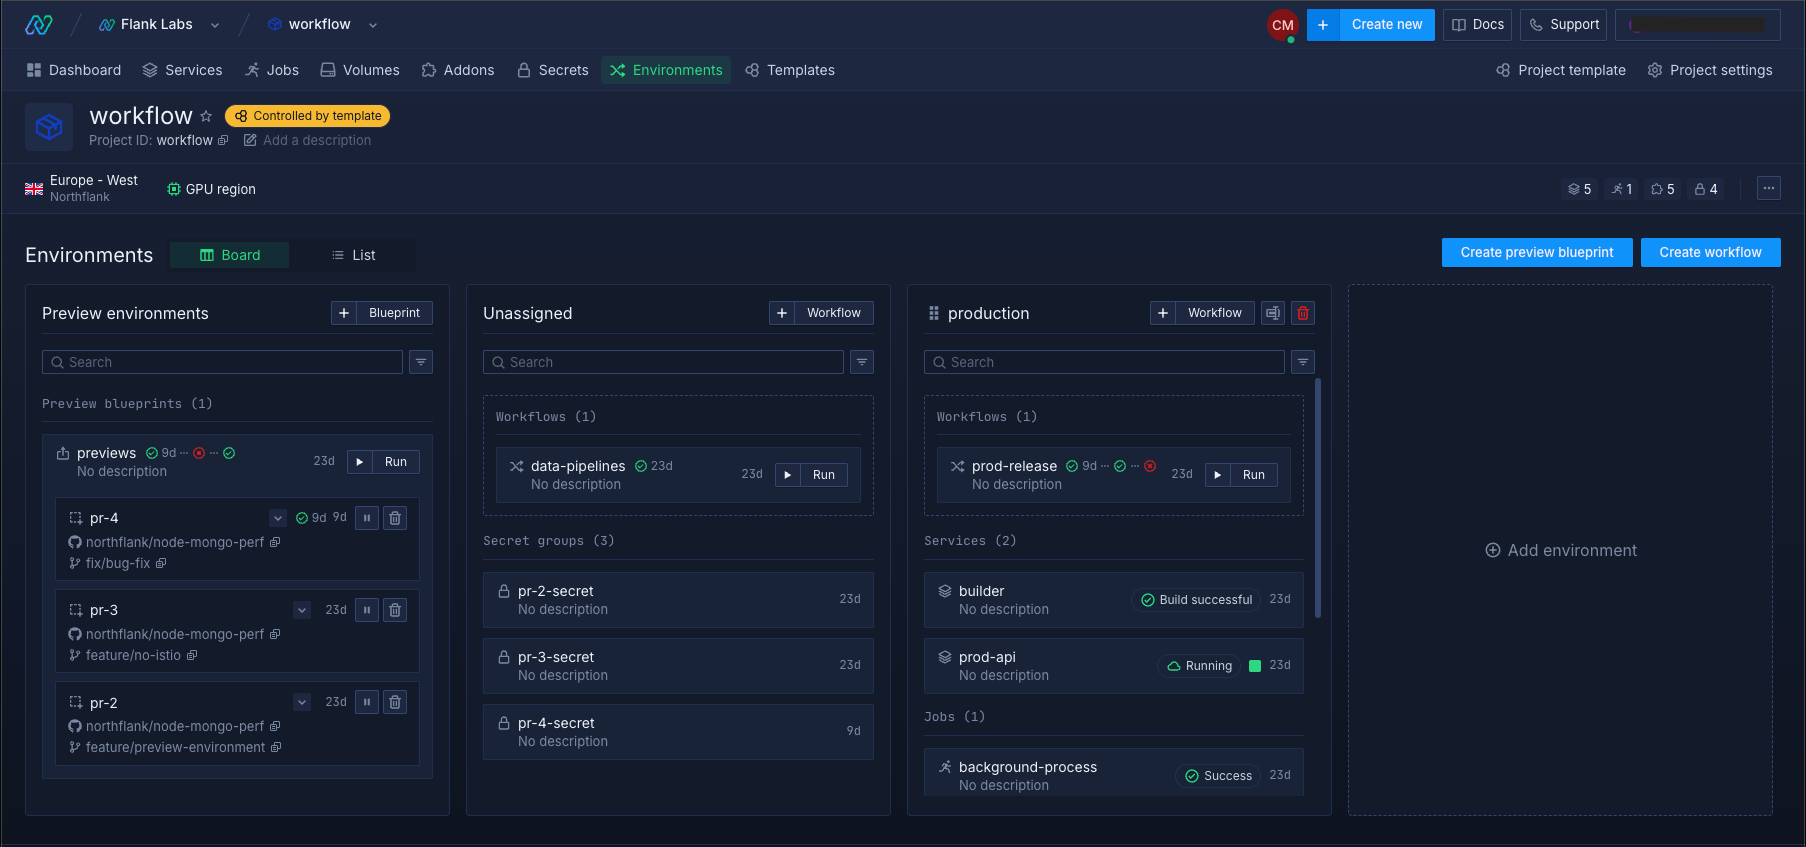
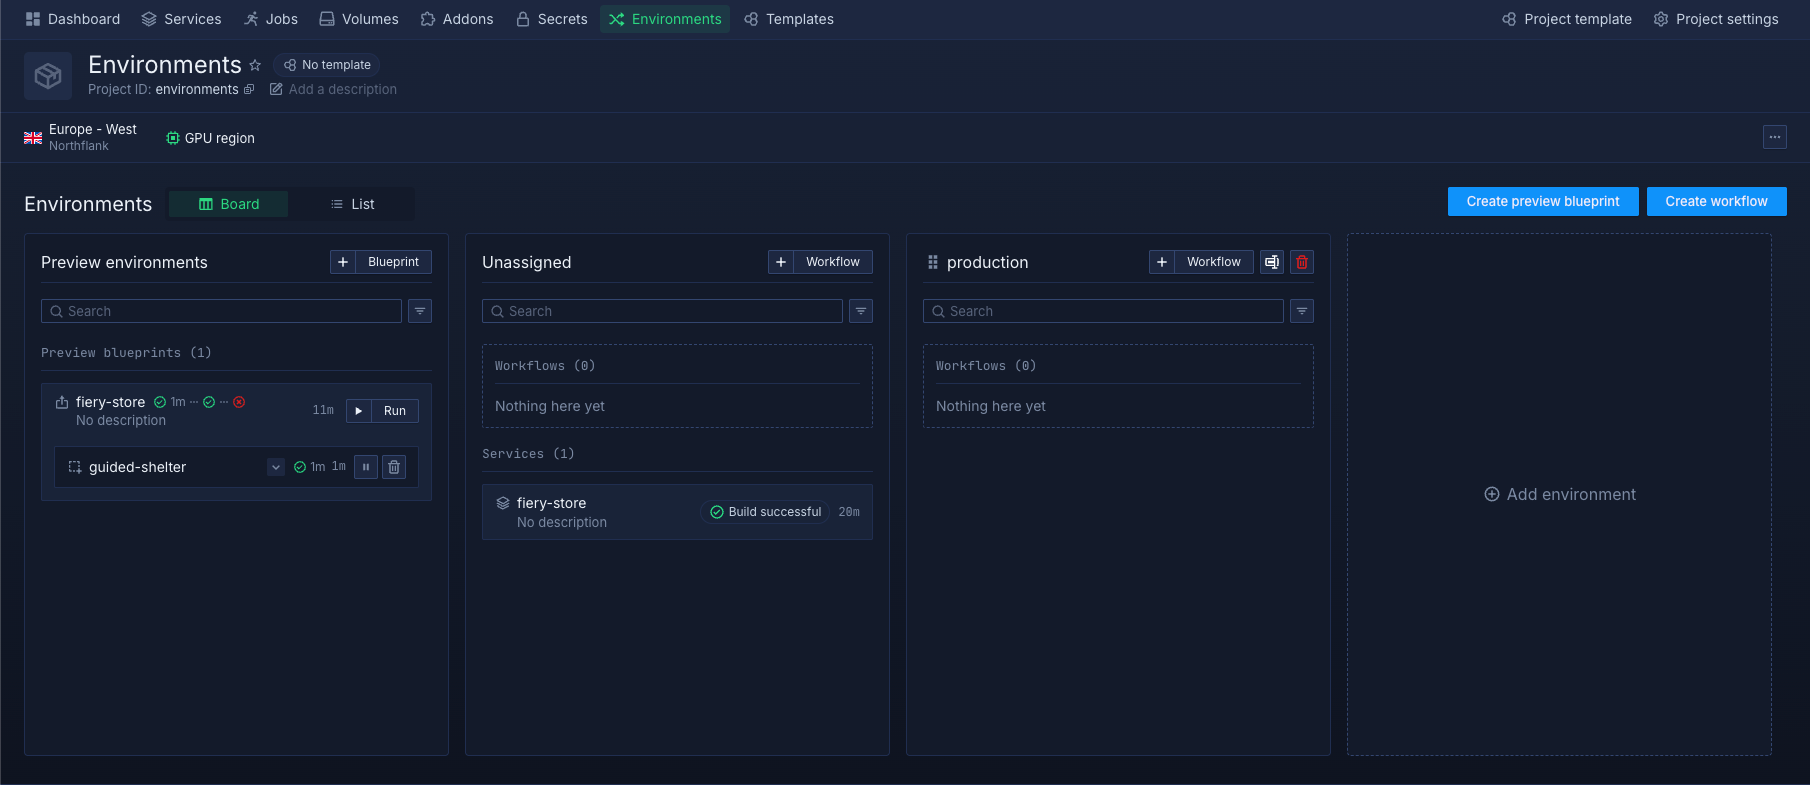
Add environments
Environments organize your workflows by deployment stage. Each environment represents a stage in your release process, such as development, staging, or production, and contains the workflows that deploy to that stage.
- Navigate to Environments in your project
- Click Add environment
- Enter a name (e.g.,
development,staging, orproduction) - Click Create
The new environment appears as a column in the environments board view. You can create multiple environments to match your deployment stages.
Create a workflow
Workflows are automated release processes that execute when triggered manually or by Git events. Each workflow contains a series of steps (nodes) that build your code, deploy it to services, run database migrations, and perform other release tasks.
Create a workflow in an environment to automate deployments to that stage. For example, a production workflow might build from your main branch and deploy to production services, while a development workflow deploys feature branches to development services.
-
In the environment column, click (+ Workflow)
-
Enter a name (e.g.,
Deploy to prod) -
Click Add trigger (optional):
- Kind: Select Git push
- Repository: Select your repository
- Branch rules: Enter the branch name (e.g.,
mainordevelop) or*to trigger on every push to a branch
-
Click Continue to open the visual editor
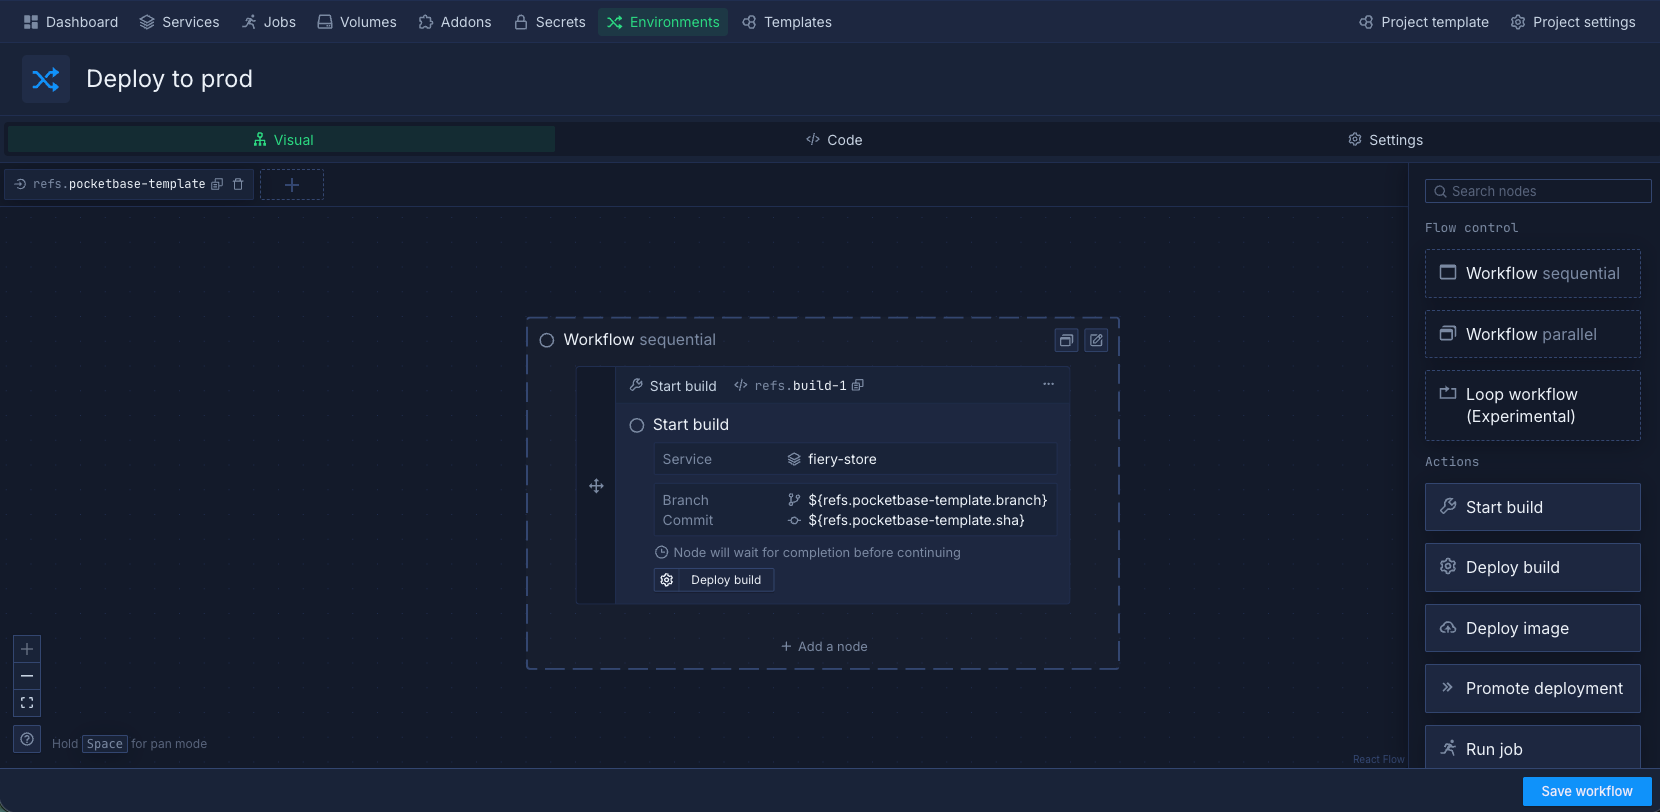
Configure the workflow
Build your deployment workflow by connecting nodes together. Each node performs a specific action: building code, deploying to services, backing up databases, or running migrations. Connect them in sequence to create your complete release process.
- Select the Start build node and configure:
- Service / job: Select your build service
- Branch: Enter the branch name (e.g.,
main) - Commit: Leave blank to build the latest commit
- Click Save node
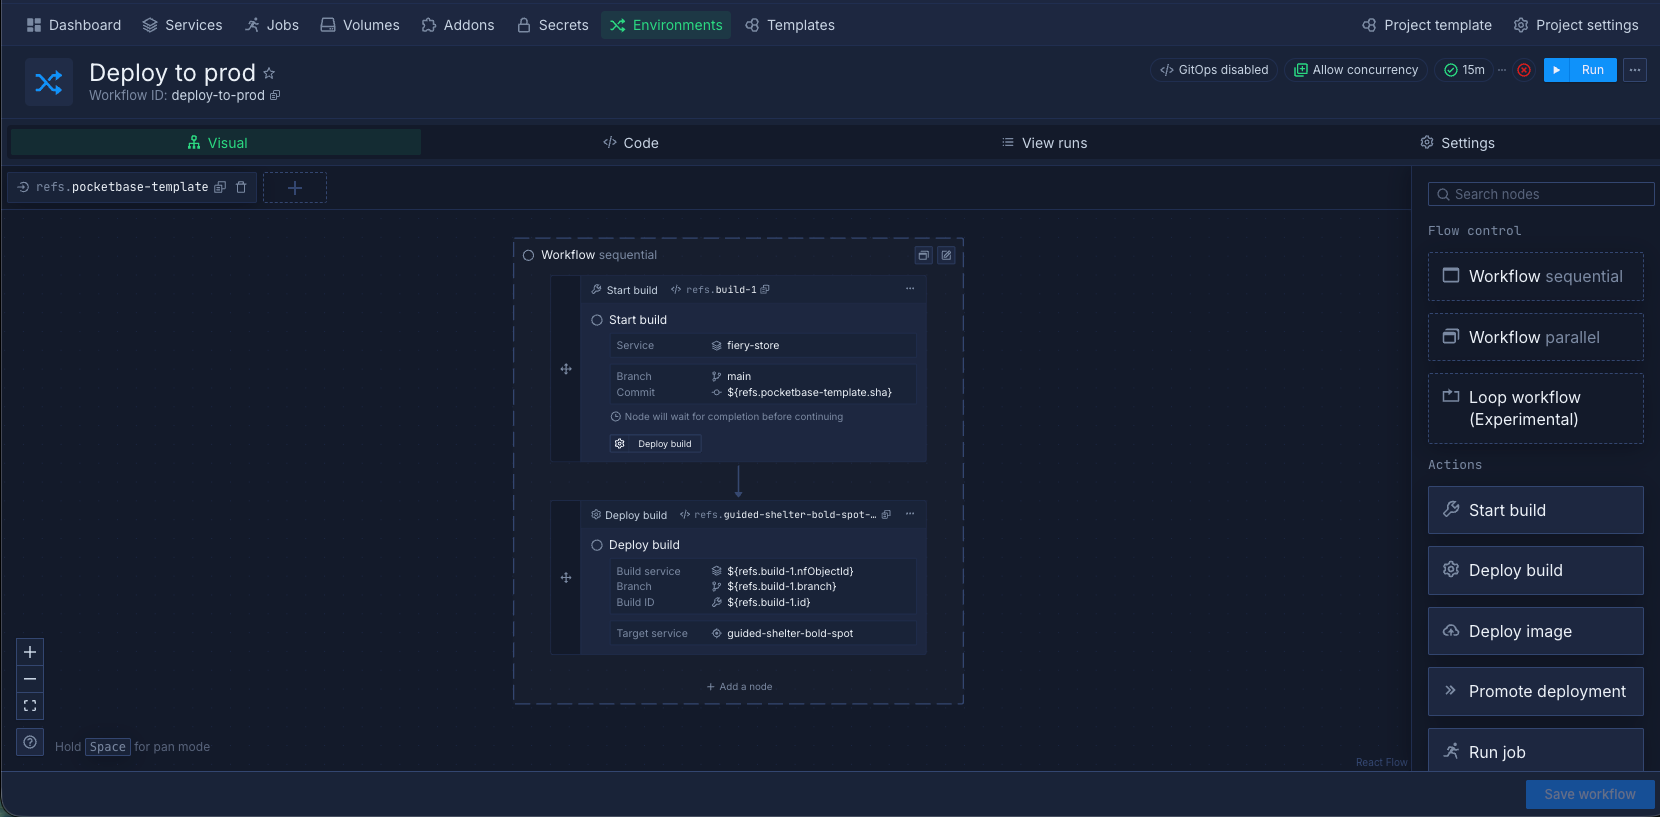
- On the Start build node, click Deploy build
- Select the Deploy build node and configure:
- Target service/job: Select or create a deployment service
- Click Save node
- Click Save workflow
Additional nodes can be added to the workflow, including databases, jobs, and volumes.
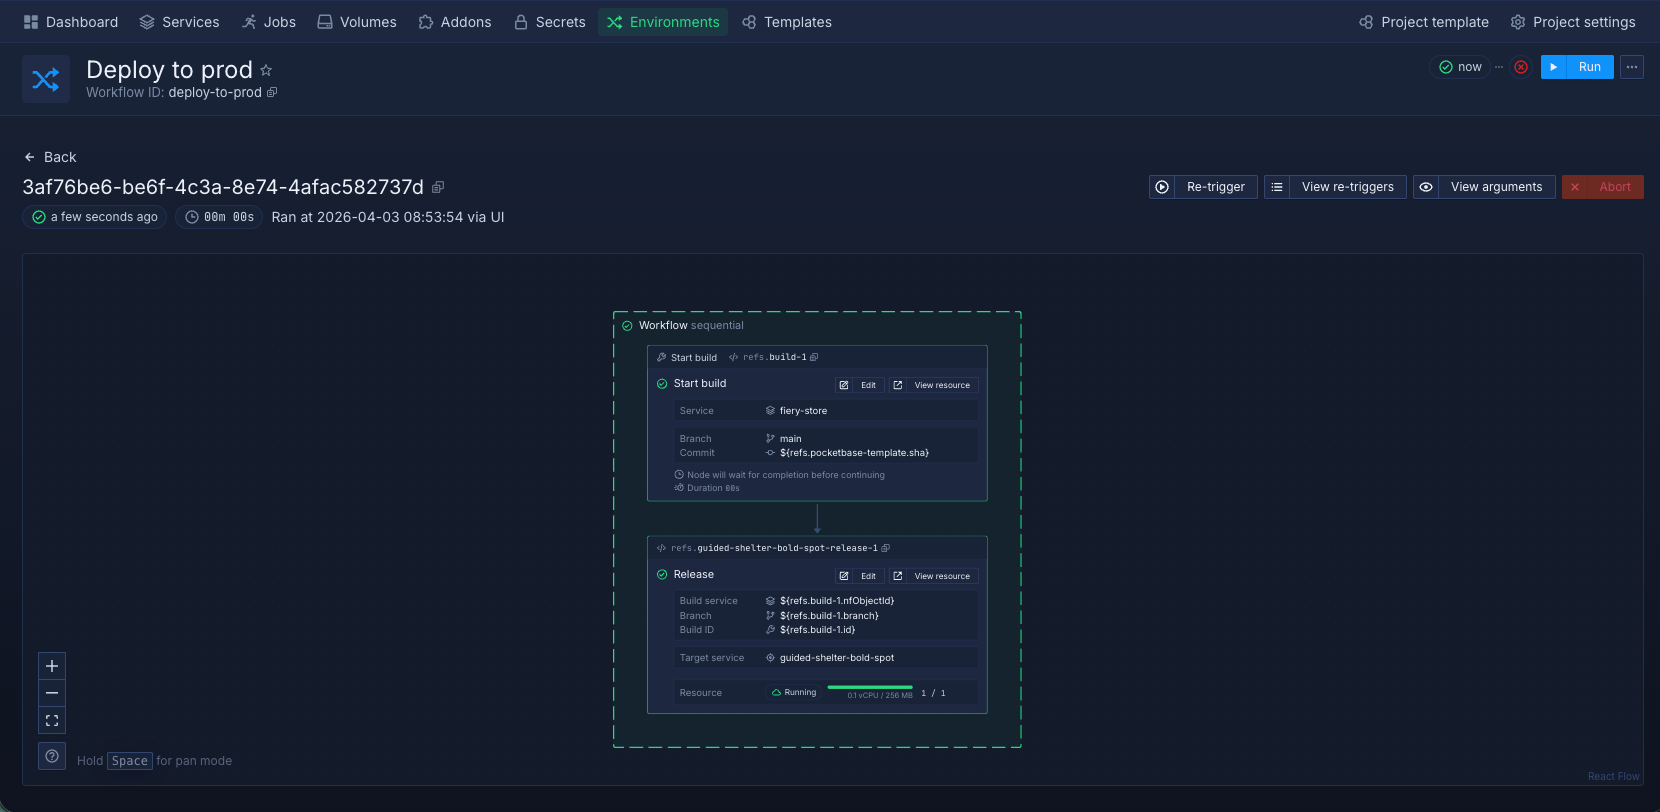
Run the workflow
After you have configured the workflow, you can manually test run it and Northflank will execute the workflow as you have specified it.
- Click Run in the header
- Add a release name (optional):
- Click Add release name
- Enter a descriptive name for this release
- Add a release description (optional):
- Click Add release description
- Enter details about what this release includes
- Click Create
The workflow will execute and you can monitor its progress. If you configured Git triggers, the workflow will also run automatically when commits are pushed to the configured branch.
Use cron schedules (optional)
Workflows and preview blueprints can run automatically on a repeating schedule. This is useful for regular deployments (nightly builds), periodic maintenance tasks (database backups, cache warming), or refreshing test environments on a schedule.
To add a cron trigger:
- Open your workflow or preview blueprint
- Click the plus sign
- Select Cron schedule from the Kind dropdown
- Enter a cron expression in the Schedule field (times are UTC, minimum interval is 10 minutes)
Each workflow or preview blueprint can have one cron trigger.
Next steps
Set up environments
Create environments to organize your release process by deployment stage.
Configure a workflow
Learn how to use the visual editor or code to configure a workflow.
Run and manage workflows
Run and manage workflows for different environments.
Set up preview blueprints
Create preview blueprints to automatically create preview environments for your branches and pull requests.
Manage preview blueprints
Manage active previews, manually create test environments, and configure automatic cleanup.